Dynamics 365 Sales is a cloud-based CRM solution that enables salespeople to build strong relationships with their customers, take actions based on insights, and close deals faster. With Dynamics 365 you can manage your customer relationships, from first contact (lead) to qualifying (opportunity) to deal (Quote/Order).

Dynamics 365 can be used by Microsoft Power Automate to automate almost anything within Dynamics 365. Dynamics 365 and Power Automate together, make a great combination for further enhancement of your sales process.

In this example we will teach you how to use Power Automate to send a message to your sales staff via Microsoft Teams when a new lead has been assigned to them in Dynamics 365.

Step 1: Create new Power Automate Flow

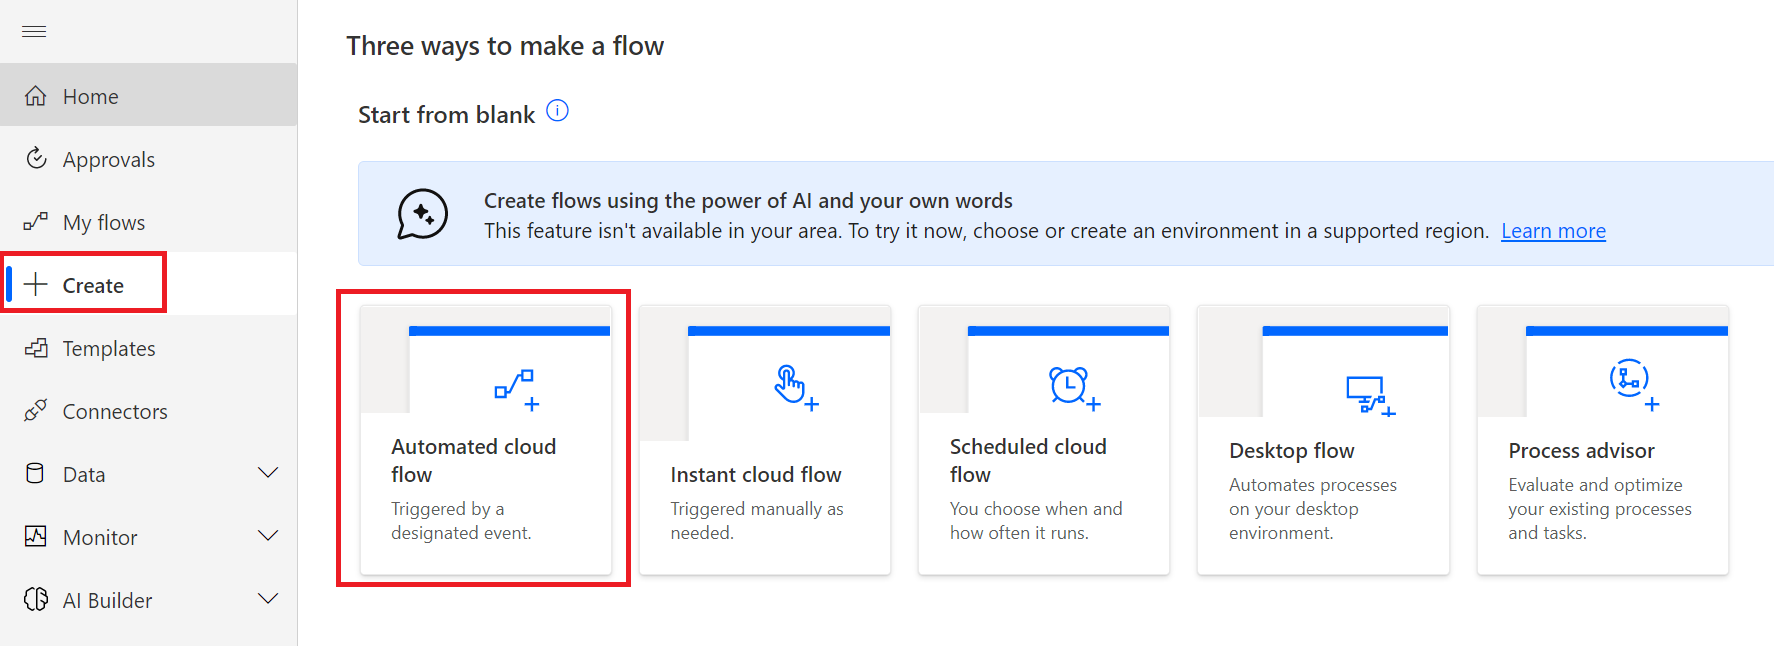
Go to https://make.powerautomate.com/ and click on “Create”, and select “Automated Flow”
Step 2: Enter Flow name and select Dataverse

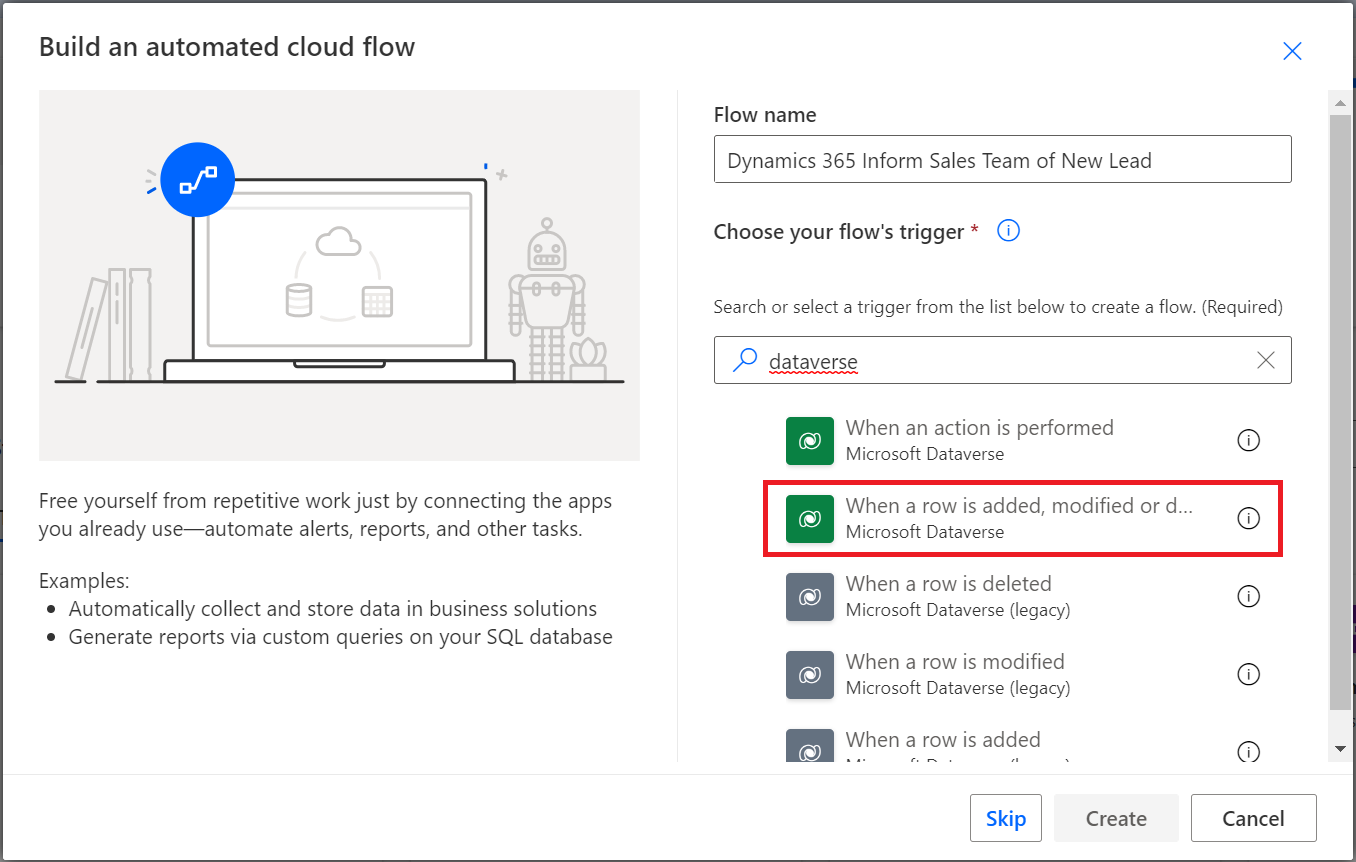
Give the flow a name, and search for “dataverse” and select “When a row is added, modified or deleted”
Step 3: Configure Trigger that will start up our Flow

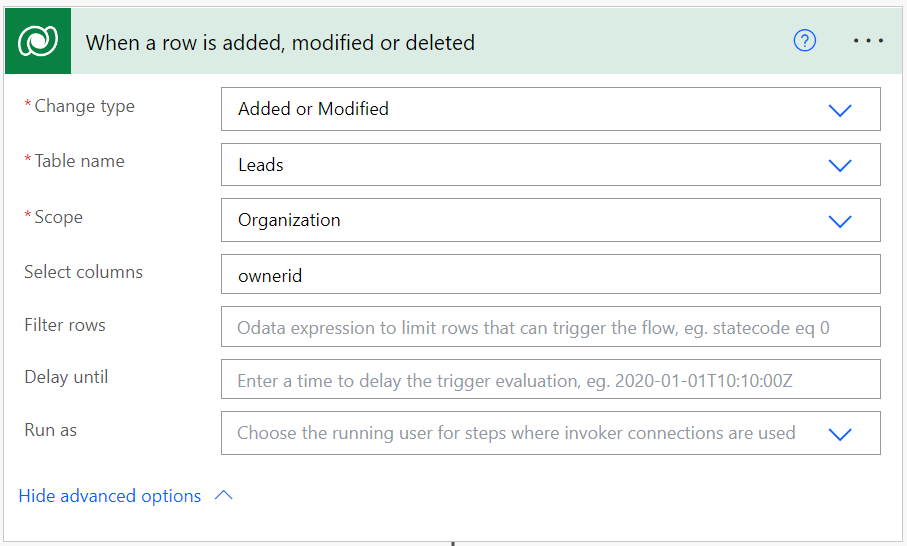
On the next screen we will configure the trigger. We will configure the Change Type to “added or modified” to ensure that the trigger only runs when a new lead is added, or when a lead is modified.

Table name: Leads (as we want to target leads in this case)

Scope: Organization (We want this flow to run for the entire dataverse organization, not just our user scope)

Select Columns: We will enter “ownerid” here because we want to make sure that our trigger only runs when the field “ownerid” (which is the lead owner) is added or changed
Step 4: Get Current Lead

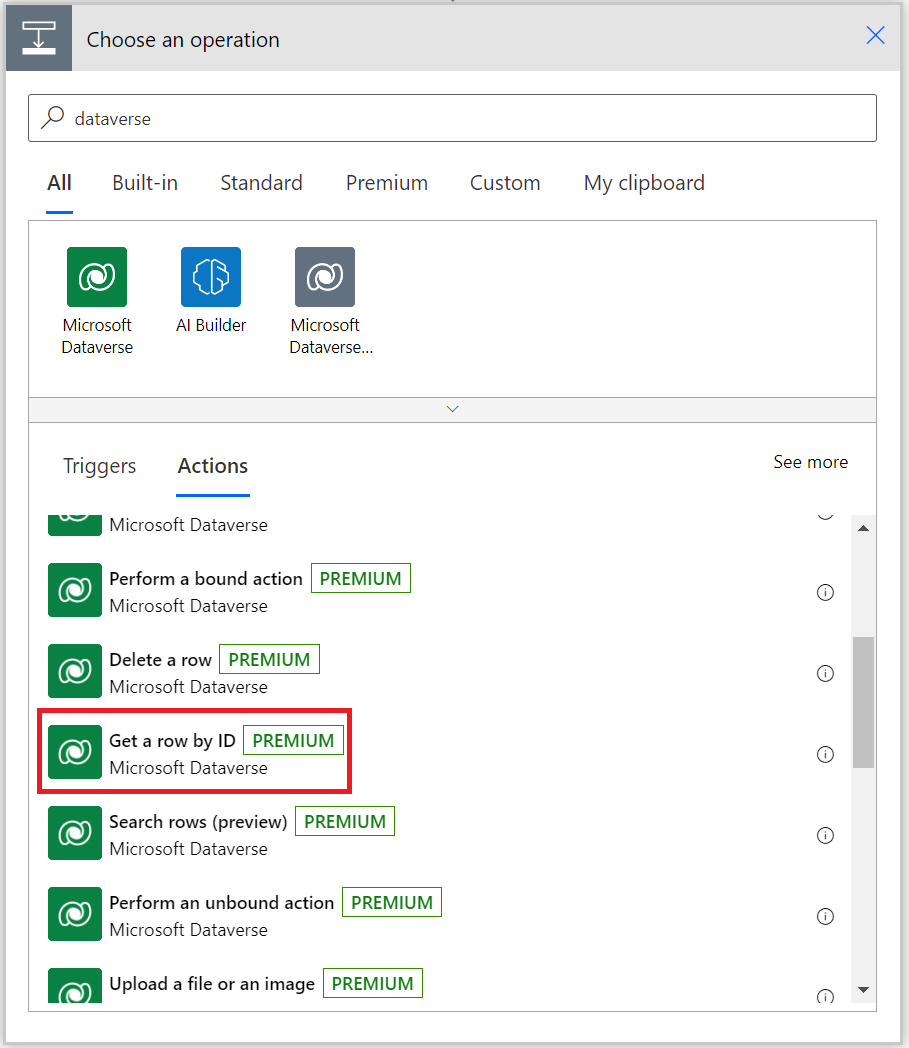
First we need to get the record of the lead that had an addition/change to the lead owner. We will add a new action to our flow and search for “dataverse” and select “get a row by ID”
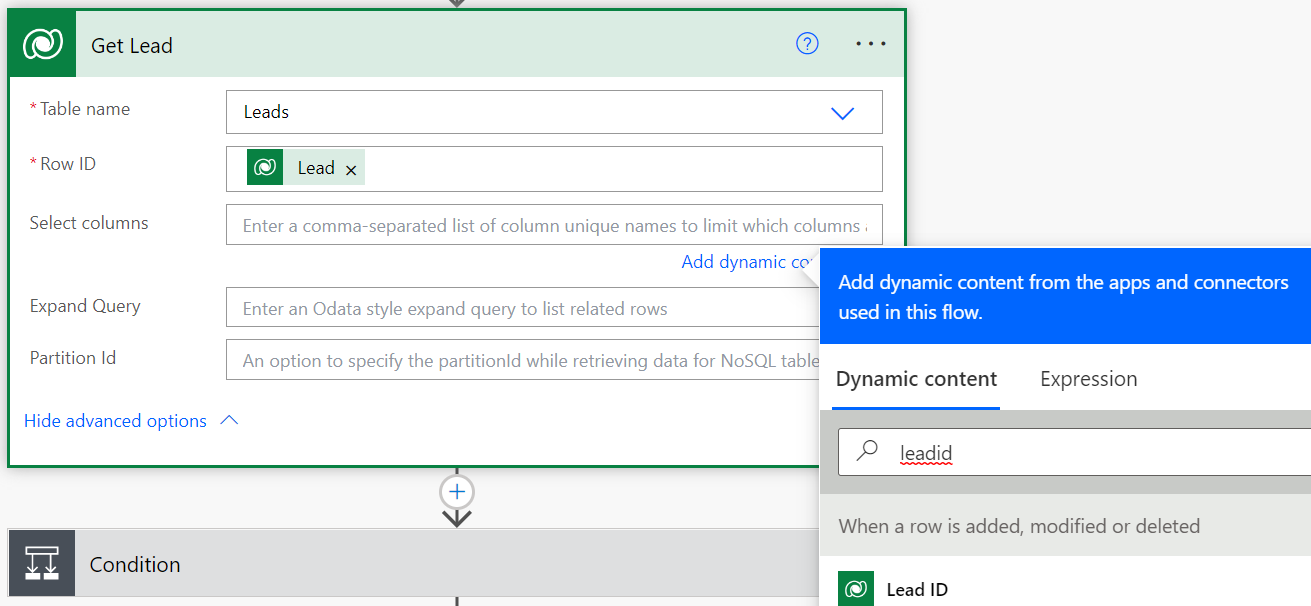
We will select the table name “Leads” and for Row ID we will select “lead ID”
Step 5: Ignore Closed Leads

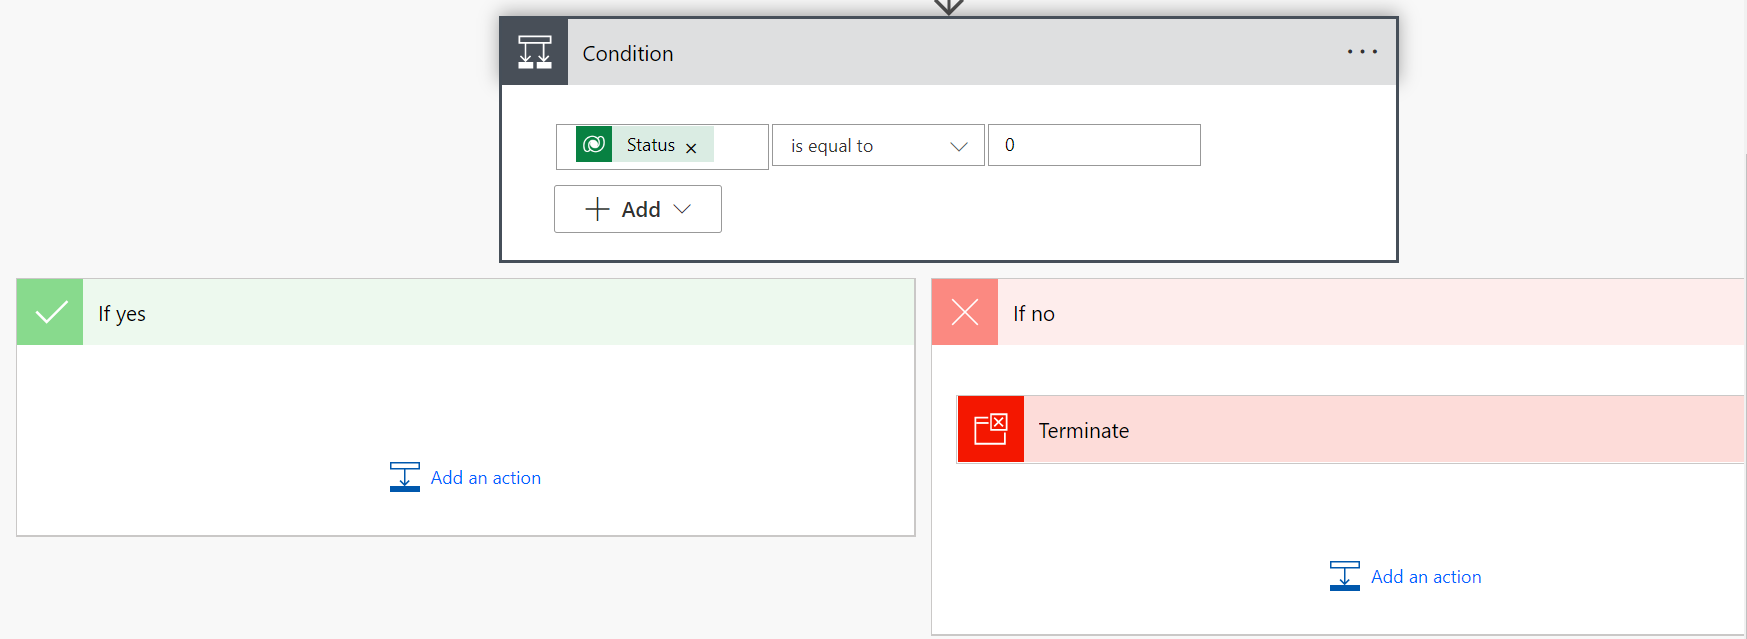
To make sure we’re not going to process leads that have been closed already, we need to filter out the closed leads with a condition. We can do that by terminating the flow if the “Lead Status” is equal to 0.
 

Step 6: Get Lead Owner

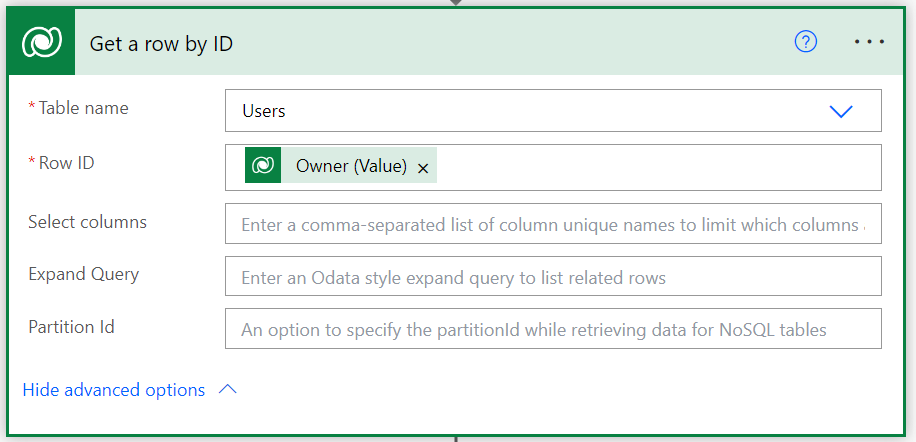
For the leads that are not closed, we continue by getting the lead owner from the relationship between table “leads” and “users”. We can do that by retrieving the Table “Users” and get the row id from the Owner Value from the Leads.
Step 7: Get Lead Owner Email Address

Since we want to send a teams message, we will need to retrieve the primary account UPN for that particular owner. We can do that by creating an action called “Get user profile (V2)”, and search the user based on the primary email address we got from the previous step.

Step 8: Get a Mention token for a user in Teams

Since we want to send a message in a particular channel, and tag the owner in the message, we need to get a “mention token” for this user. We can do this with the task “Get an @mention token for a user” from Teams, and use the user principal name we got from the previous step:

Step 9: Delay task for 1 Minute

In order to make sure that Teams is ready to accept our message with mention token, it is recommended to add a 1 minute delay, to make sure no errors occur:

Step 10: Post a Message in a Chat or Channel

Now we have all the information we need, we can post a message in a Teams Channel. In our case we post it in a group chat, but you can also choose a channel.

For the message, we will include not only the Lead Company Name and Lead Topic, but we also want to include a link to the actual lead in dynamics.
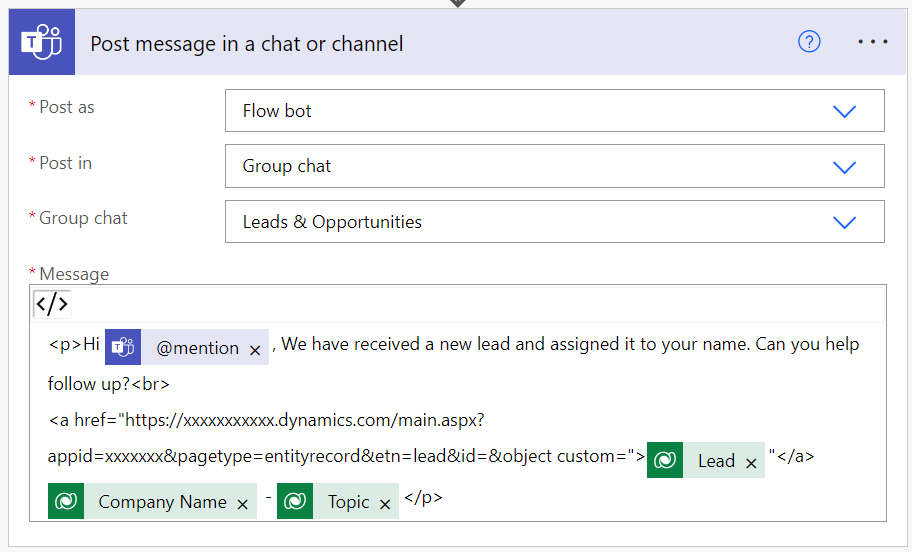
Make sure that you enter the fields using the Code View “</>” option, so your urls will not be truncated or broken. In the Code View option, you can enter HTML code to change the layout of the text. (We use <p> for paragraphs, <br> for lines etc

You can see from above screenshot, we first add the “mention token” and then we also include a link to the URL of the lead in Dynamics.

How to get the Lead URL in Dynamics:

  1. Go to Dynamics 365 – Leads
  2. Click on any Lead
  3. Extract the URL from your browser, and remove the last guid from the url (see orange below)
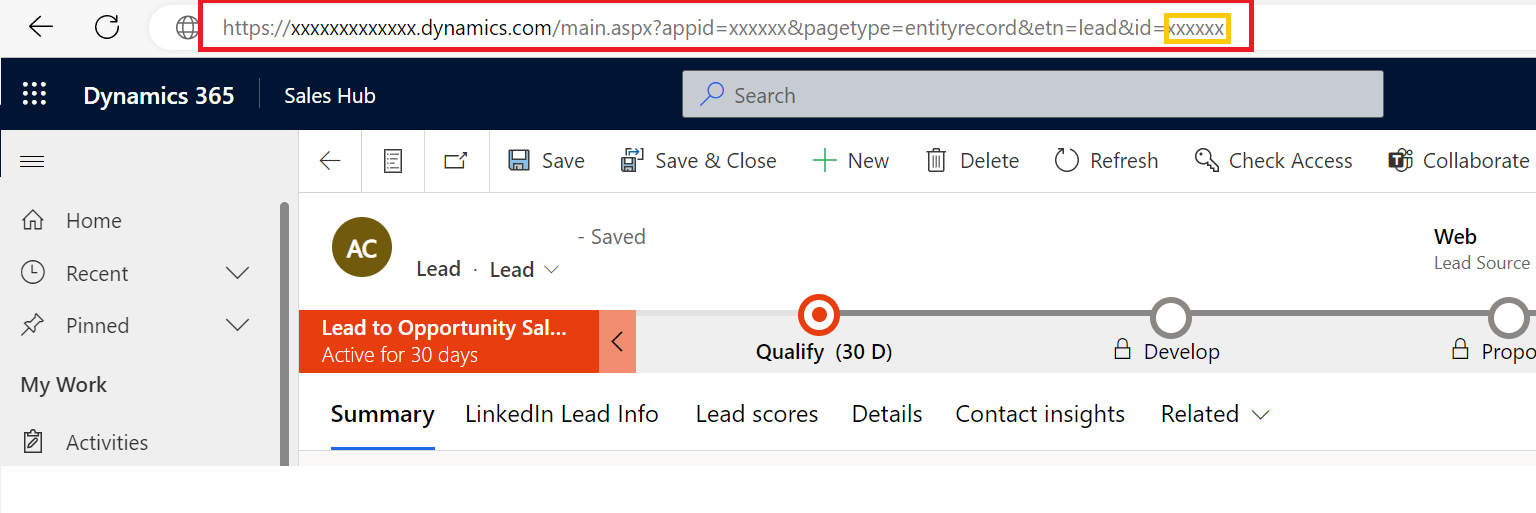
The URL you should use should looks something like:

https://xxxxxxxxxxxxx.dynamics.com/main.aspx?appid=xxxxxx&pagetype=entityrecord&etn=lead&id=

Now paste that in your Flow and make it a Link using the html <a href=””>  lead </a> code.

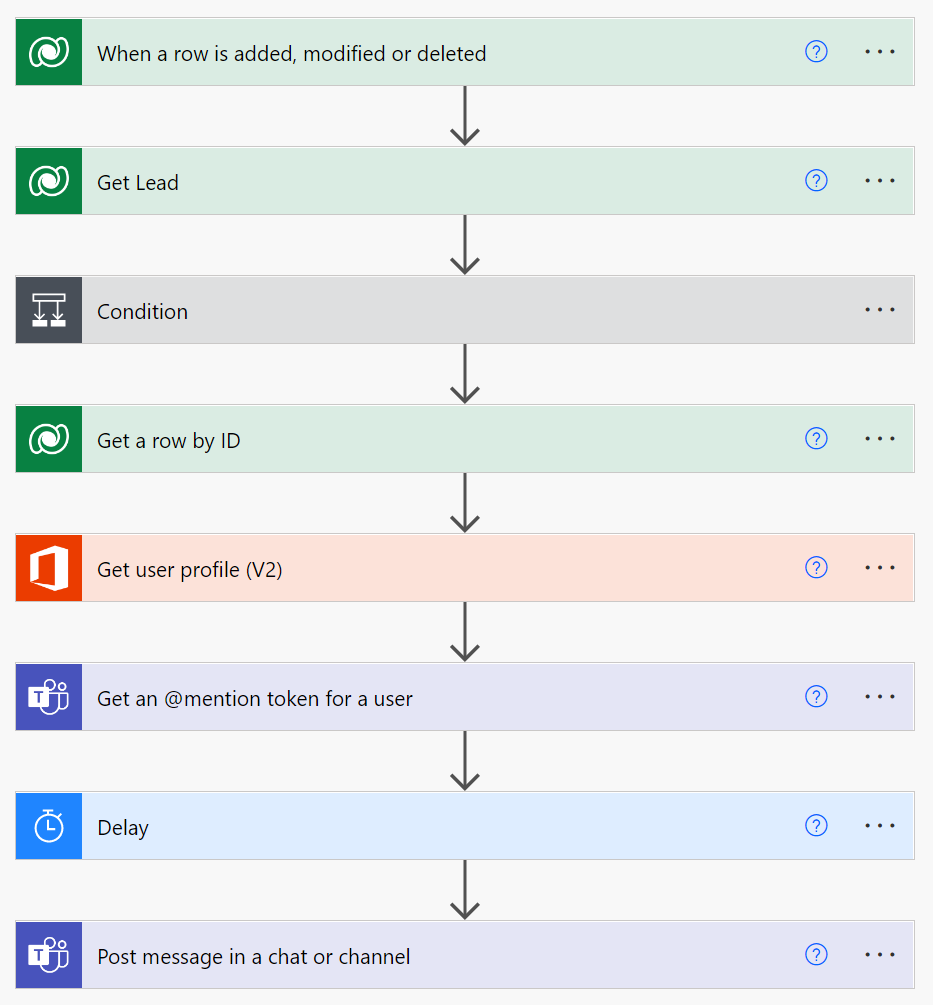
When you’re done, your flow should have the following steps:
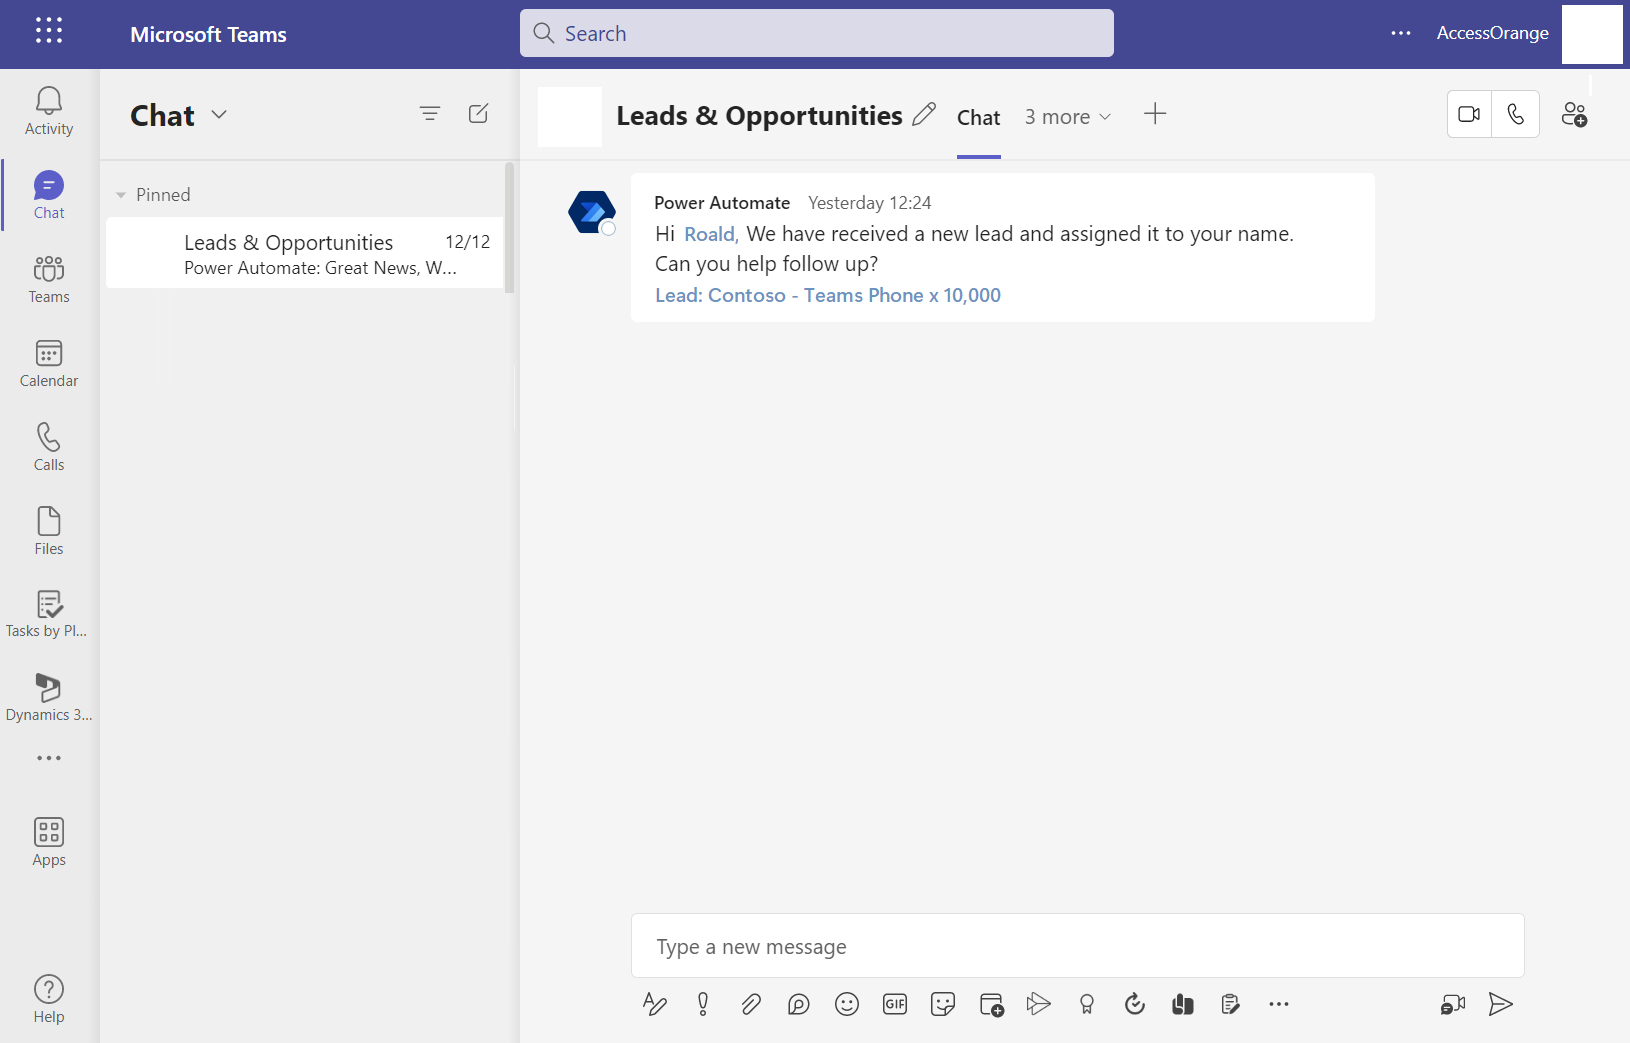
Now you can test your flow, and (hopefully) it should work. Here is an example of how it looks on our side:
Great Work! Feel free to reach out if you have any issues or questions regarding above flow.

Microsoft Power Automate (earlier known as Microsoft Flow) allows you to automate repetitive manual tasks and paper processes via an easy to use drag-and-drop wizard.

Microsoft Power Automate can create workflows to sync data across apps and software, generate real-time notifications to alert stakeholders, update databases with new information and collect data from Power Apps or other data sources.

In this example we will teach you how to use Power Automate to create recurring tasks in Microsoft Planner.

For this example we imagine that we want to remind our finance department to check and send out a monthly invoice to the customer.

Step 1: Create new Power Automate Flow

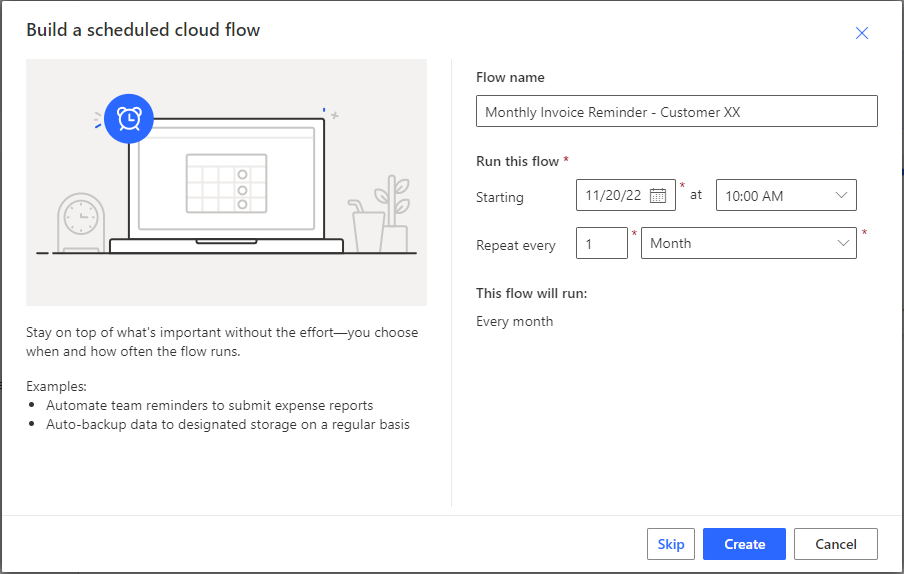
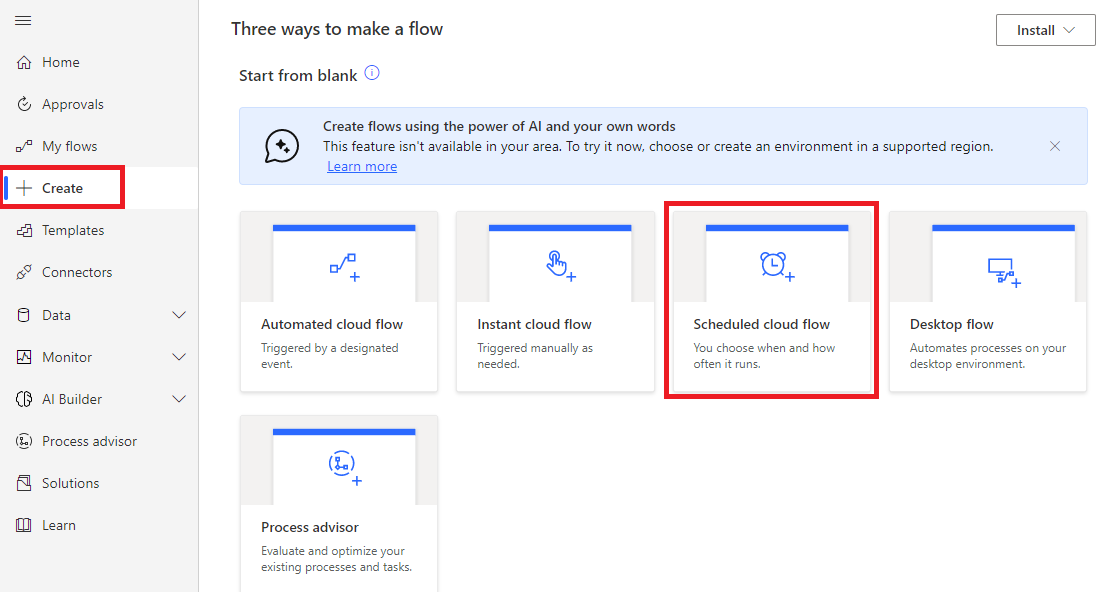
Go to https://make.powerautomate.com/ and click on “Create”, and select “Scheduled Cloud Flow”

Step 2: Enter Flow Name and Set Schedule

Give the flow a name, and enter the schedule. In our example we want to have a monthly reminder, so we set the repeat time to every 1 month.

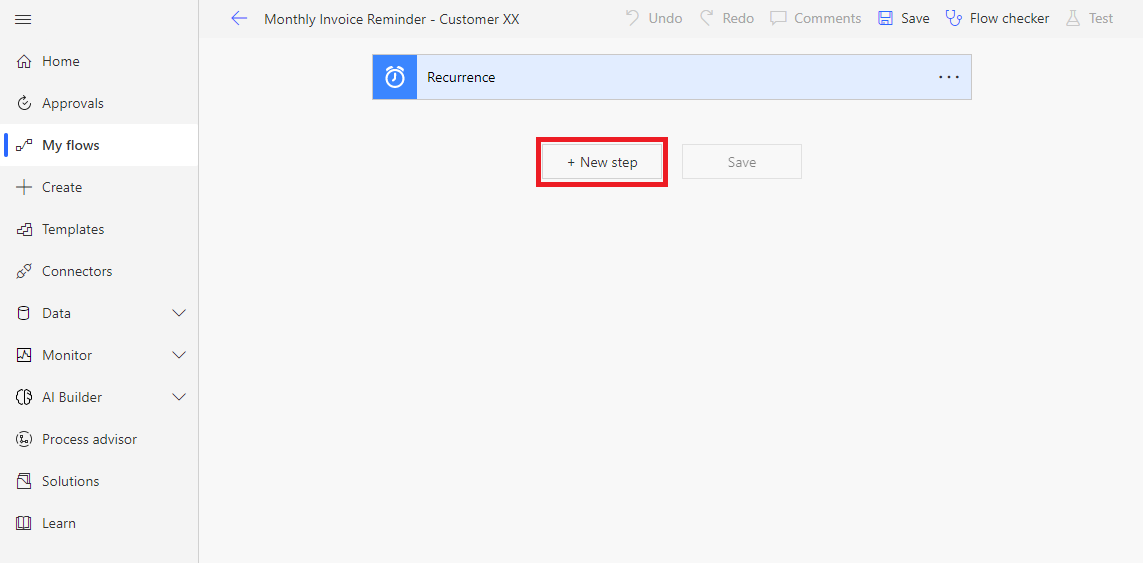
Now we can see the Flow editor screen, with our monthly recurring task as starting point. We click on new step:

Step 3: Create New Task in Planner

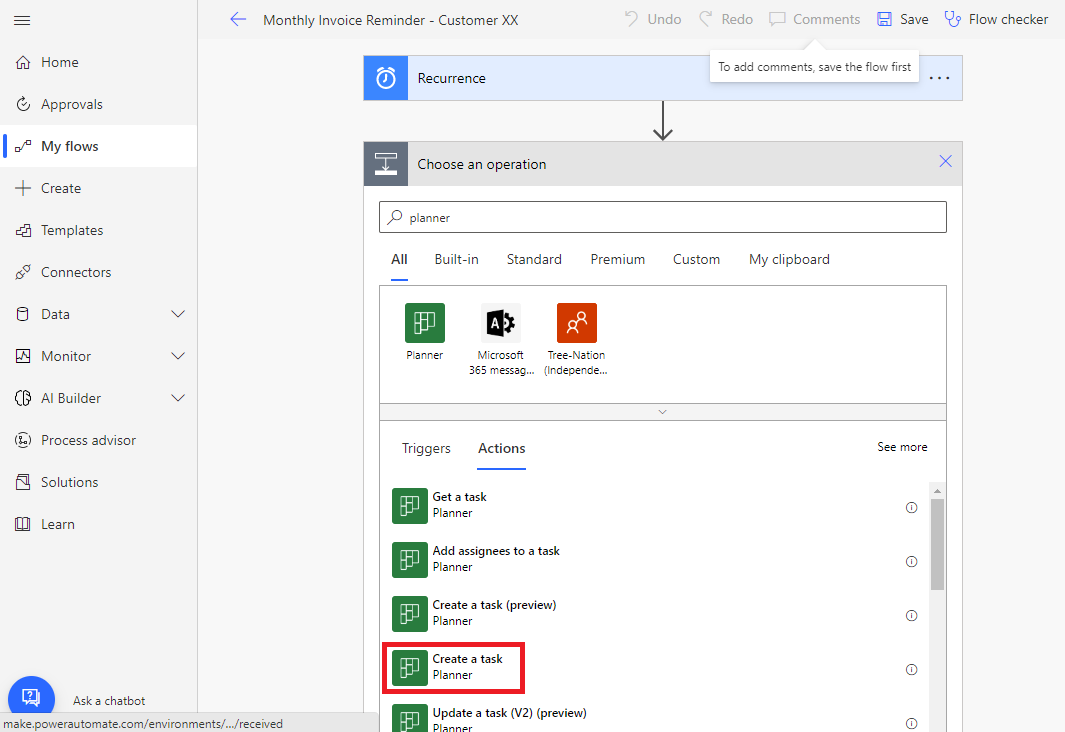
We find Planner and select “Create a Task”

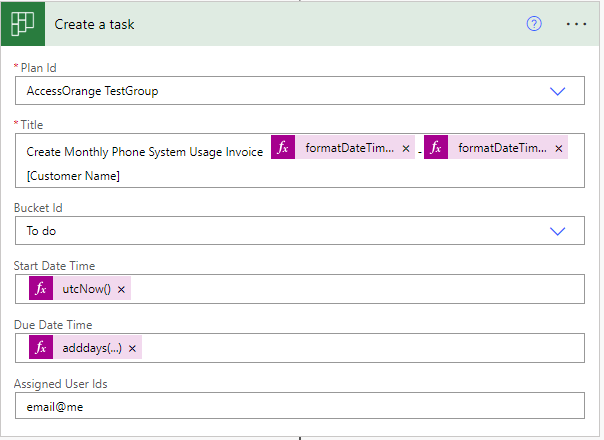
After that we select which Planner Plan the task need to be created, and we fill in the information that we want to show in the planner task.

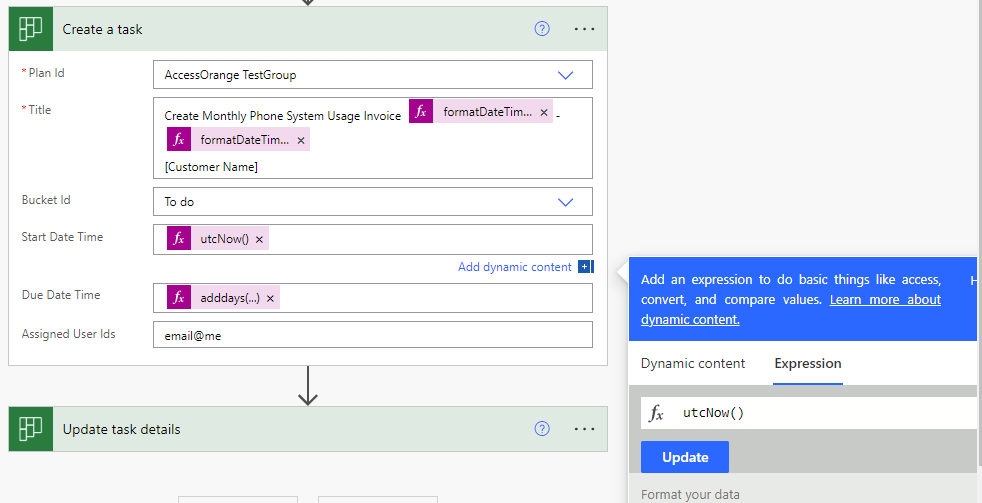
In our example we want to enter some dynamic fields, for the Start Date, Due Date and also to show a dynamic date and time in the Title.

For the Start Date we want today’s date, so we will have to fill in a Dynamic Expression:

Expression:

utcNow()

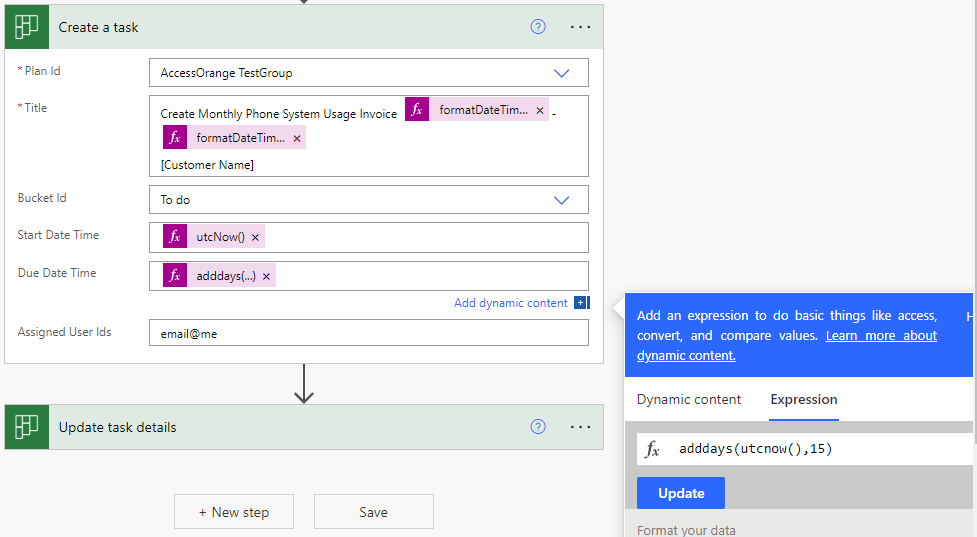
For the Due Date, we want to set it 15 days from today, hence we fill use the expression adddays() to add 15 days from today (utcnow()):

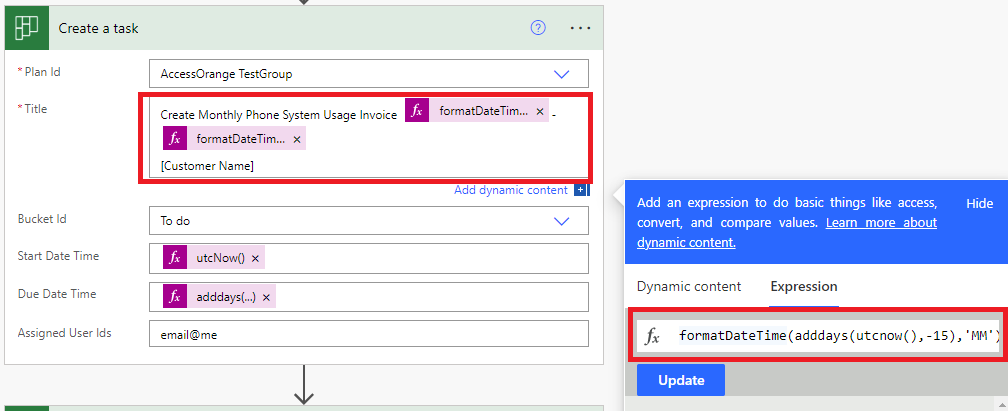
For the Title we also want to add the Due date, hence we will add the adddays function as well there:

Expression 1:

formatDateTime(adddays(utcnow(),-15),'MM')

Expression 2:

formatDateTime(utcNow(),'yyyy')

Important: For Assigned User Id’s, fill in the email addresses of the users that you want to assign the task to.

Step 4: Update Planner Task Details

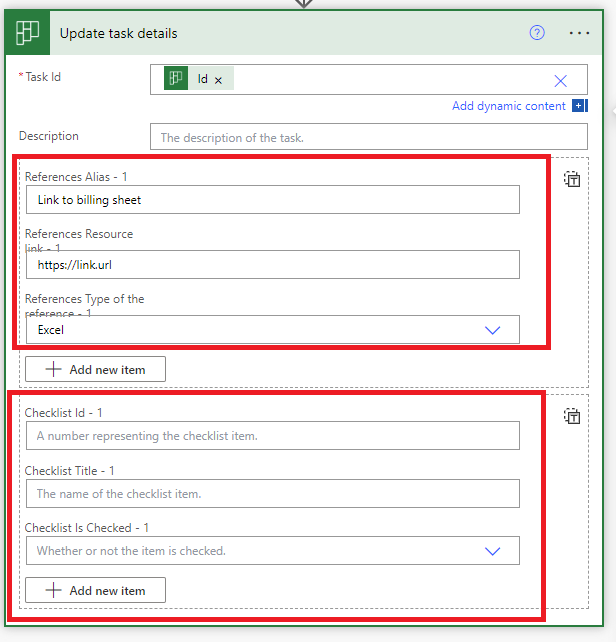
Now we have created the main task, we can also update or add more details under the planner task details. For this we add one more flow called “Update task details””.

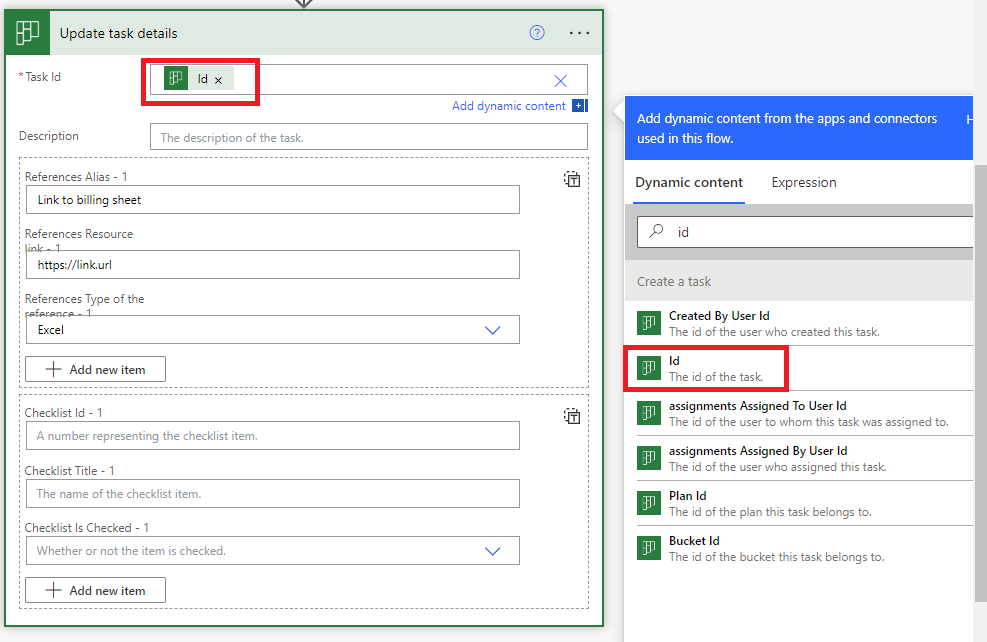
In this task, we need to refer to our original planner task ID.


And after that we can add some more information. In our case we add a link to the billing sheet we want the finance department to use, which is an Excel file. But you Can also add a checklist here.

That’s it! Now our Flow is ready. We can save it, enable it and test it out. If everything runs smooth, your task will now appear in Microsoft Planner every month.

Singapore, September 2022 – AccessOrange announced that Singapore’s Cyber Security Agency (CSA) has recognised AccessOrange for its strong cybersecurity practices with the Cyber Essentials mark certification.

The Cyber Essentials mark serves to recognise that enterprises have put in place good cyber hygiene practices to protect their operations and customers against common cyber-attacks. To achieve the Cyber Essentials mark by CSA, businesses will have to meet measures across assets (people, hardware, software, and data), secure and protect its access controls and security configurations against malicious software, and stay constantly updated, backed-up and ready to respond to cyber threats.

“Cyber Security is an increasingly important topic for businesses in Singapore and the world. Given the fact that AccessOrange implements security solutions and best practices for our customers, we need to ensure that our own internal systems and procedures are among the highest standards.” , according to Roald Andersen, Director and Business Development of AccessOrange. “The CSA Cyber Security Essentials certification is an important step to ensure that we have the right practices in place to safeguard our business and customer data.”

About CSA Cyber Essentials Certification

The Cyber Essentials mark is a cybersecurity certification for enterprises that are embarking on their cybersecurity journey. It is targeted at organisations operating in Singapore and aims to enable them to prioritise the cybersecurity measures needed to safeguard their systems and operations from common cyber-attacks.

For more information about Cyber Essentials, please visit Cyber Essentials Mark

About AccessOrange

AccessOrange helps companies work smarter by implementing innovative cloud solutions, such as Microsoft Azure, Microsoft 365 for which they provide adoption & migration services, training and support. Microsoft Teams & SharePoint Implementations are a major part of their service portfolio.

For more information about AccessOrange, please visit www.accessorange.com

Over the past 10 years, Microsoft has added a huge amount of new features to Microsoft 365. Services such as SharePoint and Teams have significantly broadened the possibilities for users. For the first time in a decade, Microsoft is now going to raise prices a bit. In addition, the software giant introduces changes to subscription terms.

As of March 1st, 2022, prices will increase for the following six products:

  • Office 365 Plan E1
  • Office 365 Plan E3
  • Office 365 Plan E5
  • Microsoft 365 Business Basic
  • Microsoft 365 Business Premium
  • Microsoft 365 Plan E3

On average, the price increase is around 20% but in some cases it can be UP TO 30%. The new prices will apply to all new orders you place on & after March 1st.

New Commerce Experience: 

Monthly vs Yearly Subscriptions

Besides the price increase, Microsoft is changing the license terms to what they call the “New Commerce Experience”.

From March 1st you can choose from the following three subscription terms:

  • Monthly Subscription
    You can change the number of licenses every month, but this option is 20% more expensive than an annual subscription.
  • Yearly Subscription
    You commit yourself for a year, paying a fixed amount upfront every year
  • 3 Year Subscription (Coming Soon)
    In the near future, it is also possible to lock in your subscription for 3 years by paying for 3 years upfront, enabling you to keep a fixed price for 3 years. We will inform you when this option is available.

Please note the following:

  • Licenses cannot be downgraded to a lower plan during the license period
  • Upgrading licenses to a higher plan during the subscription period is still possible
  • Increasing licenses is possible during subscription period. Decreasing licenses is not possible.

Next Steps

Do you have an existing yearly Microsoft 365 subscription?

  • If you renew with us before March 1st, we can lock your existing price for another 12 months.

Do you have an existing monthly Microsoft 365 subscription?

  • We can help you convert them to yearly (annual) subscriptions before March 1st, to prevent the additional 20% price increase.

Renew Early and get a 5% DISCOUNT on annual subscription

From January to February 2022 you can get a 5% discount on an annual subscription. And if you choose a new monthly subscription between January and June 2022, you pay the same price per month as with an annual subscription. (Existing monthly subscriptions excluded)

These promotions are valid for a maximum of 2,400 workplaces.

Want to know more?

Contact us at [email protected] to discuss the possibilities and see how we can help

We would like to inform you that Microsoft has announced it is aware of ongoing targeted attacks, that try to exploit a new vulnerability in Office 356 and Office 2019.

This article informs you  about the status, risks and how to prevent your organization from getting infected.

Ongoing Attack against Office 365

Identified by Microsoft as CVE-2021-40444, the security issue affects Windows Server 2008 through 2019 and Windows 8.1 through 10 and has a severity level of 8.8 out of the maximum 10.

Microsoft is aware of targeted attacks that attempt to exploit this vulnerability by using specially-crafted Microsoft Office documents that are sent by Email.

An attacker could craft a malicious ActiveX control to be used by a Microsoft Office document that hosts the browser rendering engine. Upon opening it, the document loads the Internet Explorer engine to render a remote web page from the threat actor.

Malware is then downloaded by using a specific ActiveX control in the web page. Executing the threat is done using “a trick called ‘Cpl File Execution’,” referenced in Microsoft’s advisory.

How can you protect yourself

Customers should keep antimalware products up to date. Customers who utilize automatic updates do not need to take additional action, however it is advised to inform your staff once again not to open emails or attachments from unknown sources.

Microsoft Defender Antivirus and Microsoft Defender for Endpoint both provide detection and protections for the known vulnerability.

Additional ways to protect your organization:

For customers who are looking for additional protection, we have two recommendations:

Defender for Office 365 Plan 1 (Advanced Threat Protection)

Defender for O365 Plan 1 protects your users from incoming virus or malware via email. The advanced anti spam/virus/phishing engine will scan all incoming email for any malicious content. This is recommended as an add on for all Business Basic, Standard, E1 and E3 subscriptions.

Malwarebytes EndPoint Protection

From our experience, especially for businesses in Asia, Malwarebytes offers by far the most effective antivirus protection for Laptops/Desktops and Servers. Malwarebytes is 100% managed in the cloud and Detects and blocks ransomware from encrypting files using signature-less behavioral monitoring technology. Identifies entire families of known malware by using a combination of heuristic and behavioral rules.

From our experience, we have seen Malwarebytes detect and protect customers data where other antivirus solutions such as Symantec, Kaspersky and others failed to detect the infection.

More information here: https://accessorange.com/malwarebytes/

If you want to know more about Defender for Office 365 or Malwarebytes, please contact our sales team at [email protected] or chat with us via our website chat.

Stay safe!

In this free Webinar we demonstrate how WorkPoint 365 can help you streamline your Project Management in SharePoint and Teams