Tag Archive for: Microsoft 365

Microsoft 365 Copilot: The Future of AI-Powered Productivity

Feature Examples:

  • Automatically Building a PowerPoint Deck from content
  • Convert Word doc to PowerPoint presentation
  • Excel data manipulation
  • Analyze and reply emails
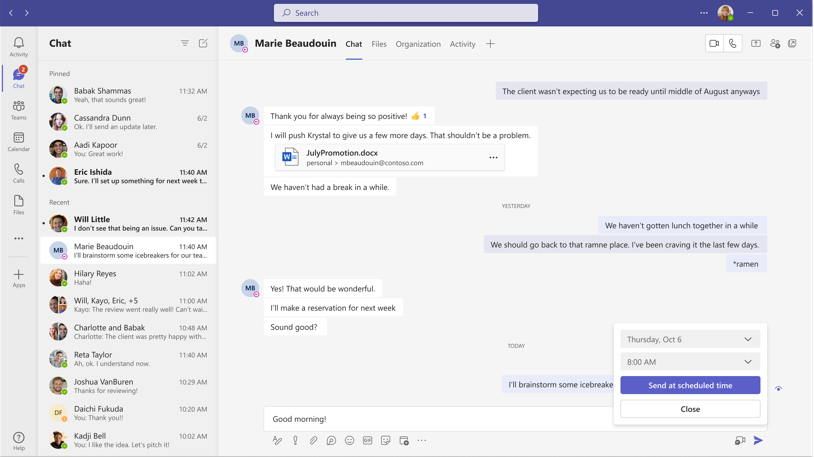
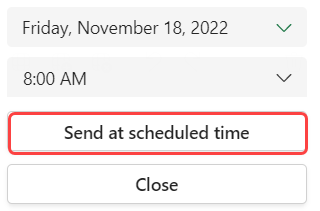
  • Teams Chat summary and interaction live in meetings and meeting summaries
  • Viva Sales meeting preparation and live in-meeting coaching and putting data directly into CRM
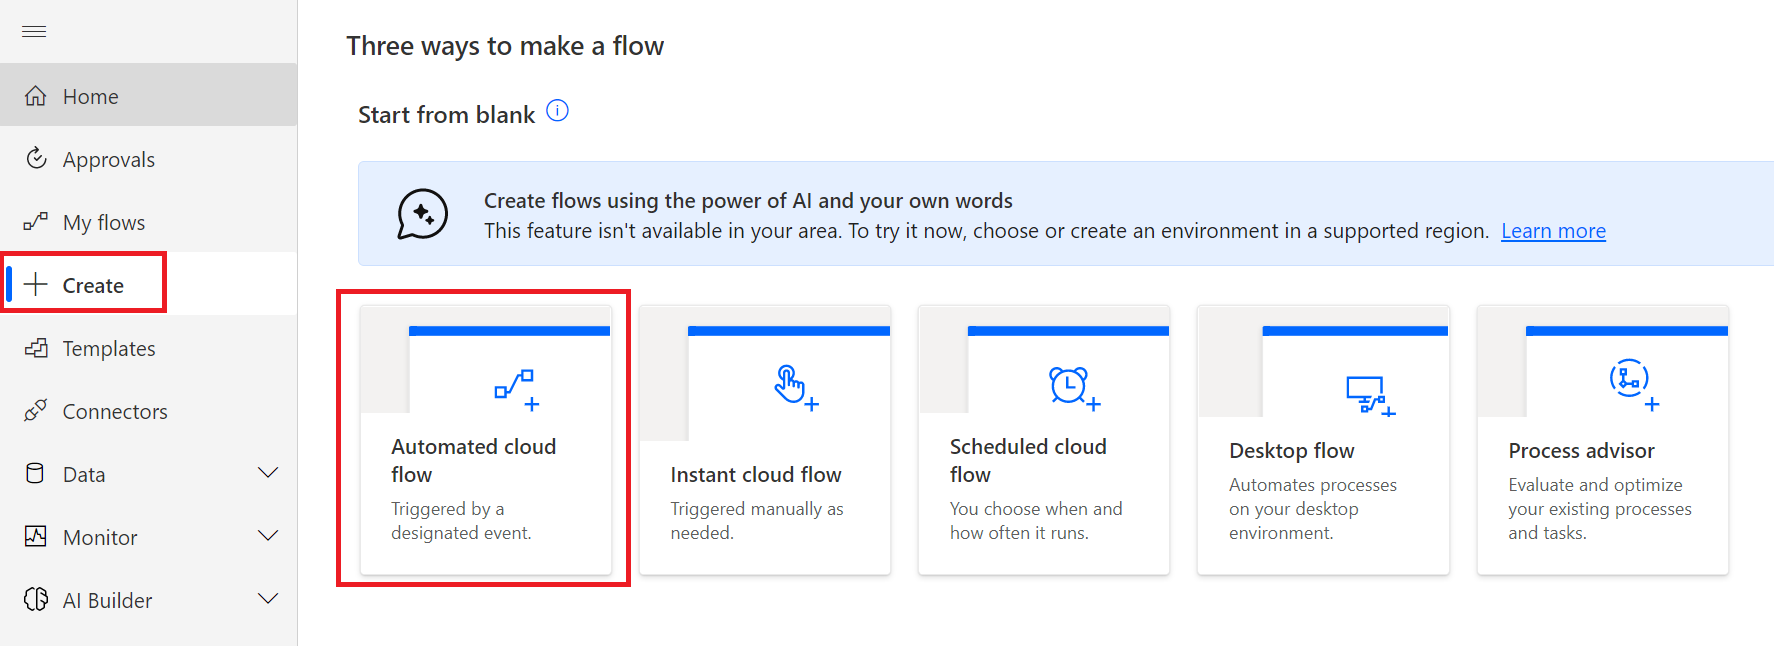
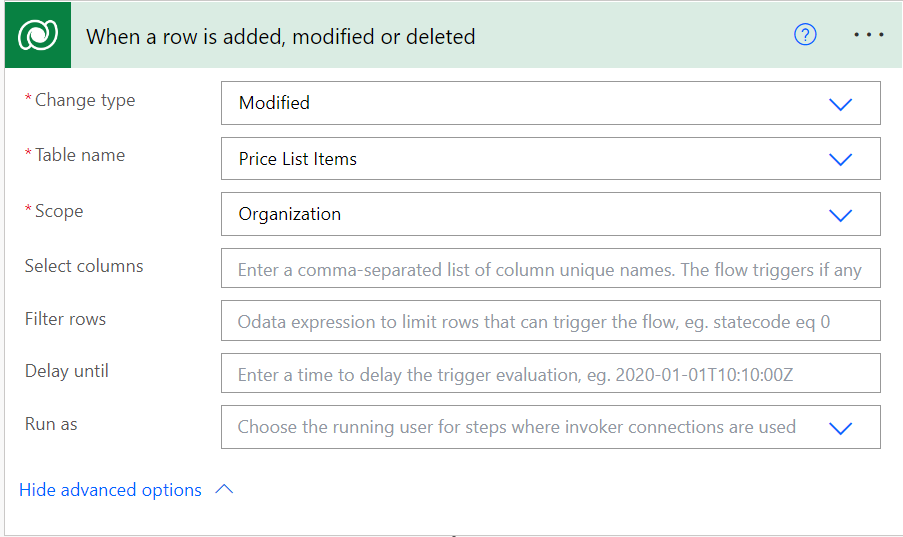
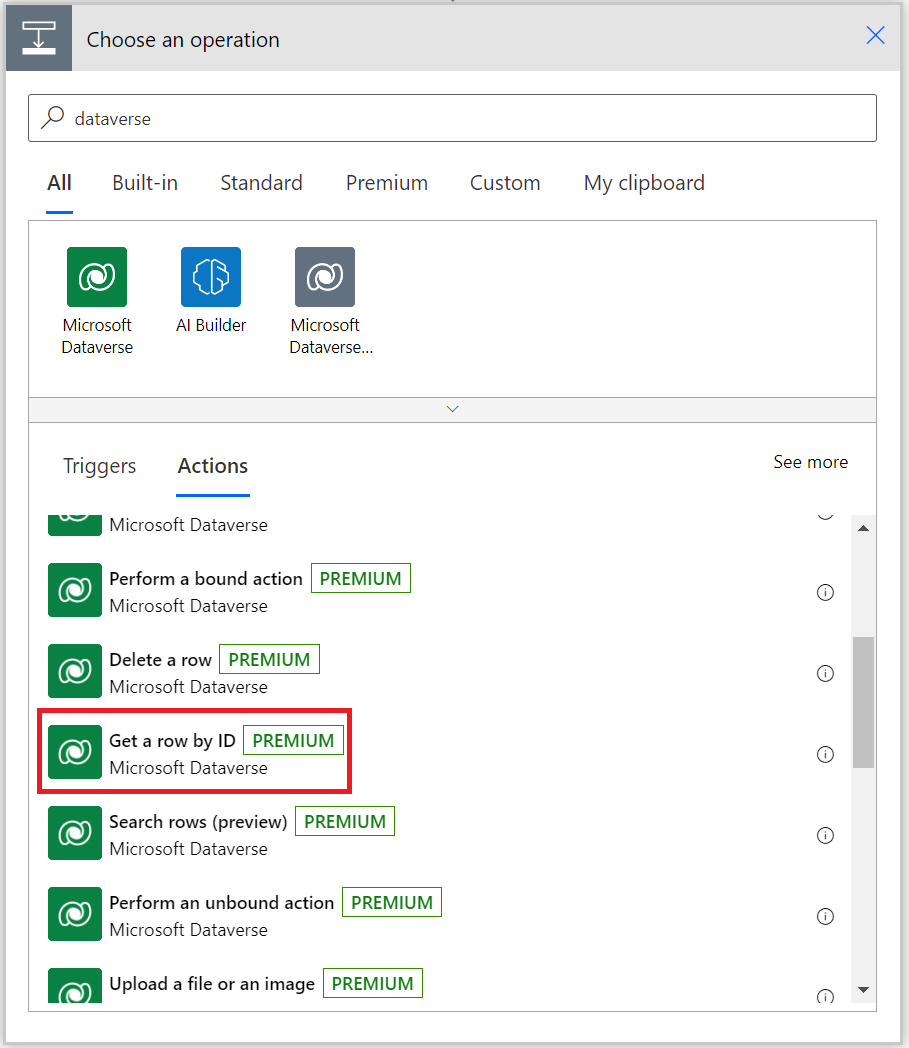
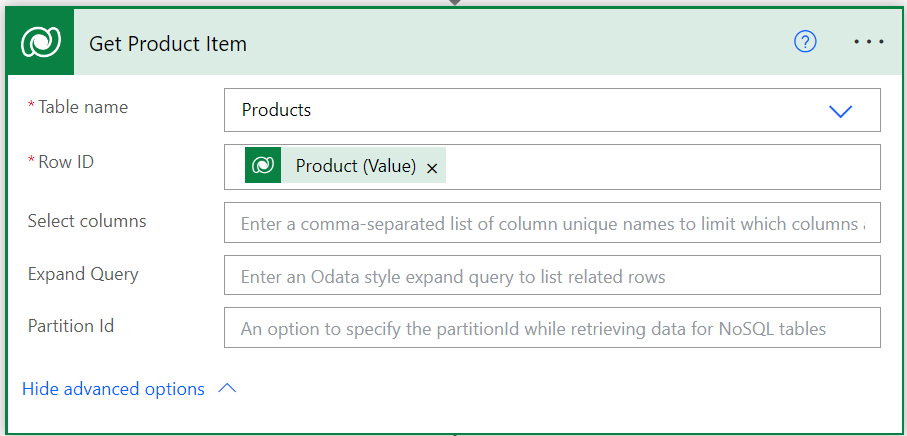
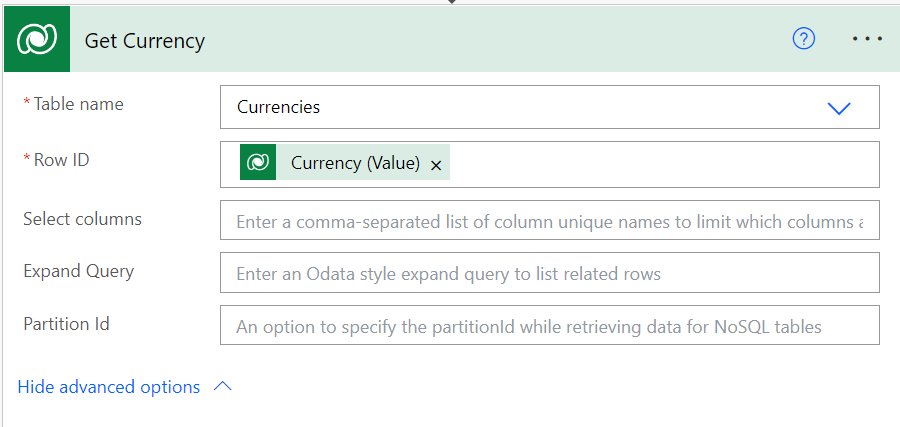
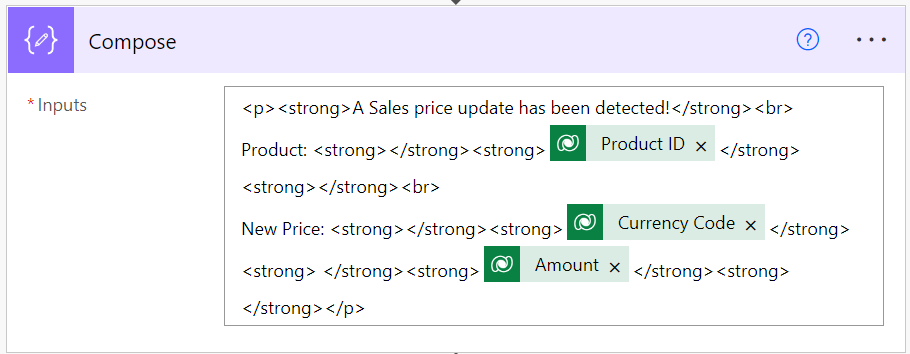
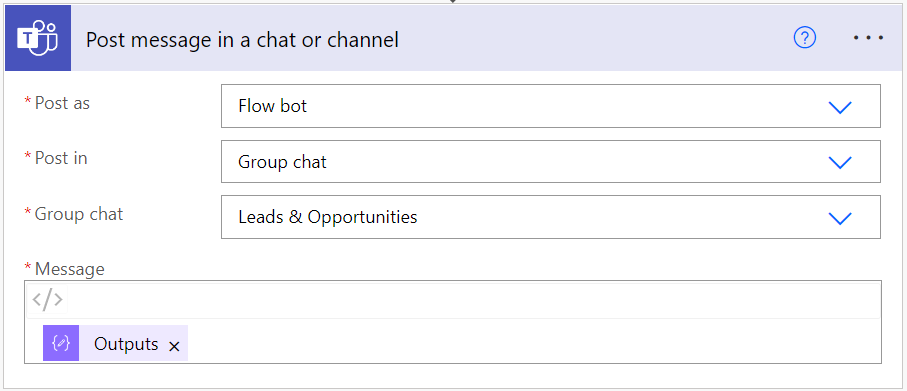
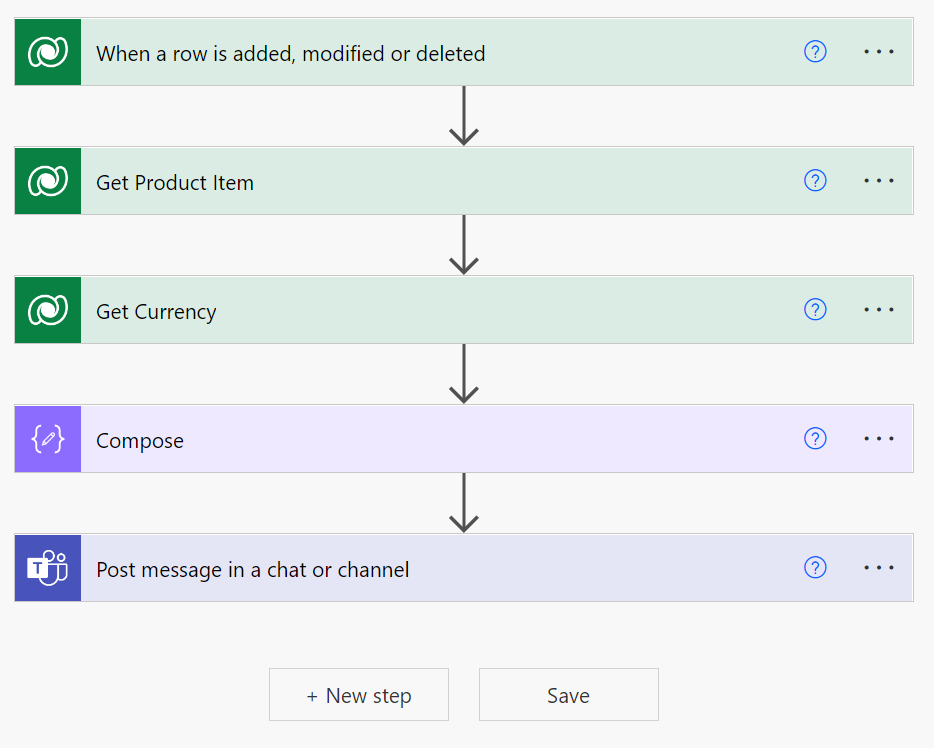
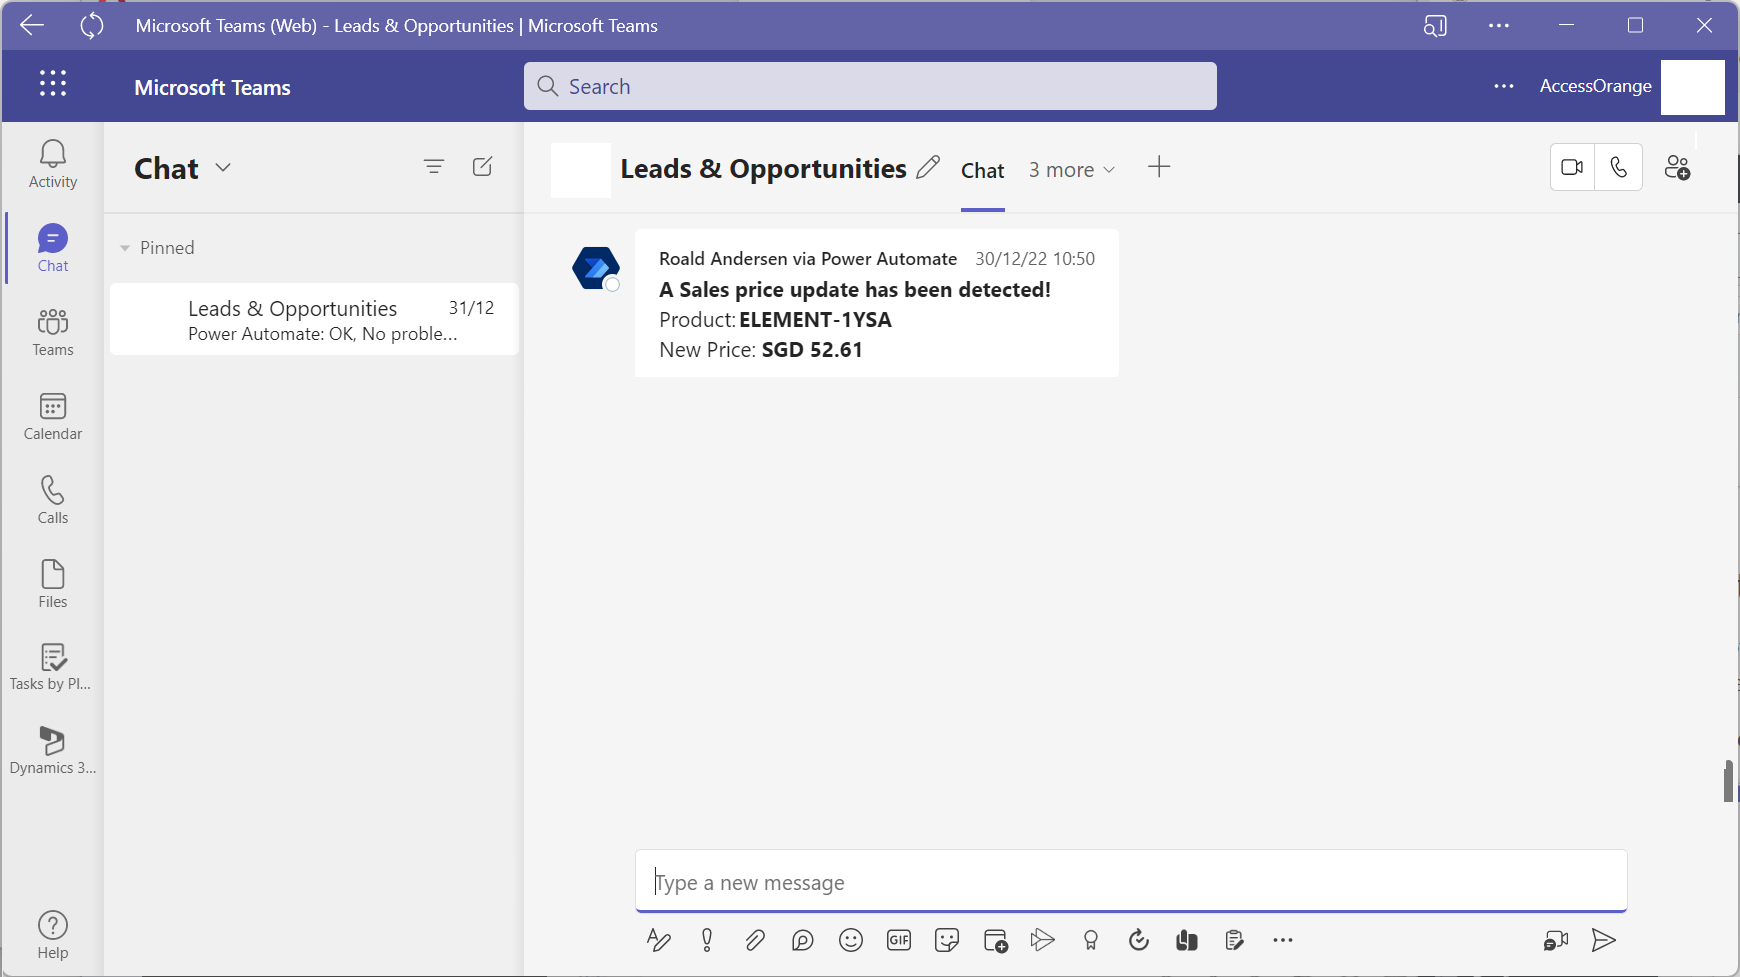
  • Generate a Power Automate workflow
  • Business Chat Demo – Customer interaction summary and generating a SWOT analysis

In today’s fast-paced digital world, productivity is key. Whether you’re a student, a professional, or a small business owner, you need to be able to get things done quickly and efficiently. That’s where Microsoft 365 Copilot comes in. This AI-powered feature is designed to provide personalized assistance and automate tasks within the Microsoft 365 suite of applications. In this article, we’ll explore the features and benefits of Microsoft 365 Copilot, and take a closer look at how it works.

What is Microsoft 365 Copilot?

Microsoft 365 Copilot is an AI-powered feature that provides personalized assistance to users within the Microsoft 365 suite of applications. It uses natural language processing (NLP) and machine learning algorithms to understand user queries and provide real-time assistance. Copilot is currently in preview and is available to a limited number of users.

Introduction Video about Microsoft 365 AutoPilot

How Does Microsoft 365 Copilot Work?

Microsoft 365 Copilot works by analyzing user behavior and preferences within Microsoft 365 applications. It uses NLP to understand user queries and provide personalized assistance based on the context of the query. For example, if a user types “How do I format a document?”, Copilot will analyze the query and provide step-by-step instructions on how to format a document.

Copilot can also automate certain tasks within Microsoft 365 applications. For example, if a user is working on a document and wants to add a table of contents, they can simply type “Add table of contents” and Copilot will automatically generate a table of contents based on the headings in the document.

Benefits of Microsoft 365 Copilot

Microsoft 365 Copilot offers a number of benefits to users, including:

  1. Increased productivity: Copilot can help users complete tasks more quickly and efficiently, reducing the time and effort required to perform certain tasks within Microsoft 365 applications.
  2. Personalized assistance: Copilot can learn from a user’s behavior and preferences to provide personalized assistance and recommendations.
  3. Real-time assistance: Copilot can provide real-time assistance to users as they work in Microsoft 365 applications, helping them complete tasks more quickly and efficiently.
  4. Task automation: Copilot can automate certain tasks within Microsoft 365 applications, reducing the need for manual input and reducing the risk of errors.
  5. Multilingual support: Copilot can support multiple languages, making it accessible to users around the world.

What Tasks Can Microsoft 365 Copilot Help With?

Microsoft 365 Copilot can help with a variety of tasks within the Microsoft 365 suite of applications, including:

  1. Document formatting: Copilot can provide step-by-step instructions on how to format a document, including adding headings, tables, and images.
  2. Presentation creation: Copilot can provide suggestions and recommendations for creating effective presentations, including slide design and content.
  3. Email management: Copilot can help users manage their emails more efficiently, including organizing emails, setting up filters, and composing emails.
  4. Spreadsheet creation: Copilot can help users create spreadsheets and perform calculations, including generating charts and graphs.
  5. Task management: Copilot can help users manage tasks and deadlines, including setting up reminders and creating to-do lists.

A few examples:

Microsoft Teams: Copilot can set meeting agendas and schedules. But it will also be an effective decision-maker as the chatbot can list the pros and cons of any discussion and suggest the next steps.

Microsoft Word: Copilot can create a first draft for you based on a prompt. Thanks to Microsoft Graph in the background, Copilot can include content from collaborative documents across the organization. It can even tweak the document to sound professional or casual.

Microsoft Excel: Copilot can work with natural language prompts to give answers that earlier needed complex formulas. You can ask it to show you different visualizations, projections, and give recommendations without changing the spreadsheet.

Microsoft PowerPoint: Copilot can use your outline or a Word document and auto-generate a slide deck. With simple commands, you can simplify longer presentations.

Microsoft Outlook: Besides quickly answering routine emails, Copilot can pull discussions from email threads and content across Microsoft 365. Copilot will also allow you to adjust the tone and length of your responses.

Business Chat: This new service taps into your calendar, emails, chats, documents, meetings, and contacts. You can boost your collaboration by using it as a single-window solution for your queries on projects and plans.

Is Microsoft 365 Copilot Right for You?

Microsoft 365 Copilot is designed to help users be more productive and efficient within the Microsoft 365 suite of applications. If you’re someone who spends a lot of time working in Microsoft 365, Copilot may be a helpful tool for you. However, if you’re someone who prefers to work without assistance, or if you’re concerned about the security implications of an AI-powered feature.

Microsoft 365 Copilot currently is only available to a limited set of customers, but you can expect it to come to your Microsoft 365 account soon.

Stay tuned for more information!

Have you ever had to prepare a presentation that needed to include PowerBI charts & graphs? You probably ended up making screencaps of your PowerBI charts, and copying them in to your PPTX as a picture, since there as no decent way to embed a PowerBI report directly in PowerPoint… Until now!

Recently, Microsoft Announced the feature to embed live PowerBI reports into your presentation, with the possibility to refresh your data as well! No wasted time spent on updating your sales presentation whenever the sales data got updated.

Embed your PowerBI report in Powerpoint in 2 easy steps:

Step 1 : Get PowerBI Report Page URL:

Open your PowerBI Report via Powerbi.com, and click on the share button

Choose the permissions you want to grant and who you want to grant them to, and click on PowerPoint.


Click on Copy to copy the report page link.

Step 2: Embed the PowerBI report in PowerPoint

Open your PowerPoint presentation and click on Insert – PowerBI.

Paste the link you copied from PowerBI, and click insert.

Now you have your PowerBI report embedded in PowerPoint!

You can also refresh your data via the refresh button:

More questions on PowerBI? Let us know!

Dynamics 365 Sales is a customer relationship management (CRM) software solution that is part of the Dynamics 365 suite of business applications. It is designed to help sales teams manage their relationships with customers and prospects and streamline sales processes. With Dynamics 365 Sales, salespeople can access customer data and interactions from a single platform, track sales activities and opportunities, automate tasks, and collaborate with other team members and departments.

Dynamics 365 can be used by Microsoft Power Automate to automate almost anything within Dynamics 365. Dynamics 365 and Power Automate together, make a great combination for further enhancement of your sales process.

In this example we will teach you how to use Power Automate to send a message to your sales staff via Microsoft Teams when a price change has been detected in a Dynamics 365 Pricelist.

Step 1: Create new Power Automate Flow

Go to https://make.powerautomate.com/ and click on “Create”, and select “Automated Flow”

Step 2: Enter Flow name and select Dataverse

Give the flow a name, and search for “dataverse” and select “When a row is added, modified or deleted”

Step 3: Configure Trigger that will start up our Flow

On the next screen we will configure the trigger. We will configure the Change Type to “modified” to ensure that the trigger only runs when a price list has been modified.

Table name: Price List Items (as we want to target Price List Changes in this case)

Scope: Organization (We want this flow to run for the entire dataverse organization, not just our user scope)

Step 4: Get details of product thas has been modified in the price list

First we need to get the record of the Product that had a price change. We will add a new action to our flow and search for “dataverse” and select “get a row by ID”

We will select the table name “Products” and for Row ID we will select “Product (Value)”

Step 5: Get Price List Currency

In our case we have price lists with different currencies, hence we will need to retrieve the actual currency of the pricelist.

We do that again with a Dataverse : Get Row by ID and select Currencies and Row ID: Currency (Value)

Step 6: Create Chat Message

Since the Teams “Post message in a chat or channel” is sometimes buggy when it comes to message layouts, it is recommended to draft your message in a compose, and parse the compose to the next step.

Here is our chat  message including a little layout tweaking such as adding <strong> </strong> to make some letters bold.

We want to show the product code, which in our case is a custom field named “Product ID”.  The amount is the local amount from the price list, for which we add the Curency as well in order to be complete.

Step 7: Post Message in a Chat or Channel

Now we can do the final step, which is to post our chat message in a group chat or in a channel. In our case we have a chat specifically for our sales team, where we want to post the message in.

The actual message is the output of our compose in step 6

When you’re done with above, the entire flow should have the following elements:

Now you can test your flow, and (hopefully) it should work. Here is an example of how it looks on our side:

Great Work! Feel free to reach out if you have any issues or questions regarding above flow.

Exchange Online Plan 1 and Microsoft 365 Business Basic are two different subscription plans offered by Microsoft. Both plans offer email and calendar capabilities, but there are some key differences between them that may make one plan more suitable for a business than the other.

Exchange Online Plan 1 is a standalone email and calendar service that is part of the Microsoft 365 suite of products. It is designed for businesses that need a robust email and calendar solution, but do not require the additional productivity and collaboration tools that are included in other Microsoft 365 plans. Exchange Online Plan 1 includes features such as 50GB of email storage, support for email and calendar sharing, and integration with Microsoft Outlook and other email clients.

Microsoft 365 Business Basic, on the other hand, is a comprehensive productivity and collaboration suite that includes Exchange Online Plan 1 as well as other tools such as Microsoft Word, Excel, PowerPoint, and OneDrive. It is designed for small and medium-sized businesses that need a full suite of productivity and collaboration tools to help them work more efficiently and effectively. In addition to email and calendar capabilities, Microsoft 365 Business Basic also includes tools for document creation and sharing, online meetings and video conferencing, and team collaboration.

One of the main differences between Exchange Online Plan 1 and Microsoft 365 Business Basic is the scope of features and tools included in each plan. Exchange Online Plan 1 is a standalone email and calendar service, while Microsoft 365 Business Basic is a comprehensive suite of productivity and collaboration tools. This means that if you are a business that only needs email and calendar capabilities, Exchange Online Plan 1 may be a better fit for you. However, if you need a full suite of tools to help your business run more efficiently and effectively, Microsoft 365 Business Basic may be a better choice.

Another difference between the two plans is the pricing structure. Exchange Online Plan 1 is typically offered as a monthly or annual subscription, while Microsoft 365 Business Basic is typically offered as an annual subscription. This means that if you choose Microsoft 365 Business Basic, you will need to pay for the full year upfront, while with Exchange Online Plan 1 you have the option to pay on a monthly or annual basis.

Exchange Online Plan 1 and Microsoft 365 Business Basic are two different subscription plans offered by Microsoft that cater to different needs and budgets. Exchange Online Plan 1 is a standalone email and calendar service that is suitable for businesses that only need these capabilities, while Microsoft 365 Business Basic is a comprehensive suite of productivity and collaboration tools that is suitable for small and medium-sized businesses that need a full range of tools to help them work more efficiently and effectively.

Making the right choice for your business

Your business should consider choosing Exchange Online Plan 1 over Microsoft 365 Business Basic if they only need email and calendar capabilities and do not require the additional productivity and collaboration tools offered by Microsoft 365 Business Basic. Exchange Online Plan 1 is a standalone email and calendar service that is part of the Microsoft 365 suite of products and is designed specifically for businesses that only need these capabilities.

That being said, Microsoft 365 Business Basic is a comprehensive productivity and collaboration suite that includes Exchange Online Plan 1 as well as other tools such as Microsoft Word, Excel, PowerPoint, and OneDrive. It is designed for small and medium-sized businesses that need a full suite of tools to help them work more efficiently and effectively. If a business requires a full range of productivity and collaboration tools in addition to email and calendar capabilities, Microsoft 365 Business Basic may be a better fit.

In general, the choice between Exchange Online Plan 1 and Microsoft 365 Business Basic will depend on the specific needs and budget of the business. If a business only needs email and calendar capabilities, Exchange Online Plan 1 may be a more cost-effective option. However, if a business needs a full suite of productivity and collaboration tools, Microsoft 365 Business Basic may be a better choice. It is important for businesses to carefully evaluate their specific needs and budget when deciding between these two subscription plans.

Please see below table for a more complete overview of the differences between each edition.


(Microsoft prices per 12-2022. Contact us to get the best deal for your organization!)

Want to know more? Contact us at [email protected] and we’ll have one of our consultants discuss with you what is the best option for your organization.

In the latest Microsoft Teams Update, Microsoft has introduced a new feature called “Scheduled Send Chat Messages”.

With this new feature is possible to choose a specific time to send out your chat message. It is similar to the “Delay Delivery” option in Outlook, that lets users schedule messages to be sent at a time convenient to their recepients.

With the new Scheduled Send feature, it is also possible to edit or delete the message before they are being delivered to the recepients.

All scheduled messages can only be delivered no more than 7 days in the future and cannot be flagged as urgent or important. Inline images and attached files will only be accessible by others in the chat once the message has been delivered.

How to schedule a chat message in Teams

To schedule a message in Teams, desktop users will need to right-click on the Send button and choose a date and time within 7 days. Review the schedule details in the  compose box and click the Send at scheduled time button to deliver it at the scheduled date and time.

On mobile, users will need to type the message and long press the send button to open the scheduling menu. Select the date and time and tap the “Send at scheduled time button” to deliver it at a later time.

What do you think? Great feature, isn’t it?

Microsoft 365 is a powerful and feature-rich platform, but like any software, it is not immune to issues such as data loss, cyber attacks, or other disasters.

By having a separate backup, you can protect yourself against these types of events and ensure that you have access to your data even if something goes wrong with your Microsoft 365 environment.

In addition to providing an extra layer of protection, having a separate backup also allows you to more easily recover from data loss or corruption. If you only have one copy of your data, you may have to wait longer to restore your data if the primary copy becomes damaged or is otherwise unavailable. With a separate backup, you can restore your data more quickly by choosing the backup that is most recent and therefore most likely to be intact.

Also, having a separate backup allows you to store your data in a different location, which can help to protect against physical disasters such as fires or floods. For example, you could store your backup in a cloud-based storage solution such as MSP360. This way, if your primary location is compromised, you still have access to your data from another cloud location.

Having a separate backup can also help to reduce the risk of data loss due to human error. For example, if you accidentally delete a file or overwrite an important document, you can restore it from your backup rather than having to recreate the data from scratch.

Therefore we recommend to have a separate backup of your Microsoft 365 environment in order to protect against data loss and ensure that you have a reliable backup plan in place. By taking the time to set up a separate backup, you can safeguard your data and have peace of mind knowing that your important information is secure.

MSP360 Backup can Help

MSP360 Backup (formerly known as CloudBerry Backup) is a data backup and recovery software that can protect your Microsoft 365 data.

Here are a few ways in which MSP360 Backup can help protect your Microsoft 365 data:

  1. Automatic backups: MSP360 Backup allows you to set up automatic backups of your Microsoft 365 data, which means you don’t have to remember to manually back up your data. This helps to ensure that your data is always protected and up to date.
  2. Multiple backup destinations: MSP360 Backup supports a wide range of backup destinations, including cloud storage platforms like Amazon S3, Microsoft Azure, and Google Cloud. This allows you to choose the backup destination that best meets your needs and budget.
  3. Data encryption: MSP360 Backup uses AES 256-bit encryption to protect your data during the backup process. This helps to ensure that your data is secure and cannot be accessed by unauthorized parties.
  4. Data restoration: In the event of data loss, MSP360 Backup allows you to easily restore your Microsoft 365 data from a previous backup. This can help you to quickly recover from data loss or corruption and get back to business as usual.

MSP360 Backup is a powerful tool that can help you to protect your Microsoft 365 data and ensure that you have a reliable backup plan in place. By automating your backups and offering multiple backup destinations and data encryption, MSP360 Backup can help you to keep your data safe and secure.

For more information on Microsoft 365 Backup solutions or MSP360, contact us at [email protected] or chat with us on our website.

With PowerShell, you can automate tasks and manage your Microsoft 365 tenant, including adding multiple users to your organization.

To bulk import users into Microsoft 365 using PowerShell, you will need to first install the Azure Active Directory PowerShell module. You can do this by opening a PowerShell window and running the following command:

Install-Module AzureAD

Next, you will need to connect to your Microsoft 365 tenant. You can do this by running the following command and entering your Microsoft 365 global administrator credentials when prompted:

Connect-AzureAD

Now that you are connected to your tenant, you can start importing users. There are a few different ways you can do this, depending on the information you have about the users you want to import.

One option is to use a CSV file to import your users. The CSV file should contain the following information for each user:

  • UserPrincipalName: the email address of the user
  • DisplayName: the name of the user that will be displayed in Microsoft 365
  • Password: the password that the user will use to sign in to Microsoft 365

Once you have your CSV file ready, you can import the users by running the following command:

Import-Csv -Path <path to CSV file> | ForEach-Object {New-AzureADUser -UserPrincipalName $_.UserPrincipalName -DisplayName $_.DisplayName -Password (ConvertTo-SecureString -String $_.Password -AsPlainText -Force)}

Another option is to import users directly from a database or other data source. To do this, you will need to use the New-AzureADUser cmdlet and specify the required parameters for each user. For example:

New-AzureADUser -UserPrincipalName user1@example.com -DisplayName "User 1" -Password (ConvertTo-SecureString -String "Pa$$w0rd" -AsPlainText -Force)

You can use a loop or other method to iterate over the data and create the users one by one.

It’s important to note that when you bulk import users into Microsoft 365 using PowerShell, they will not be assigned a license by default. You will need to assign a license to each user using the Set-AzureADUserLicense cmdlet.

For example:

Set-AzureADUserLicense -ObjectId <object ID of the user> -AssignedLicenses <license ID>

You can also use the Set-AzureADUser cmdlet to assign other properties to the users, such as their department or job title.

For a full list of available parameters, you can use the Get-Help cmdlet to view the Set-AzureADUser cmdlet’s documentation:

Get-Help Set-AzureADUser -Detailed

In conclusion, PowerShell is a powerful tool for managing your Microsoft 365 tenant, including bulk importing users. With the Azure Active Directory PowerShell module and the appropriate cmdlets, you can easily import multiple users at once and assign them licenses and other properties.

Migrating files from an on-premises file server to SharePoint Online can be a useful way to improve collaboration, access, and security for your organization. Here are some steps you can follow to migrate your files:

  1. Determine what needs to be migrated: The first step in any migration is to identify what needs to be migrated. This includes not only the files themselves, but also any metadata or other related information.
  2. Plan your migration: Once you know what needs to be migrated, you can start planning the details of the migration. This includes deciding on a timeline, identifying any potential issues or challenges, and determining the resources that will be needed.
  3. Prepare your files: Before you start the actual migration, you will need to make sure that your files are organized and ready to be moved. This includes verifying that all the files are in a consistent format, renaming any files that may cause issues, and cleaning up any outdated or unnecessary files.
  4. Choose a migration tool: There are several tools available that can help you migrate your files to SharePoint Online. Some options include Microsoft’s own SharePoint Migration Tool (see below), or third-party tools like CodeTwo. Choose a tool that meets your needs and budget.
  5. Migrate your files: Once you have chosen a migration tool, you can start the actual process of moving your files to SharePoint Online. This may involve uploading your files to the tool, configuring any necessary settings, and verifying that the migration was successful.
  6. Test and verify: After the migration is complete, it’s important to test and verify that all of your files have been transferred correctly and are accessible in SharePoint Online. This may involve checking individual files or groups of files, or running a comparison between the on-premises file server and the new SharePoint Online location.
  7. Clean up: Once you have verified that everything has been migrated correctly, you can begin the process of cleaning up your on-premises file server. This may include deleting any outdated or unnecessary files, archiving any files that are no longer needed, and making sure that the file server is organized and ready for the next phase of use.

Using the Free Sharepoint Migration Tool

The SharePoint Migration Tool (SPMT) is a free tool provided by Microsoft that allows organizations to easily migrate their files, folders, and other content from various sources, including on-premises file servers and other cloud services, to SharePoint Online or OneDrive for Business.

Here are some steps to follow when using the SharePoint Migration Tool:

  1. Download and install the tool: The first step is to download and install the SharePoint Migration Tool on your computer. You can find the tool on the Microsoft Download Center.
  2. Create a migration batch: A migration batch is a collection of items that you want to migrate together. To create a new migration batch, open the SharePoint Migration Tool, select “New batch,” and give the batch a name.
  3. Add your files and folders: Once you have created a migration batch, you can start adding your files and folders to it. To do this, click “Add” and select the files and folders you want to migrate. You can also use the “Add from file” option to import a list of files and folders from a CSV file.
  4. Configure your migration settings: Before you start the migration, you will need to configure your migration settings. This includes choosing your target location (either SharePoint Online or OneDrive for Business), setting any advanced options (such as file versioning or metadata mapping), and specifying any custom permissions that you want to set.
  5. Start the migration: Once you have configured your migration settings, you can start the migration by clicking “Start.” The SharePoint Migration Tool will begin transferring your files and folders to your target location. You can monitor the progress of the migration in the tool’s dashboard.
  6. Test and verify: After the migration is complete, it’s important to test and verify that all of your files and folders have been transferred correctly and are accessible in your target location. This may involve checking individual files or groups of files, or running a comparison between the source and target locations.

Migrating files from an on-premises file server to SharePoint Online can be a complex process, but by following these steps and using the right tools, you can make the transition smoothly and effectively.

AccessOrange can Help

A Microsoft Partner like AccessOrange can also help you with the migration.

There are many benefits to having AccessOrange help with a SharePoint migration. Here are some of the key benefits:

  1. Expertise: Microsoft partners such as AccessOrange are trained and certified experts in SharePoint and other Microsoft technologies. This means that they have the knowledge and experience needed to help you plan and execute a successful SharePoint migration.
  2. Support: Working with a Microsoft Partner such as AccessOrange means that you have access to support and resources from Microsoft itself. This includes technical support, best practices guidance, and other resources that can help you get the most out of SharePoint.
  3. Cost savings: AccessOrange can help you save time and money by streamlining the migration process and identifying any potential issues before they become major problems. This can help you avoid costly mistakes and ensure that your migration is completed on time and on budget.
  4. Custom solutions: AccessORange can work with you to develop custom solutions that are tailored to your specific needs and requirements, such as MetaData migration or other complex migration scenario’s where standard tools are not sufficient. This can include custom integrations, custom applications, and other solutions that can help you get the most out of SharePoint.
  5. Ongoing support: AccessOrange can provide ongoing support and maintenance after your SharePoint migration is complete. This can include technical support, training, and other resources to help you get the most out of SharePoint in the long term.

Overall, working with AccessOrange can provide a range of benefits that can help you achieve a successful SharePoint migration. From expert guidance and support to cost savings and custom solutions, AccessOrange can be an invaluable resource for organizations looking to migrate to SharePoint.

For more information, contact us at [email protected] or chat with us on the website.

Power Automate is a powerful tool that allows users to automate various processes and tasks within their organization. This can help to save time, increase efficiency, and reduce the risk of errors. Some of the key benefits of using Power Automate include the following:

  1. Increased productivity: By automating routine and repetitive tasks, Power Automate can help to free up time for more important and value-added activities. For example, instead of spending time manually entering data into a spreadsheet, Power Automate can be used to automatically transfer data from one system to another, eliminating the need for manual intervention.
  2. Improved accuracy: Automating tasks can help to reduce the risk of errors, as there is no longer a need for manual data entry or other manual processes. This can help to ensure that the data is accurate and consistent, which is important for making informed decisions.
  3. Better collaboration: Power Automate can be used to automate the sharing of information and documents within an organization, making it easier for teams to work together and collaborate. This can help to improve communication and coordination, leading to better outcomes.
  4. Greater flexibility: Power Automate allows users to create custom automated processes that can be easily tailored to their specific needs and requirements. This means that users can design and implement processes that are tailored to their specific business needs, making it easier to adapt to changing circumstances.

Example Use Cases

Some examples of how Power Automate can be used to benefit an organization include the following:

  1. Automating the onboarding process for new employees: Instead of manually collecting and entering information about new hires, Power Automate can be used to automate the process. This can involve sending emails to new employees, updating HR systems with their information, and assigning tasks to the appropriate team members.
  2. Automating the generation of reports: Instead of manually collecting data and creating reports, Power Automate can be used to automatically generate reports on a regular basis. This can involve pulling data from multiple sources, applying any necessary calculations, and formatting the report in the desired format.
  3. Automating the process of sending out marketing emails: Marketing teams can use Power Automate to automate the process of sending out newsletters, promotional emails, and other marketing communications. This can save time and effort, allowing the team to focus on other tasks.
  4. Automating the process of reconciling accounts: Financial teams can use Power Automate to automate the process of reconciling their company’s accounts. This can improve accuracy and reduce the risk of errors, ensuring that the financial data is always up-to-date and accurate.
  5. Automating the process of sending out project updates: Project managers can use Power Automate to automatically send out updates to team members when a project is updated. This can improve collaboration and communication within the team, ensuring that everyone is always up-to-date on the latest project developments.
  6. Automating the process of backing up important data: IT teams can use Power Automate to automate the process of backing up important data. This can ensure that the data is always protected and easily accessible, reducing the risk of data loss in the event of a disaster.
  7. Automating the process of scheduling meetings and appointments: Administrative staff can use Power Automate to automate the process of scheduling meetings and appointments. This can save time and effort, allowing them to focus on other tasks.

License Requirements

To use Power Automate, you must have a valid license. There are different types of licenses available for Power Automate, each of which provides access to different features and capabilities. The specific license you need will depend on your specific needs and how you plan to use the service.

One common license for Power Automate is the Microsoft 365 Business Premium license. This license includes access to Power Automate, as well as other Microsoft products and services such as Office 365, Exchange Online, and SharePoint Online. The Microsoft 365 Business Premium license is suitable for small and medium-sized businesses that want to automate their processes and improve productivity.

Another common license for Power Automate is the Microsoft 365 Business Standard license. This license includes access to Power Automate, as well as other Microsoft products and services such as Office 365 and Exchange Online. The Microsoft 365 Business Standard license is suitable for small and medium-sized businesses that want to automate their processes and improve productivity, but do not need all of the features and capabilities included in the Business Premium license.

Finally, the Microsoft 365 E1 license is another option for Power Automate users. This license includes access to Power Automate, as well as other Microsoft products and services such as Office 365, Exchange Online, and Skype for Business. The Microsoft 365 E1 license is suitable for organizations that want to automate their processes and improve productivity, but do not need all of the features and capabilities included in the Business Premium or Business Standard licenses

In conclusion, Power Automate is a valuable tool for organizations looking to save time, improve productivity, and work more efficiently and effectively. By automating repetitive and time-consuming tasks, it can help teams to focus on more important tasks, improving overall organizational performance.

How can we help?

A Microsoft Partner Such as AccessOrange can help with the development of Power Automate flows in a number of ways.

For example, a we can assist with the design and implementation of Power Automate flows by providing guidance on best practices and offering expertise in specific areas such as data integration, business process automation, and user experience design.

In addition, we can help with the deployment and management of Power Automate flows, including setting up the necessary infrastructure, integrating with other systems, and providing ongoing support and maintenance.

Overall, working with a Microsoft partner such as AccessOrange can help organizations to maximize the value of Power Automate by leveraging the partner’s expertise and experience in implementing and managing these types of solutions.

For more information, contact us at [email protected] or chat with us on our website.

Microsoft 365 offers a range of benefits for businesses, including improved collaboration, enhanced security, scalability, accessibility, and integration with other Microsoft products. These benefits can help businesses operate more efficiently and effectively, leading to better outcomes and improved bottom-line results:

These are the top 5 benefits:

  1. Improved Collaboration: One of the biggest benefits of Microsoft 365 is its ability to improve collaboration among team members. With tools like Microsoft Teams, SharePoint, and OneDrive, employees can easily share documents and collaborate on projects in real time, regardless of their location. This can help teams work more efficiently and effectively, resulting in better outcomes for the business.
  2. Enhanced Security: Another key benefit of Microsoft 365 is its focus on security. The platform uses advanced security measures, such as multi-factor authentication and data encryption, to protect business data from threats like hacking and ransomware. This can give business owners peace of mind and help them comply with industry-specific regulations.
  3. Scalability: Microsoft 365 is a highly scalable platform, which means it can grow with a business as its needs change. Whether a business is small and just starting out, or large and well-established, Microsoft 365 can provide the tools and services it needs to operate effectively.
  4. Accessibility: Microsoft 365 is a cloud-based platform, which means it can be accessed from anywhere with an internet connection. This makes it easy for employees to work remotely and stay connected to the rest of the team. It also enables businesses to respond quickly to changing circumstances and adapt to new challenges.
  5. Integration with Other Microsoft Products: Finally, Microsoft 365 is closely integrated with other popular Microsoft products, such as Excel, PowerPoint, and Outlook. This means businesses can use the tools they are already familiar with, while also benefiting from the added features and functionality of Microsoft 365.

How to Migrate to Microsoft 365

Migrating from your current IT system to Microsoft 365 can bring many benefits to your business, including improved collaboration, enhanced security, and access to a range of powerful productivity tools. Here are some key steps to help you make the transition smoothly:

  1. Plan ahead: Before you start the migration process, take some time to plan out how you will move your data and applications to Microsoft 365. This will help you avoid any disruptions to your business and ensure that the transition goes smoothly.
  2. Choose the right Microsoft 365 plan: Microsoft 365 offers a range of plans to suit different business needs. Choose the plan that best meets your requirements, taking into account the number of users, the type of data and applications you need to migrate, and any specific features you require.
  3. Prepare your data and applications: Before you can migrate to Microsoft 365, you will need to ensure that your data and applications are ready. This may involve cleaning up and organizing your data, as well as updating any applications that are not compatible with Microsoft 365.
  4. Use the Microsoft FastTrack service: Microsoft FastTrack is a free service that can help you plan and execute your migration to Microsoft 365. The service includes a range of tools and resources, as well as expert support to help you every step of the way.
  5. Test and verify: Once you have migrated your data and applications to Microsoft 365, it is important to test and verify that everything is working as expected. This will help you identify any issues and ensure that your business is ready to start using Microsoft 365.
  6. Provide training and support: To ensure that your employees can make the most of Microsoft 365, it is important to provide training and support. This may involve creating training materials, holding workshops, or offering one-on-one support to help your employees get up to speed with the new system.

Choosing a Migration Partner

Working with a Microsoft Partner such as AccessOrange can be a great way to ensure a smooth and successful migration to Microsoft 365. A Microsoft Partner is a company that has been certified by Microsoft to provide a range of services related to Microsoft products, including migration to Microsoft 365.

Here are some key ways in which a Microsoft Partner can help with the migration to Microsoft 365:

  1. Expertise and experience: A Microsoft Partner has the expertise and experience to help you migrate to Microsoft 365 quickly and efficiently. They have extensive knowledge of the Microsoft 365 platform, as well as the tools and processes needed to migrate data and applications seamlessly.
  2. Planning and execution: A Microsoft Partner can help you plan and execute your migration to Microsoft 365, ensuring that your data and applications are migrated smoothly and without any disruption to your business. They can provide guidance on the best approach to take, as well as help you manage the migration process from start to finish.
  3. Support and training: A Microsoft Partner can provide support and training to help you and your employees make the most of Microsoft 365 once it is up and running. This may involve creating training materials, holding workshops, or providing one-on-one support to help your employees get up to speed with the new system.
  4. Cost savings: Working with a Microsoft Partner can help you save time and money on your migration to Microsoft 365. A partner can provide cost-effective solutions and services, as well as help you avoid costly mistakes and ensure that your migration is successful.

Overall, working with a Microsoft Partner can be a great way to ensure a smooth and successful migration to Microsoft 365. A partner can provide the expertise, support, and guidance you need to make the transition smoothly and take full advantage of the many benefits of Microsoft 365.

Want to know more information about migrating to Microsoft 365? Contact us via email at [email protected] or chat with us on our website.