Microsoft Teams has become a central hub for collaboration and communication for millions of people around the world. With the pandemic driving the need for remote work and virtual meetings, Teams has become an essential tool for businesses, schools, and organizations of all kinds. Now, Microsoft has announced a new preview of the Teams interface that aims to make the platform even more user-friendly and customizable.

Cleaner, More Modern Look

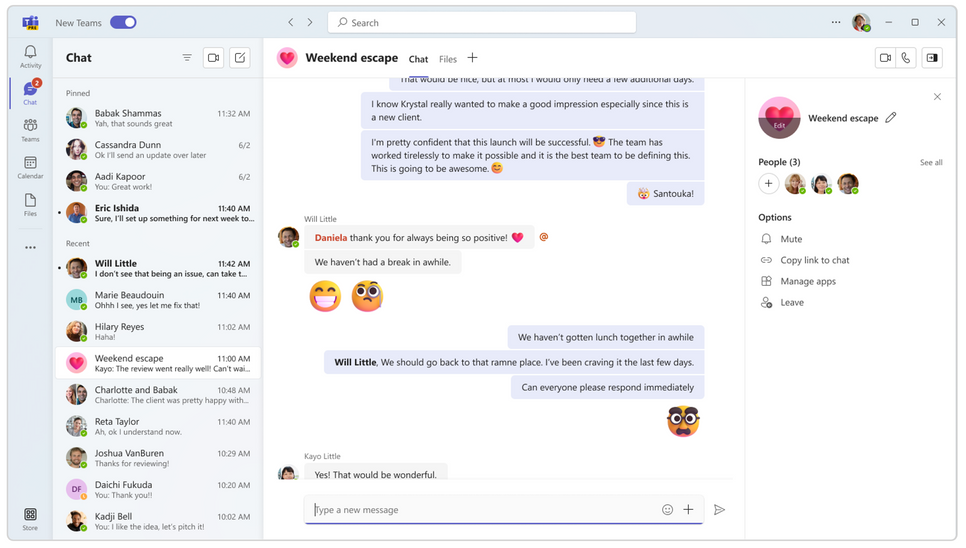
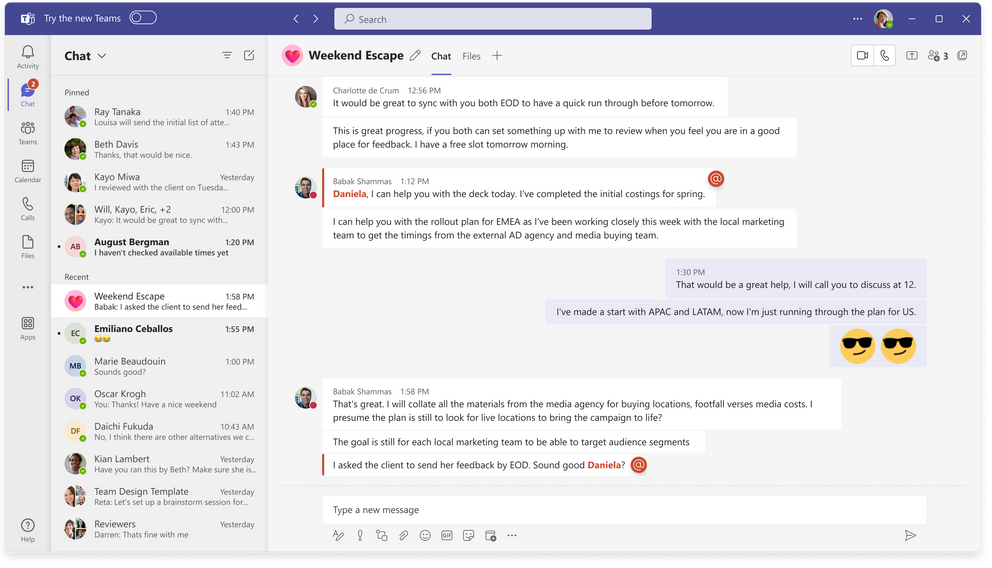
One of the most noticeable changes in the new Teams interface is the cleaner, more modern look. The new interface features more white space and updated icons, making it easier on the eyes and less cluttered. The cleaner look also extends to the chat and channel lists, with less visual noise allowing users to focus on the most important information.

Redesigned Navigation Bar

The new Teams interface is designed to provide users with a more streamlined and efficient experience. One of the most significant changes is the redesigned navigation bar, which allows users to switch between different sections of Teams more easily. The navigation bar now includes icons for the most frequently used sections, including chats, calls, files, and apps. Users can customize the order of these icons to prioritize the features they use most often.

Customizable Views

In addition to the redesigned navigation bar, the new Teams interface includes customizable views. This feature allows users to tailor the layout of their Teams experience to fit their needs. For example, users can choose to display their chat and channel lists side-by-side or collapse them to save screen space. This customization also extends to app access, with users able to directly access third-party integrations from the left-hand rail. This feature makes it easier for users to find and use the apps they need without having to navigate through multiple menus.

Improved Search Functionality

Microsoft has also improved the search functionality in the new Teams interface. Users can now find messages, files, and other content more easily with improved search filters and suggestions. Additionally, Microsoft has made it easier to access keyboard shortcuts, making it faster and more efficient to navigate Teams with the keyboard.

Command Bar

Another significant change in the new Teams interface is the introduction of the command bar. The command bar is a new feature that provides quick access to frequently used commands, such as starting a new chat or creating a new channel. This feature makes it easier for users to perform common actions without having to navigate through multiple menus or use the mouse.

Accessibility Improvements

The new Teams interface is designed to be more user-friendly for people with disabilities. Microsoft has made improvements to the accessibility of Teams, including the ability to customize the contrast and font size of the interface. Additionally, Microsoft has improved the compatibility of Teams with assistive technologies, making it easier for people with disabilities to use Teams to collaborate and communicate.

Multi-Language Support

Microsoft is committed to making Teams a more inclusive and equitable platform for all users. As part of this commitment, Microsoft has made the new Teams interface available in more languages than ever before. The new interface supports over 40 languages, making it easier for users around the world to use Teams in their preferred language.

Improved Account Switching

Collaborating efficiently across organizational boundaries can be a challenge, especially when managing multiple work or school accounts. One major issue is the inability to receive real-time notifications during calls or meetings between different accounts and organizations. Switching between accounts or organizations can also be disruptive, requiring frequent logins and logouts that interrupt workflow.

The new Teams interface addresses these challenges by allowing users to be actively signed into multiple accounts simultaneously and receive real-time notifications regardless of which one is currently in use. This means that users can seamlessly engage with individuals across multiple accounts and organizations without the need to drop out of a call or meeting, ensuring a smooth workflow.

How to get the Preview

The new Teams interface is designed to be more user-friendly, customizable, and accessible. With a redesigned navigation bar, customizable views, and a cleaner, more modern look, the new interface provides a more streamlined and efficient experience for users. The improved search functionality, command bar, and accessibility features make Teams more accessible and efficient for all users, including those with disabilities. The new Teams interface is currently available in preview, with Microsoft planning to roll it out to all users in the coming months. Users can try out the new interface by enabling the “Preview” in the Admin center.

Here is how you can preview the new Teams experience today:

1. Open the Teams desktop app on your Windows machine.

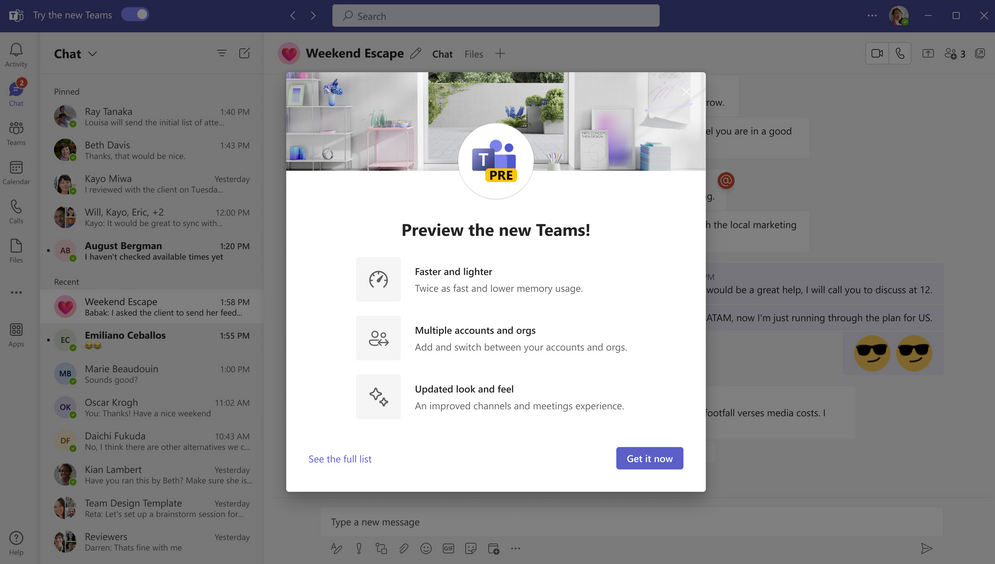
2. Turn on the Try the new Teams toggle at the top left corner of the Teams app.

3. Select Get it now from the pop-out dialogue. The new Teams will start installing.

4. Your Teams app will reboot to open the new Teams experience. Any subsequent actions you take will happen in the new Teams by default, like joining a Teams meeting from Outlook.

With the rise of cyberattacks and data breaches, businesses and individuals are increasingly turning to multi-factor authentication (MFA) to secure their accounts. MFA is a security mechanism that requires users to provide two or more forms of authentication to access an account. One such form of MFA is the use of time-based one-time passwords (TOTP), which provide a unique code that expires after a short period and is generated by an app or device. Microsoft’s Authenticator app is one such app that provides TOTP and other MFA methods. However, not all users have the app installed, and it may not always be feasible to do so. That’s where Outlook’s Authenticator Lite feature comes in.

What is Authenticator Lite?

Authenticator Lite is a feature in Outlook that allows users to complete multi-factor authentication for their work or school account using their iOS or Android device. It provides users who haven’t downloaded the Microsoft Authenticator app with the ability to approve authentication requests and receive TOTP codes in Outlook. This feature brings the security of Authenticator to a convenient location and is especially useful for users who still use telecom transports for authentication.

When Will Authenticator Lite Be Available?

Rollout of this feature in Outlook began in March 2023, starting with public preview. The feature controls are available via MS Graph. It will move to general availability in late April 2023. On May 26th, this feature will be enabled for all users by default unless admins have taken action to disable or enable it before then. Any settings configured before May 26th will not be changed.

How to Enable Authenticator Lite

Admins can enable this feature by leveraging the Authentication Methods policy in Azure Active Directory. Starting mid-March, users can choose to enable this preview for their users from Azure Active Directory. It’s highly recommended to enable users who haven’t yet downloaded the Microsoft Authenticator app (or another strong authentication method) during the public preview.

If the feature is still set to ‘Microsoft managed’ on May 26th, the tenant will be eligible for feature enabling by Microsoft. To prevent automatic enabling, the state should be moved to ‘disabled’ or set user include and exclude groups before the date.

Why Use Authenticator Lite?

While it’s recommended to download the Authenticator app for the most up-to-date security features, Authenticator Lite is an excellent alternative for those who haven’t done so or can’t do so. It provides an additional layer of security to their account, and users can approve authentication requests and receive TOTP codes in Outlook, saving them time and hassle. It’s especially useful for those who still use telecom transports for authentication, as it adds a security enhancement to their existing authentication methods.

Conclusion

Multi-factor authentication is an essential tool in today’s cybersecurity landscape. With Authenticator Lite, Outlook brings the security of Authenticator to a convenient location for users who haven’t downloaded the app. It’s an excellent alternative for those who still use telecom transports for authentication, providing an additional layer of security to their account. Admins can enable this feature by leveraging the Authentication Methods policy in Azure Active Directory, and users can choose to enable this preview from mid-March. With the feature rolling out in public preview in March and moving to general availability in April, now is the perfect time to explore Authenticator Lite and provide additional security to your accounts.

Microsoft 365 Copilot: The Future of AI-Powered Productivity

Feature Examples:

  • Automatically Building a PowerPoint Deck from content
  • Convert Word doc to PowerPoint presentation
  • Excel data manipulation
  • Analyze and reply emails
  • Teams Chat summary and interaction live in meetings and meeting summaries
  • Viva Sales meeting preparation and live in-meeting coaching and putting data directly into CRM
  • Generate a Power Automate workflow
  • Business Chat Demo – Customer interaction summary and generating a SWOT analysis

In today’s fast-paced digital world, productivity is key. Whether you’re a student, a professional, or a small business owner, you need to be able to get things done quickly and efficiently. That’s where Microsoft 365 Copilot comes in. This AI-powered feature is designed to provide personalized assistance and automate tasks within the Microsoft 365 suite of applications. In this article, we’ll explore the features and benefits of Microsoft 365 Copilot, and take a closer look at how it works.

What is Microsoft 365 Copilot?

Microsoft 365 Copilot is an AI-powered feature that provides personalized assistance to users within the Microsoft 365 suite of applications. It uses natural language processing (NLP) and machine learning algorithms to understand user queries and provide real-time assistance. Copilot is currently in preview and is available to a limited number of users.

Introduction Video about Microsoft 365 AutoPilot

How Does Microsoft 365 Copilot Work?

Microsoft 365 Copilot works by analyzing user behavior and preferences within Microsoft 365 applications. It uses NLP to understand user queries and provide personalized assistance based on the context of the query. For example, if a user types “How do I format a document?”, Copilot will analyze the query and provide step-by-step instructions on how to format a document.

Copilot can also automate certain tasks within Microsoft 365 applications. For example, if a user is working on a document and wants to add a table of contents, they can simply type “Add table of contents” and Copilot will automatically generate a table of contents based on the headings in the document.

Benefits of Microsoft 365 Copilot

Microsoft 365 Copilot offers a number of benefits to users, including:

  1. Increased productivity: Copilot can help users complete tasks more quickly and efficiently, reducing the time and effort required to perform certain tasks within Microsoft 365 applications.
  2. Personalized assistance: Copilot can learn from a user’s behavior and preferences to provide personalized assistance and recommendations.
  3. Real-time assistance: Copilot can provide real-time assistance to users as they work in Microsoft 365 applications, helping them complete tasks more quickly and efficiently.
  4. Task automation: Copilot can automate certain tasks within Microsoft 365 applications, reducing the need for manual input and reducing the risk of errors.
  5. Multilingual support: Copilot can support multiple languages, making it accessible to users around the world.

What Tasks Can Microsoft 365 Copilot Help With?

Microsoft 365 Copilot can help with a variety of tasks within the Microsoft 365 suite of applications, including:

  1. Document formatting: Copilot can provide step-by-step instructions on how to format a document, including adding headings, tables, and images.
  2. Presentation creation: Copilot can provide suggestions and recommendations for creating effective presentations, including slide design and content.
  3. Email management: Copilot can help users manage their emails more efficiently, including organizing emails, setting up filters, and composing emails.
  4. Spreadsheet creation: Copilot can help users create spreadsheets and perform calculations, including generating charts and graphs.
  5. Task management: Copilot can help users manage tasks and deadlines, including setting up reminders and creating to-do lists.

A few examples:

Microsoft Teams: Copilot can set meeting agendas and schedules. But it will also be an effective decision-maker as the chatbot can list the pros and cons of any discussion and suggest the next steps.

Microsoft Word: Copilot can create a first draft for you based on a prompt. Thanks to Microsoft Graph in the background, Copilot can include content from collaborative documents across the organization. It can even tweak the document to sound professional or casual.

Microsoft Excel: Copilot can work with natural language prompts to give answers that earlier needed complex formulas. You can ask it to show you different visualizations, projections, and give recommendations without changing the spreadsheet.

Microsoft PowerPoint: Copilot can use your outline or a Word document and auto-generate a slide deck. With simple commands, you can simplify longer presentations.

Microsoft Outlook: Besides quickly answering routine emails, Copilot can pull discussions from email threads and content across Microsoft 365. Copilot will also allow you to adjust the tone and length of your responses.

Business Chat: This new service taps into your calendar, emails, chats, documents, meetings, and contacts. You can boost your collaboration by using it as a single-window solution for your queries on projects and plans.

Is Microsoft 365 Copilot Right for You?

Microsoft 365 Copilot is designed to help users be more productive and efficient within the Microsoft 365 suite of applications. If you’re someone who spends a lot of time working in Microsoft 365, Copilot may be a helpful tool for you. However, if you’re someone who prefers to work without assistance, or if you’re concerned about the security implications of an AI-powered feature.

Microsoft 365 Copilot currently is only available to a limited set of customers, but you can expect it to come to your Microsoft 365 account soon.

Stay tuned for more information!

Dynamics 365 Sales provides businesses with a centralized platform to manage their customer interactions, account information, and sales processes. With Dynamics 365 you can keep track of your customer accounts and contacts by allowing your team to store and access all customer-related data in one place.

In Dynamics 365 Sales it is possible to link contacts to accounts. This feature allows you to associate individual contacts with their respective customer accounts, allowing for a more comprehensive view of customer interactions and relationships.

By linking contacts to accounts, you can easily access information about an individual contact’s role within their company, as well as view a complete history of interactions with the entire organization. This information you can use to personalize interactions with customers, track the progress of opportunities and deals, and make informed decisions about future sales and marketing efforts.

Unfortunately, the process of linking contacts is a manually process, where the user who creates the contact have to manually select to which account it belongs. This manual process is time consuming, and often is forgotten along the way, making your CRM database less effective.

Therefore we have come up with a solution to automatically link your customer contacts to your accounts via Power Automate!

The solution to automatically link your contacts to your accounts with Power Automate

First of all, we assume that all your contacts have an email address, and that your customers all have a unique email domain (which should be reasonable!). We will use this email address to build a relationship between your Account and the related contacts.

First of all, we will create a custom field called “email domain” under our account card. Here is an example:

In this field, we will input the email domain of the customer. This will be used in our Power Automate script to link all the individual contacts to the Account master.

Step 1 – Create custom field for email domain

Go to Advanced Settings

Under Settings, click Customizations

Click Customize the System

Under the customization screen, find the entity Accounts and go to Fields

Here we will add our new email domain field by clicking on New 

Create the field name, and configure the settings as below

Click Save & Close and return to the previous screen

Now we will go to the Forms section and add our custom field to the accounts form

Note that you can also add the field on other forms if you want, for example the Account Quick Create, so when your sales team creates a new account via outlook, they also will be able to enter the domain field there.

Find your email domain field on the right and drag it to the location you want to have it on the form.

Click Save and Close

Click Publish All Customizations

Now you have the email domain field on your account card, where you can enter the email domain of the customer!

After this step we can now move on to the Power Automate Script.

Step #2 – Power Automate Script to Link Contacts to Accounts

Go to Power Automate and create a new flow

Click Build your Own

We will use a scheduled trigger to keep things simple, so every day our new contacts will be linked to their master account.

Go into the flow and start adding the next step

Next we need to filter out all the accounts where the email domain is not empty:

Next is we need to create an Apply to Each loop so we loop through all the records that we found. We can simply start by adding a Compose to our next step, which will automatically create the loop. We can put our email domain field in the compose.

Next, we want to handle multiple entries in the email domain field. We imagine that some accounts may have multiple email domains, hence we will fill them in under the new field as: domain1.com,domain2.com,domain3.com.

In order for our power automate to process them all, we need to first split our field into separate variables and then loop through them. We first split the string into an array by doing a compose with a split command.

After that we will create another loop by creating an Apply to each on the compose output.

Now we have created the loop neccesary for going through all the acounts and all respective email domains.

The next step is to retrieve all the contacts that have the current selected domain in their email address, and are not yet linked to the Account.

We can do that with a Dataverse List Rows command, and a filter.

Now we have all the contacts that are not yet linked, so we can loop through them and link them.

We start with creating an Apply to All by adding a Compose (the easy way to create an apply to all)

Next we do a quick check if the Contact has not been linked to another account already. (As sometimes maybe user may have an email from a domain linked to customer A, but somehow may still be related to another account in your Dynamics, so we need to check if he/she has not been linked already to another account)

If the Parent Customer ID Value is null, it means the contact is not yet linked and we can proceed with linking it to our Account via a Dataverse Relate action.

We add one more Send Email flow to inform ourselves of a succesful link.

And we are done!

Now we can run the flow and we can see that all the contacts with the same email domain have been succesfully linked:

Complete Flow

Here is a screenshot of our entire flow:

Questions? Leave a message below.

We can also help you build this (and other) flows. Contact us via [email protected] if you need assistance with Power Automate or Dynamics 365 Sales.


AccessOrange wishes you a prosperous and blissful Year of the Rabbit.

Thank you for your support!

祝您新的一年鴻兔🐇大展!

Have you ever had to prepare a presentation that needed to include PowerBI charts & graphs? You probably ended up making screencaps of your PowerBI charts, and copying them in to your PPTX as a picture, since there as no decent way to embed a PowerBI report directly in PowerPoint… Until now!

Recently, Microsoft Announced the feature to embed live PowerBI reports into your presentation, with the possibility to refresh your data as well! No wasted time spent on updating your sales presentation whenever the sales data got updated.

Embed your PowerBI report in Powerpoint in 2 easy steps:

Step 1 : Get PowerBI Report Page URL:

Open your PowerBI Report via Powerbi.com, and click on the share button

Choose the permissions you want to grant and who you want to grant them to, and click on PowerPoint.


Click on Copy to copy the report page link.

Step 2: Embed the PowerBI report in PowerPoint

Open your PowerPoint presentation and click on Insert – PowerBI.

Paste the link you copied from PowerBI, and click insert.

Now you have your PowerBI report embedded in PowerPoint!

You can also refresh your data via the refresh button:

More questions on PowerBI? Let us know!

Dynamics 365 Sales is a customer relationship management (CRM) software solution that is part of the Dynamics 365 suite of business applications. It is designed to help sales teams manage their relationships with customers and prospects and streamline sales processes. With Dynamics 365 Sales, salespeople can access customer data and interactions from a single platform, track sales activities and opportunities, automate tasks, and collaborate with other team members and departments.

Dynamics 365 can be used by Microsoft Power Automate to automate almost anything within Dynamics 365. Dynamics 365 and Power Automate together, make a great combination for further enhancement of your sales process.

In this example we will teach you how to use Power Automate to send a message to your sales staff via Microsoft Teams when a price change has been detected in a Dynamics 365 Pricelist.

Step 1: Create new Power Automate Flow

Go to https://make.powerautomate.com/ and click on “Create”, and select “Automated Flow”

Step 2: Enter Flow name and select Dataverse

Give the flow a name, and search for “dataverse” and select “When a row is added, modified or deleted”

Step 3: Configure Trigger that will start up our Flow

On the next screen we will configure the trigger. We will configure the Change Type to “modified” to ensure that the trigger only runs when a price list has been modified.

Table name: Price List Items (as we want to target Price List Changes in this case)

Scope: Organization (We want this flow to run for the entire dataverse organization, not just our user scope)

Step 4: Get details of product thas has been modified in the price list

First we need to get the record of the Product that had a price change. We will add a new action to our flow and search for “dataverse” and select “get a row by ID”

We will select the table name “Products” and for Row ID we will select “Product (Value)”

Step 5: Get Price List Currency

In our case we have price lists with different currencies, hence we will need to retrieve the actual currency of the pricelist.

We do that again with a Dataverse : Get Row by ID and select Currencies and Row ID: Currency (Value)

Step 6: Create Chat Message

Since the Teams “Post message in a chat or channel” is sometimes buggy when it comes to message layouts, it is recommended to draft your message in a compose, and parse the compose to the next step.

Here is our chat  message including a little layout tweaking such as adding <strong> </strong> to make some letters bold.

We want to show the product code, which in our case is a custom field named “Product ID”.  The amount is the local amount from the price list, for which we add the Curency as well in order to be complete.

Step 7: Post Message in a Chat or Channel

Now we can do the final step, which is to post our chat message in a group chat or in a channel. In our case we have a chat specifically for our sales team, where we want to post the message in.

The actual message is the output of our compose in step 6

When you’re done with above, the entire flow should have the following elements:

Now you can test your flow, and (hopefully) it should work. Here is an example of how it looks on our side:

Great Work! Feel free to reach out if you have any issues or questions regarding above flow.

Exchange Online Plan 1 and Microsoft 365 Business Basic are two different subscription plans offered by Microsoft. Both plans offer email and calendar capabilities, but there are some key differences between them that may make one plan more suitable for a business than the other.

Exchange Online Plan 1 is a standalone email and calendar service that is part of the Microsoft 365 suite of products. It is designed for businesses that need a robust email and calendar solution, but do not require the additional productivity and collaboration tools that are included in other Microsoft 365 plans. Exchange Online Plan 1 includes features such as 50GB of email storage, support for email and calendar sharing, and integration with Microsoft Outlook and other email clients.

Microsoft 365 Business Basic, on the other hand, is a comprehensive productivity and collaboration suite that includes Exchange Online Plan 1 as well as other tools such as Microsoft Word, Excel, PowerPoint, and OneDrive. It is designed for small and medium-sized businesses that need a full suite of productivity and collaboration tools to help them work more efficiently and effectively. In addition to email and calendar capabilities, Microsoft 365 Business Basic also includes tools for document creation and sharing, online meetings and video conferencing, and team collaboration.

One of the main differences between Exchange Online Plan 1 and Microsoft 365 Business Basic is the scope of features and tools included in each plan. Exchange Online Plan 1 is a standalone email and calendar service, while Microsoft 365 Business Basic is a comprehensive suite of productivity and collaboration tools. This means that if you are a business that only needs email and calendar capabilities, Exchange Online Plan 1 may be a better fit for you. However, if you need a full suite of tools to help your business run more efficiently and effectively, Microsoft 365 Business Basic may be a better choice.

Another difference between the two plans is the pricing structure. Exchange Online Plan 1 is typically offered as a monthly or annual subscription, while Microsoft 365 Business Basic is typically offered as an annual subscription. This means that if you choose Microsoft 365 Business Basic, you will need to pay for the full year upfront, while with Exchange Online Plan 1 you have the option to pay on a monthly or annual basis.

Exchange Online Plan 1 and Microsoft 365 Business Basic are two different subscription plans offered by Microsoft that cater to different needs and budgets. Exchange Online Plan 1 is a standalone email and calendar service that is suitable for businesses that only need these capabilities, while Microsoft 365 Business Basic is a comprehensive suite of productivity and collaboration tools that is suitable for small and medium-sized businesses that need a full range of tools to help them work more efficiently and effectively.

Making the right choice for your business

Your business should consider choosing Exchange Online Plan 1 over Microsoft 365 Business Basic if they only need email and calendar capabilities and do not require the additional productivity and collaboration tools offered by Microsoft 365 Business Basic. Exchange Online Plan 1 is a standalone email and calendar service that is part of the Microsoft 365 suite of products and is designed specifically for businesses that only need these capabilities.

That being said, Microsoft 365 Business Basic is a comprehensive productivity and collaboration suite that includes Exchange Online Plan 1 as well as other tools such as Microsoft Word, Excel, PowerPoint, and OneDrive. It is designed for small and medium-sized businesses that need a full suite of tools to help them work more efficiently and effectively. If a business requires a full range of productivity and collaboration tools in addition to email and calendar capabilities, Microsoft 365 Business Basic may be a better fit.

In general, the choice between Exchange Online Plan 1 and Microsoft 365 Business Basic will depend on the specific needs and budget of the business. If a business only needs email and calendar capabilities, Exchange Online Plan 1 may be a more cost-effective option. However, if a business needs a full suite of productivity and collaboration tools, Microsoft 365 Business Basic may be a better choice. It is important for businesses to carefully evaluate their specific needs and budget when deciding between these two subscription plans.

Please see below table for a more complete overview of the differences between each edition.


(Microsoft prices per 12-2022. Contact us to get the best deal for your organization!)

Want to know more? Contact us at [email protected] and we’ll have one of our consultants discuss with you what is the best option for your organization.