Tag Archive for: Dynamics 365

In Dynamics 365 Sales, duplicate detection exists but only works at an individual level, for example, when a lead is converted or a new account is created.

Unfortunately, there’s no out-of-the-box solution to automatically detect duplicates in bulk across the system. This limitation can lead to data inaccuracies, especially as your organization grows.

To overcome this challenge, I created a Power Automate flow that finds and merges duplicate accounts automatically.

In this article, I’ll walk you through how to create this flow, and you can adapt it for your own needs.

Flow overview:
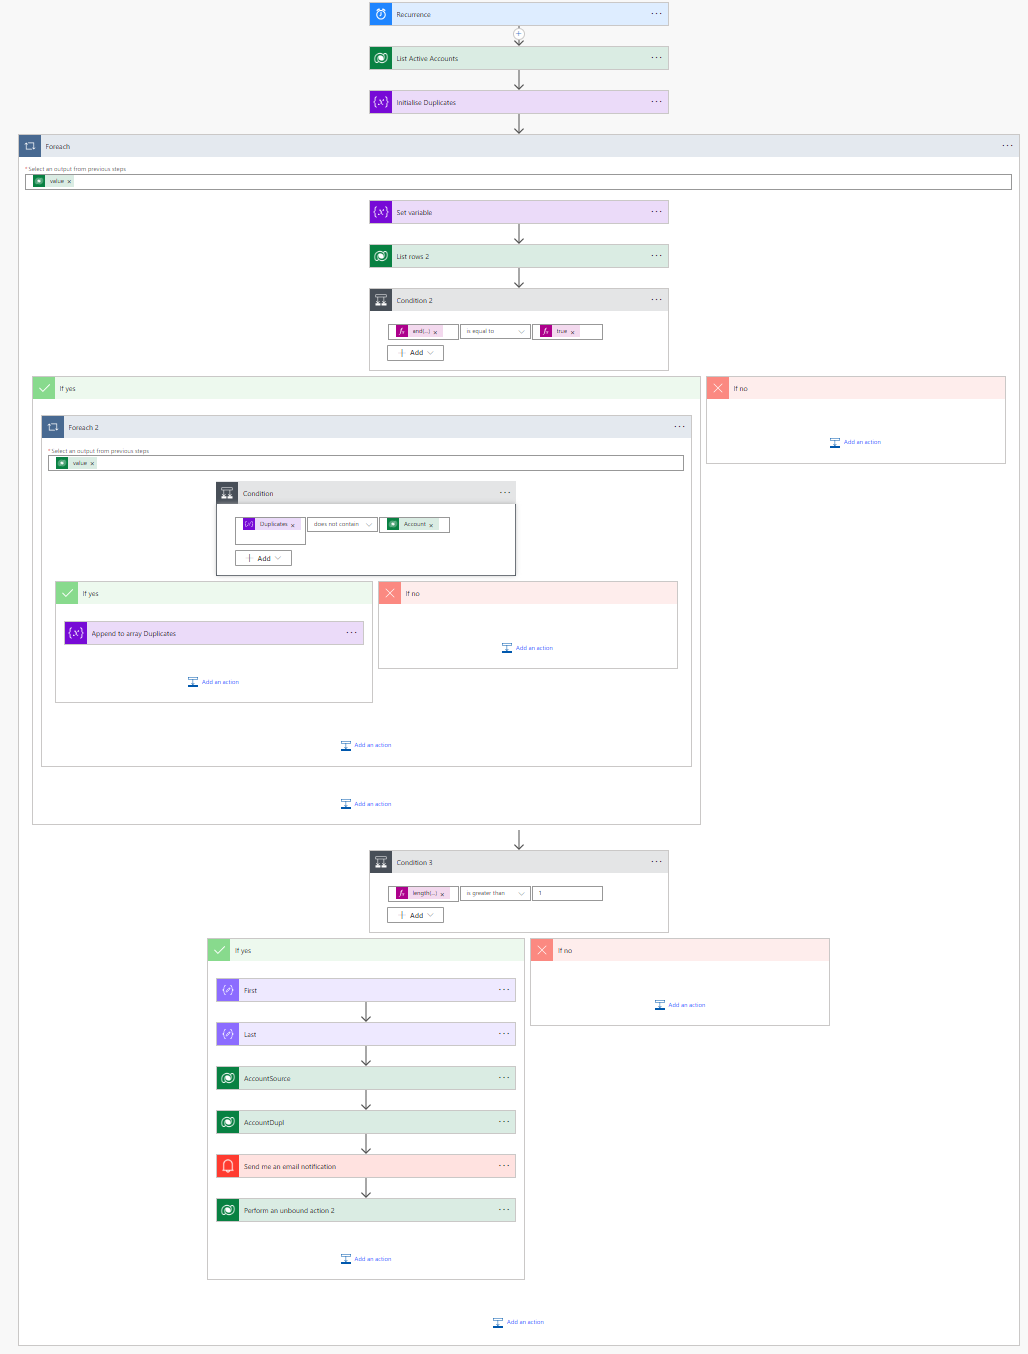
(Apologies, I have not renamed some of the foreach and conditions, but I think you will understand 🙂 )

Step-by-Step Guide to Creating the Flow

Step 1: Set up the Trigger

The first step is to set up the trigger for the flow. We want this flow to run on a regular schedule to detect duplicates. Use the Recurrence trigger to specify how frequently the flow should run (e.g., daily or weekly).

Step 2: Query Accounts from Dataverse

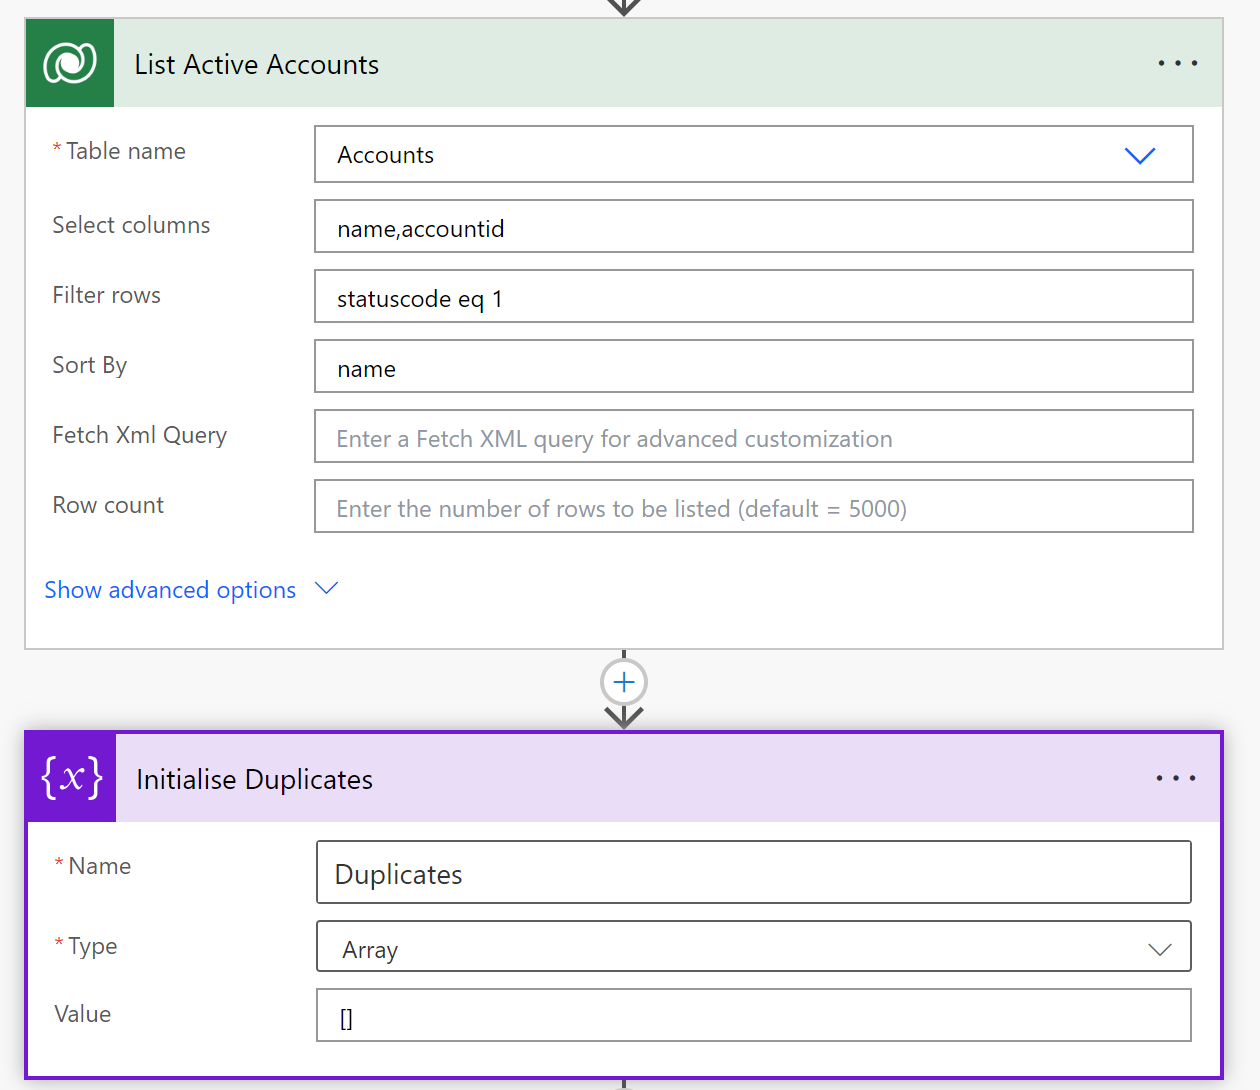
Next, add an action to list all accounts from the Dataverse. This will retrieve all active accounts so that we can compare them and detect duplicates.

  • Action: Use List Rows from the Dataverse connector.
  • Filter: You can filter for only active accounts or specific criteria that make sense for your business.
  • Also initialize the variable Duplicates here as an array
Step 3: Identify Duplicate Accounts

Once the accounts are retrieved, you need to compare the names or other unique fields to detect duplicates.

  • Use a loop to go through each account and check for duplicate names.
  • Clear the array variable Duplicates
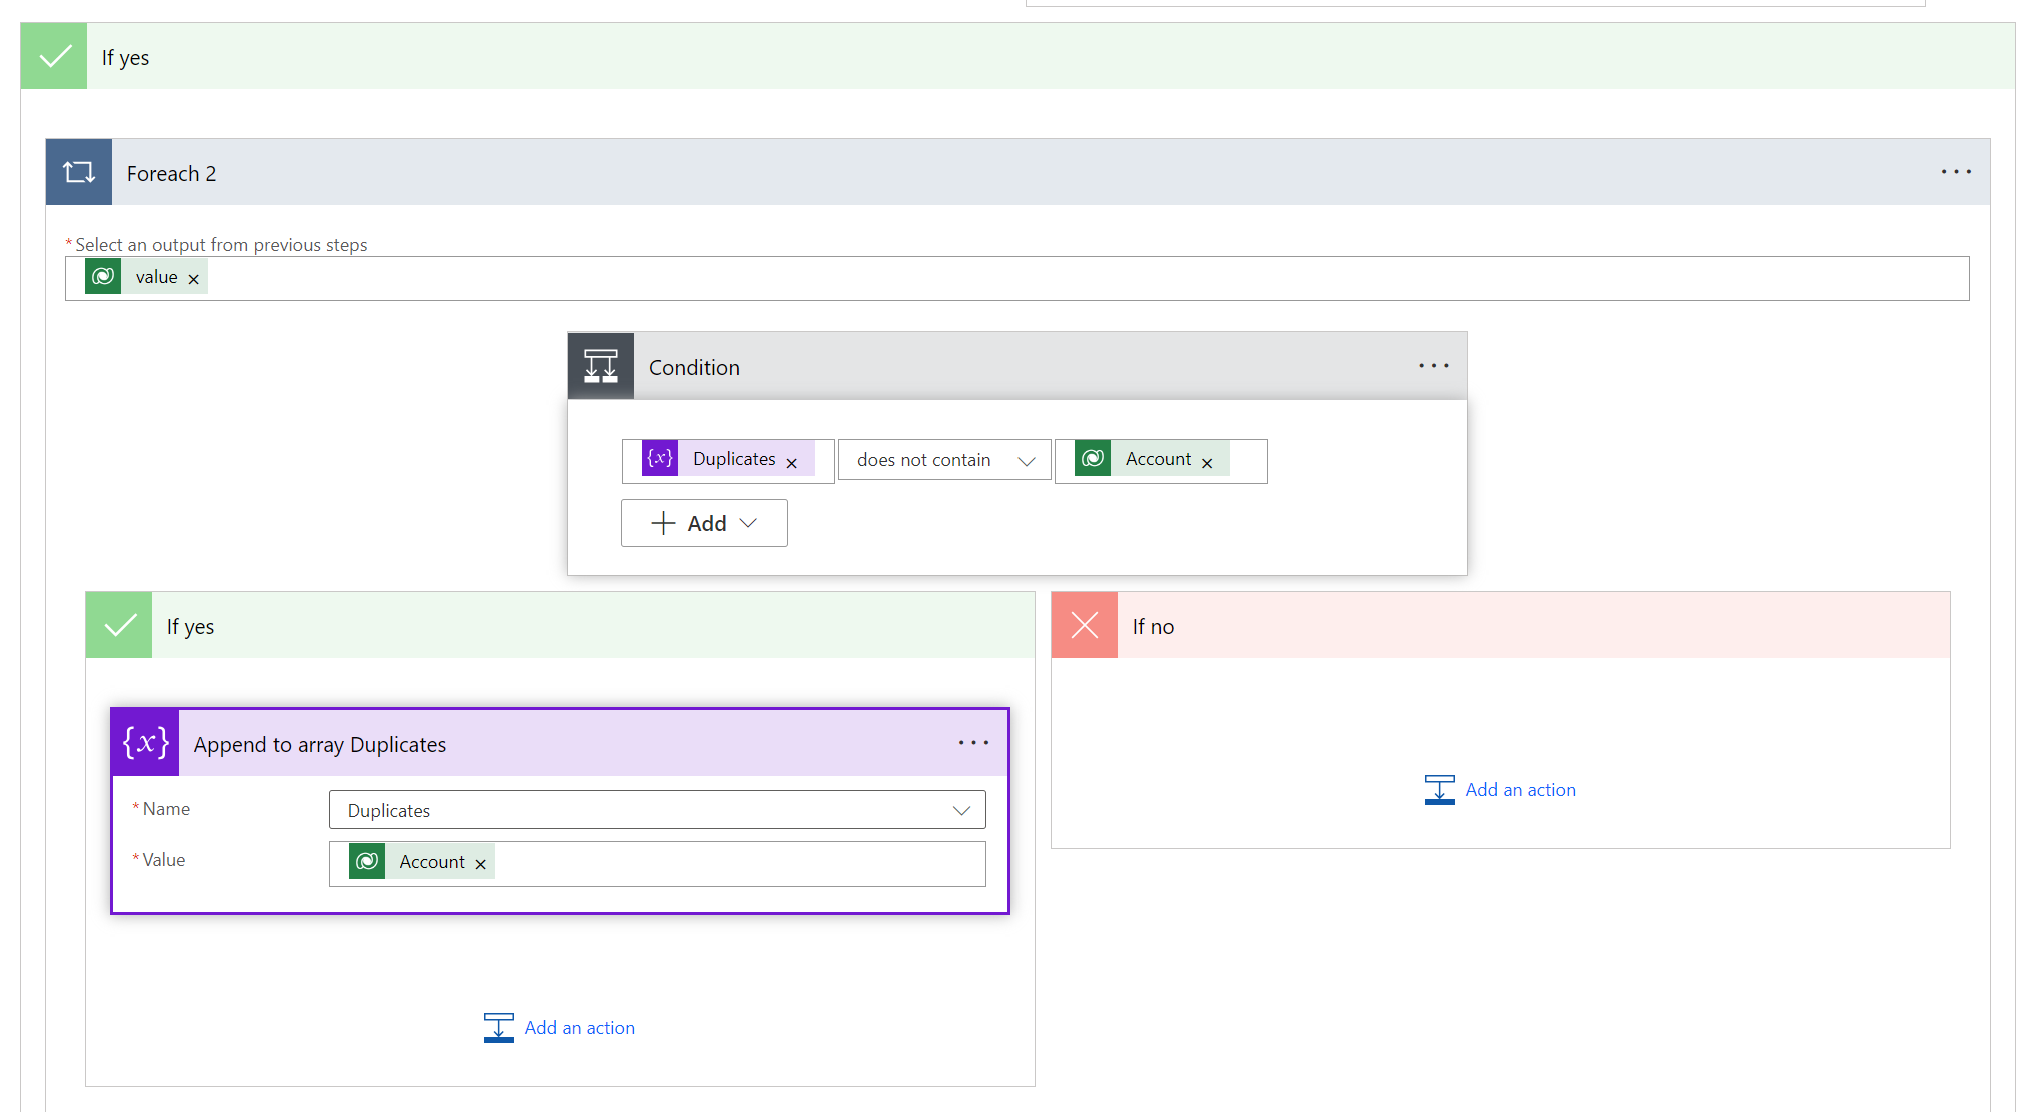
  • Implement a condition in the flow to identify if two or more accounts share the same name.
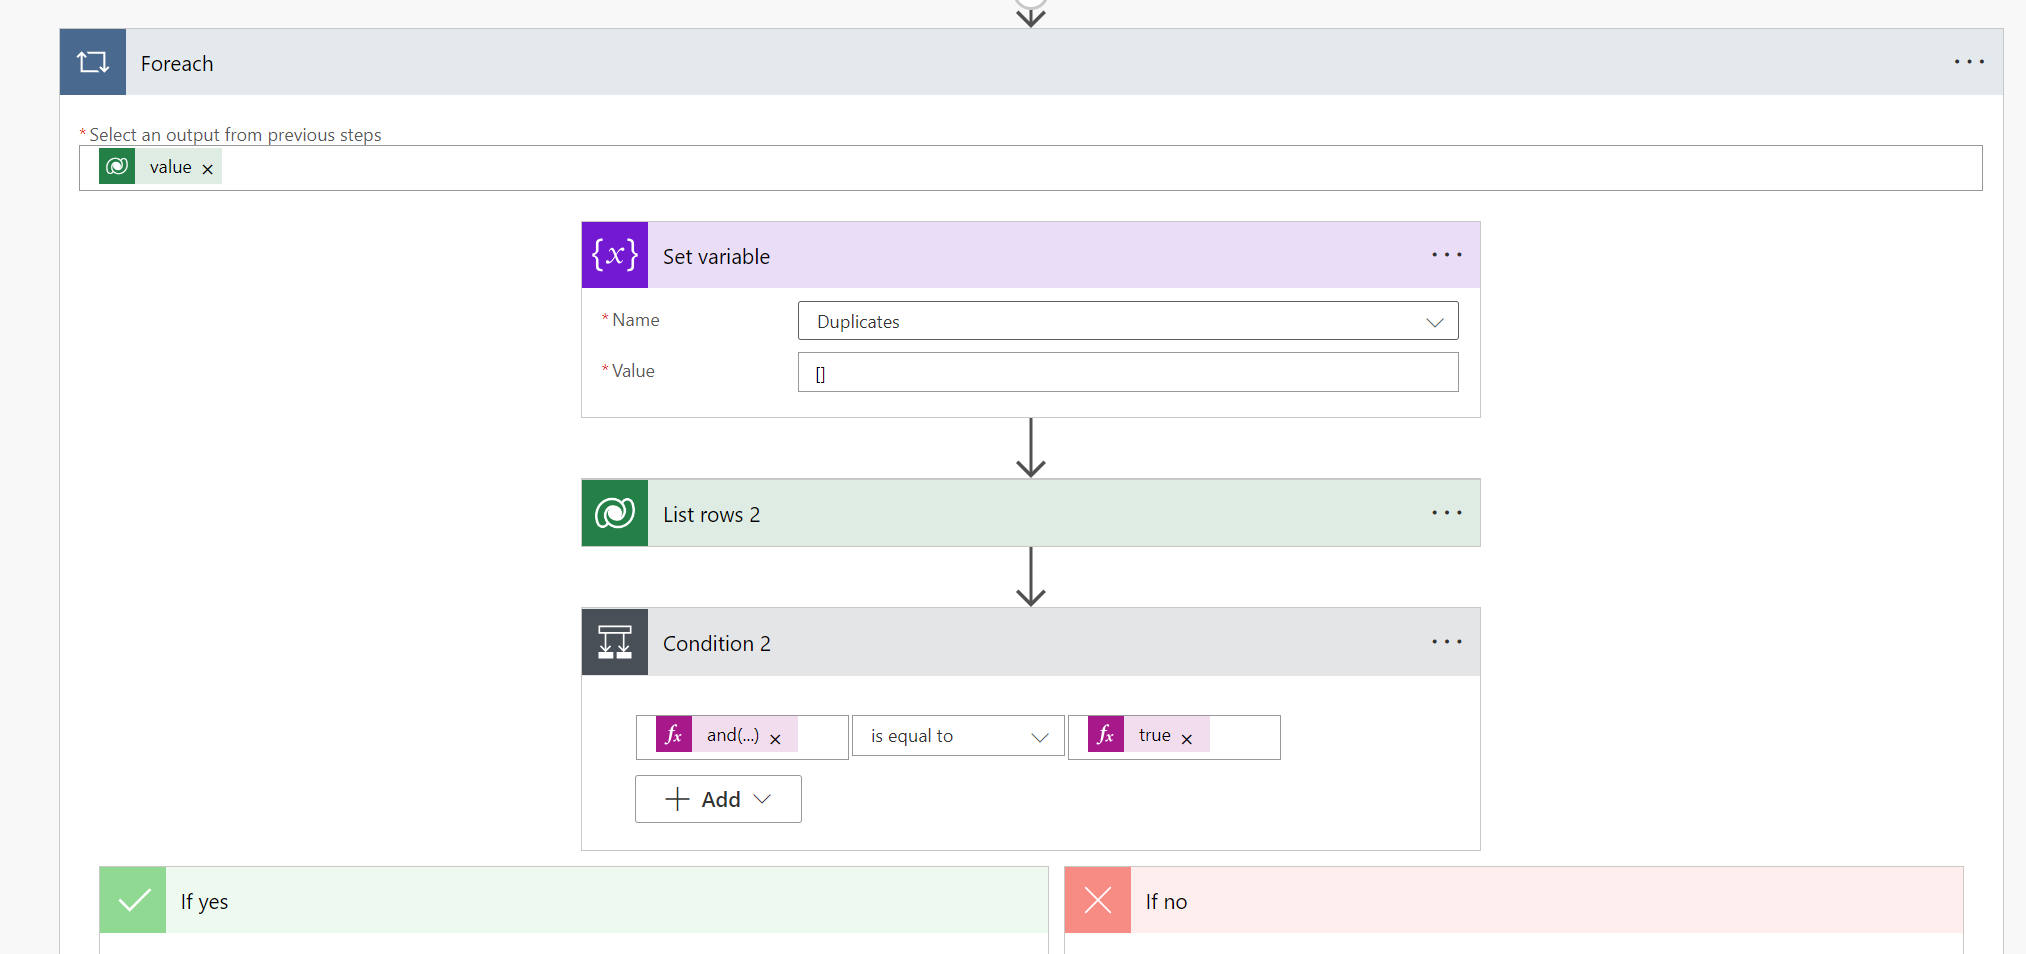
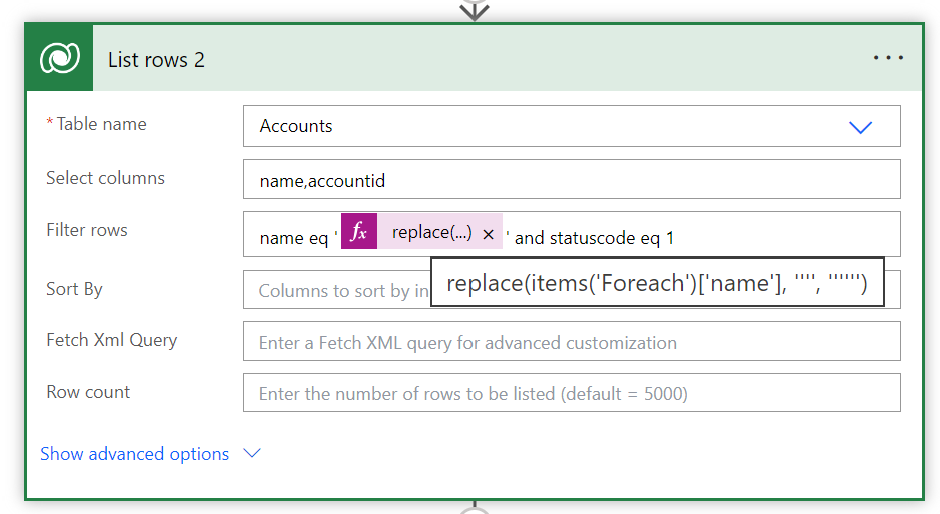
The Replace() is used to fix the acounts that have the character inside their name, to not break the odata filter.

Condition:

and(greater(length(outputs(‘List_rows_2’)?[‘body/value’]), 1))
If any duplicate is found (YES under condition), add the Account ID to the Duplicates array

Step 4: Merge the Duplicates

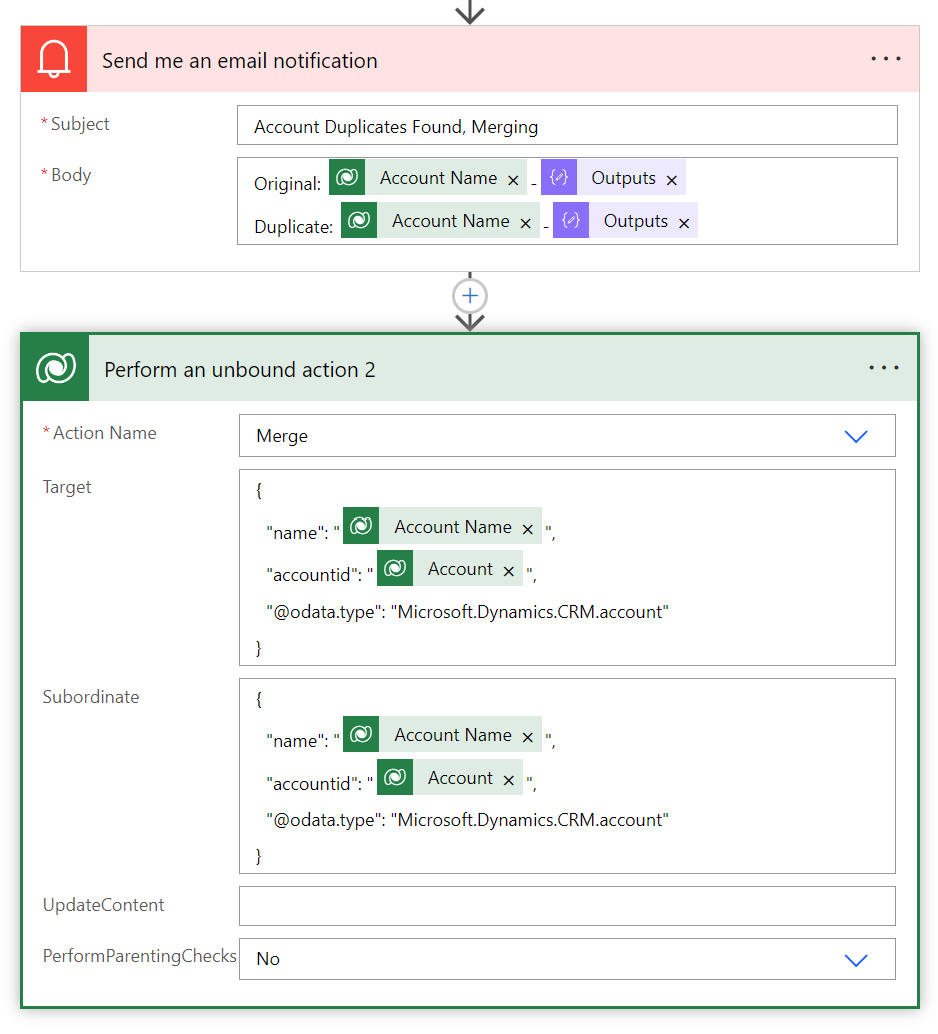
Once duplicates are identified, use Dataverse’s Unbound Action to merge the duplicate accounts. The unbound action allows you to merge records within Dataverse without having to handle the data manually.

  • Action: Use the Perform Unbound Action step from the Dataverse connector.
  • Target: The original account and the duplicate account.
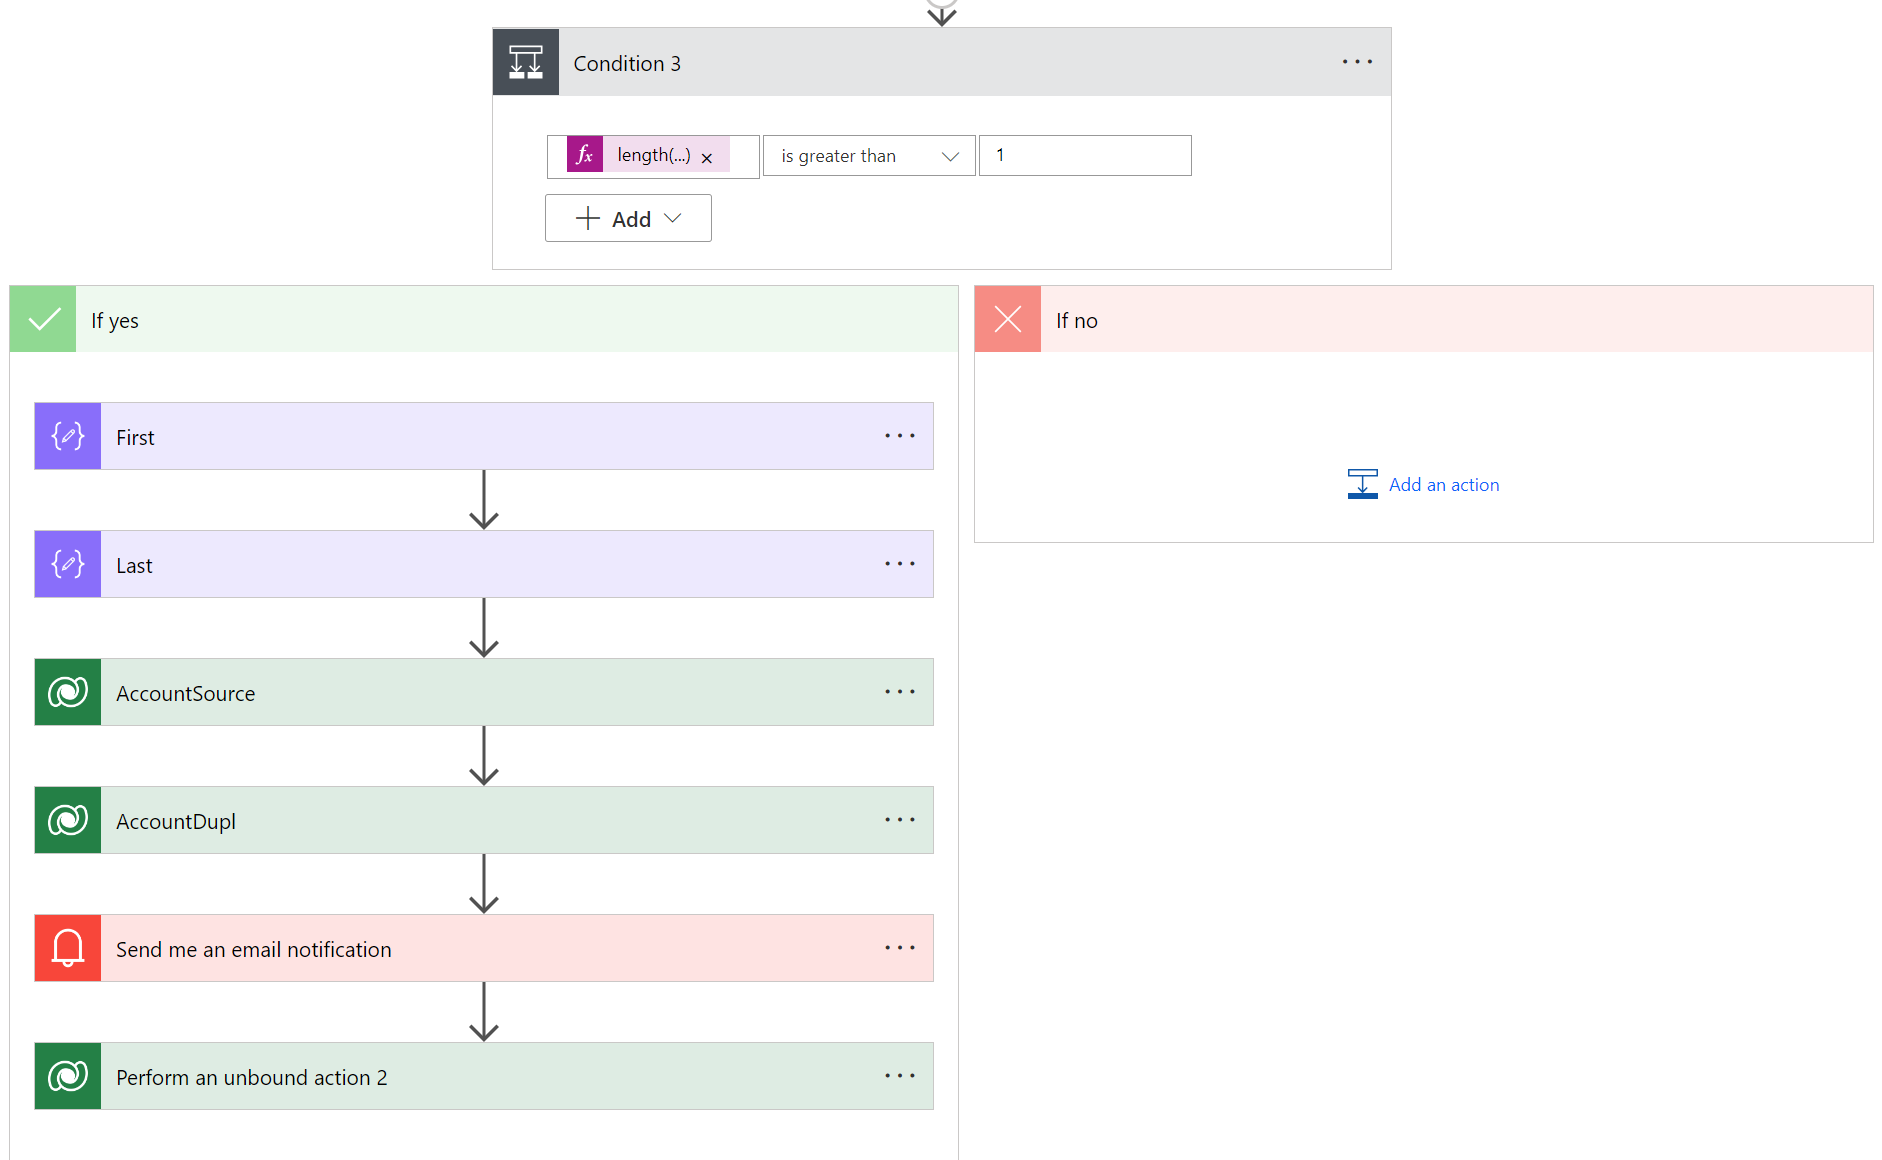
Condition 3: (meaning one or more duplicates have been found)

length(variables(‘Duplicates’))
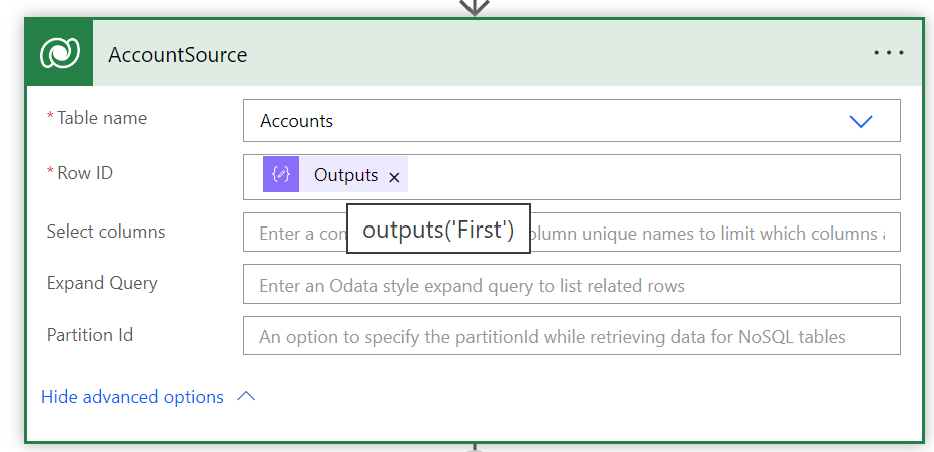
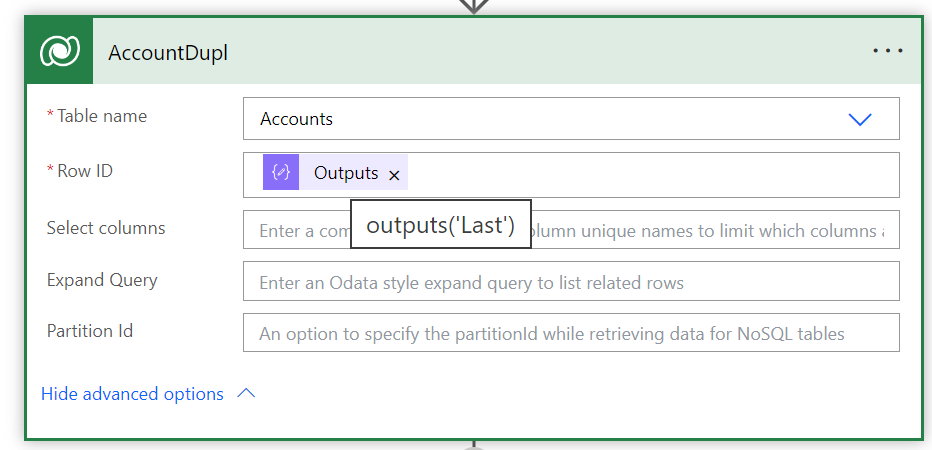
If YES, then take the first and the last account:
(Because you can only merge 2 accounts at the same time)
Get the first Account:
Get the last duplicated account:
Send me an email notification, and then do an Unbound Action (Merge):
That’s it, our entire flow is ready:
AccessOrange is a leading Microsoft Partner that specializes in Microsoft 365, Dynamics 365 and Azure to help our customers work smarter.
If you need help with building this flow in your own environment, leave your contact information below, and we will contact you as soon as possible.

"*" indicates required fields

This site is protected by reCAPTCHA and the Google Privacy Policy and Terms of Service apply.
This field is for validation purposes and should be left unchanged.

Introduction 

Microsoft 365 is a powerful suite of cloud-based productivity and collaboration tools that can help you run your business efficiently and securely. But did you know that you can also leverage the power of Dynamics 365 and Copilot AI to take your customer relationship management (CRM) and marketing to the next level? 

Dynamics 365 is a set of intelligent business applications that integrate seamlessly with Microsoft 365 and enable you to manage your sales, customer service, marketing, and more. Copilot AI is a feature of Dynamics 365 that uses artificial intelligence (AI) to assist you with tasks such as generating leads, creating proposals, and following up with customers. 

In this blog, we will explore the benefits of using Dynamics 365 and Copilot AI for CRM and marketing, and how they can help you grow your business and delight your customers. 

Benefits of Dynamics 365 for CRM and marketing 

Dynamics 365 offers a range of solutions that can help you manage and optimize your customer interactions and marketing campaigns. Some of the benefits of using Dynamics 365 for CRM and marketing are: 

  • Unified data and insights: Dynamics 365 connects with Microsoft 365 and other data sources to provide you with a holistic view of your customers and prospects. You can access and analyze data from multiple channels, such as email, social media, web, and phone, and gain insights into customer behavior, preferences, and needs. 

  • Personalized and relevant communication: Dynamics 365 enables you to segment your audience based on criteria such as location, industry, purchase history, and engagement level. You can then tailor your messages and offers to each segment and
  • deliver them through the most appropriate channel and time. You can also use Dynamics 365 to create and track personalized journeys for each customer, and nurture them along the sales funnel. 
  • Automated and streamlined workflows: Dynamics 365 helps you automate and simplify your CRM and marketing processes, such as lead generation, qualification, scoring, and assignment. You can also use Dynamics 365 to create and execute marketing campaigns, such as email, webinars, events, and surveys, and measure their effectiveness and ROI. You can also integrate Dynamics 365 with other tools, such as Outlook, Teams, and Power BI, to enhance your productivity and collaboration. 

Benefits of Copilot AI for CRM and marketing 

Copilot AI is a feature of Dynamics 365 that uses AI to assist you with CRM and marketing tasks. Copilot AI can help you: 

  • Generate more leads: Copilot AI can help you find and connect with potential customers who are interested in your products or services. Copilot AI can scan the web and social media for relevant prospects, and send them personalized messages and invitations to engage with you. 
  • Create better proposals: Copilot AI can help you create professional and persuasive proposals that showcase your value proposition and address your customers’ pain points. Copilot AI can suggest the best content, layout, and design for your proposals, and help you customize them for each customer. 
  • Follow up with customers: Copilot AI can help you stay in touch with your customers and prospects, and ensure that you don’t miss any opportunities or deadlines. Copilot AI can remind you to follow up with customers and suggest the best time and channel to do so. Copilot AI can also help you respond to customer queries and requests, and provide relevant information and solutions. 

Conclusion 

Microsoft 365 is a great platform for running your business, but it can be even better with Dynamics 365 and Copilot AI. By using these tools, you can enhance your CRM and marketing capabilities, and achieve better results and customer satisfaction. Dynamics 365 and Copilot AI can help you: 

  • Access and leverage unified data and insights 
  • Communicate with your customers and prospects in a personalized and relevant way 
  • Automate and streamline your CRM and marketing workflows 
  • Generate more leads, create better proposals, and follow up with customers 

If you want to learn more about Dynamics 365 and Copilot AI, and how they can help you grow your business, contact us at [email protected] and our customer success manager can help you to learn more. 

Dynamics 365 Sales is a customer relationship management (CRM) software solution that is part of the Dynamics 365 suite of business applications. It is designed to help sales teams manage their relationships with customers and prospects and streamline sales processes. With Dynamics 365 Sales, salespeople can access customer data and interactions from a single platform, track sales activities and opportunities, automate tasks, and collaborate with other team members and departments.

Dynamics 365 can be used by Microsoft Power Automate to automate almost anything within Dynamics 365. Dynamics 365 and Power Automate together, make a great combination for further enhancement of your sales process.

In this example we will teach you how to use Power Automate to send a message to your sales staff via Microsoft Teams when a price change has been detected in a Dynamics 365 Pricelist.

Step 1: Create new Power Automate Flow

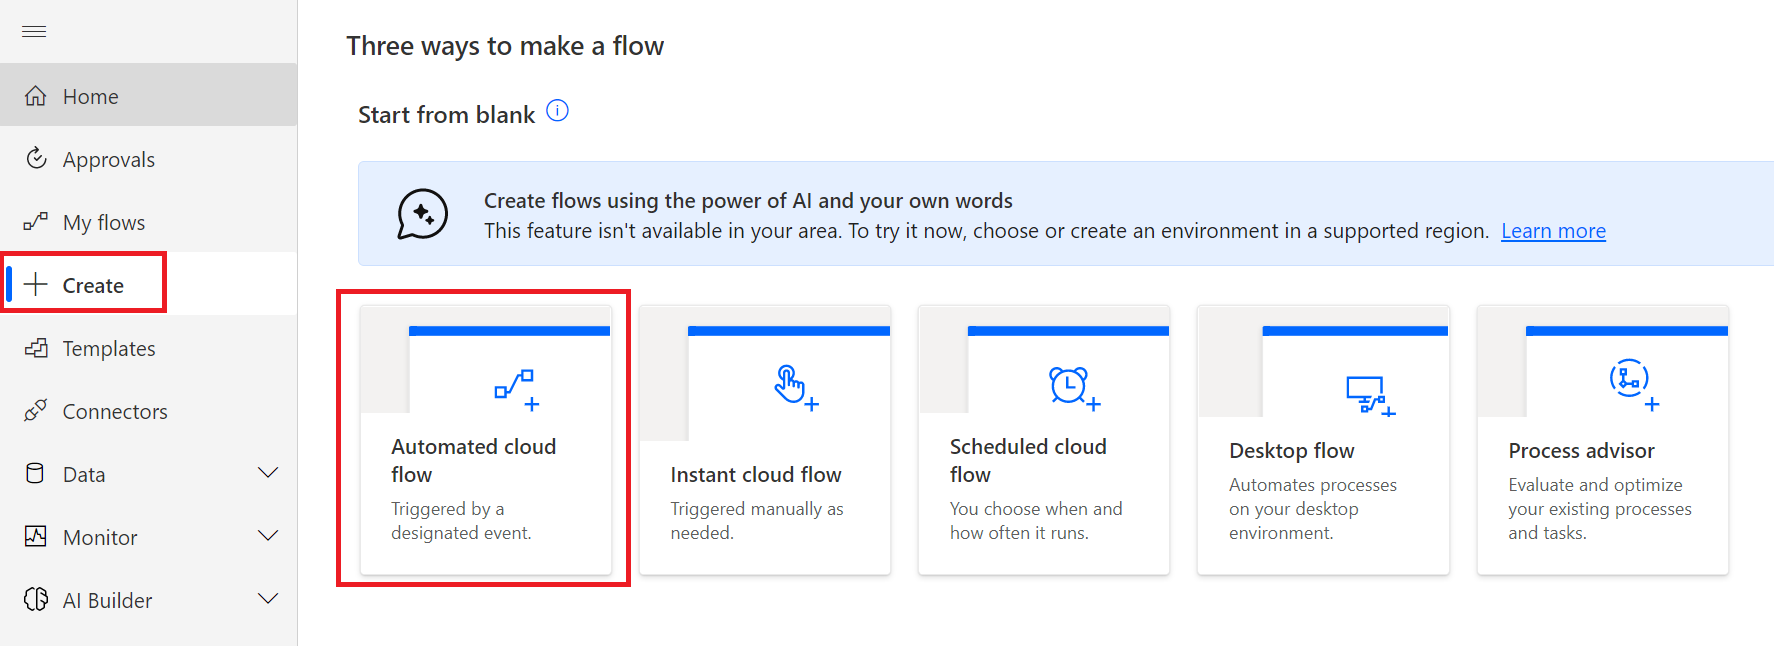
Go to https://make.powerautomate.com/ and click on “Create”, and select “Automated Flow”

Step 2: Enter Flow name and select Dataverse

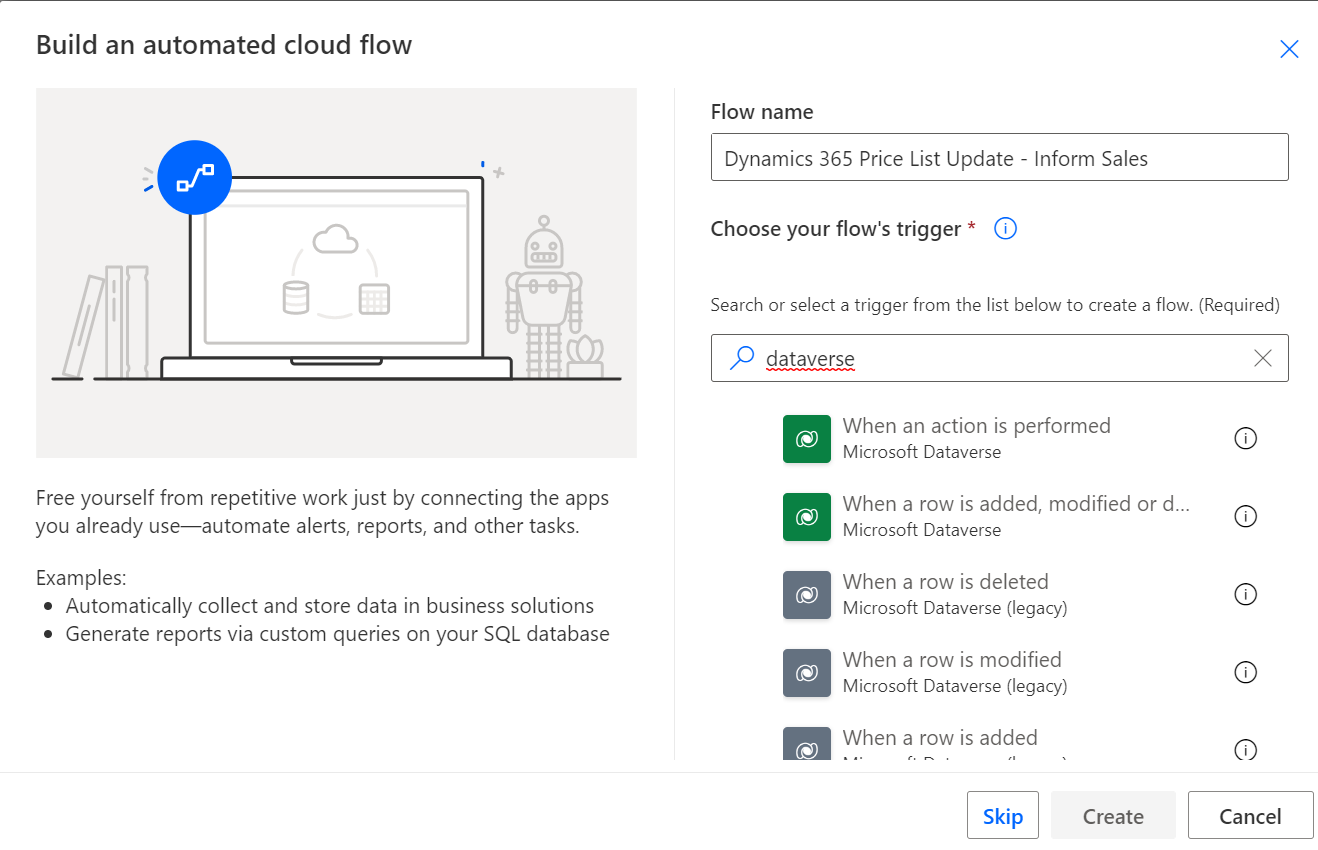
Give the flow a name, and search for “dataverse” and select “When a row is added, modified or deleted”

Step 3: Configure Trigger that will start up our Flow

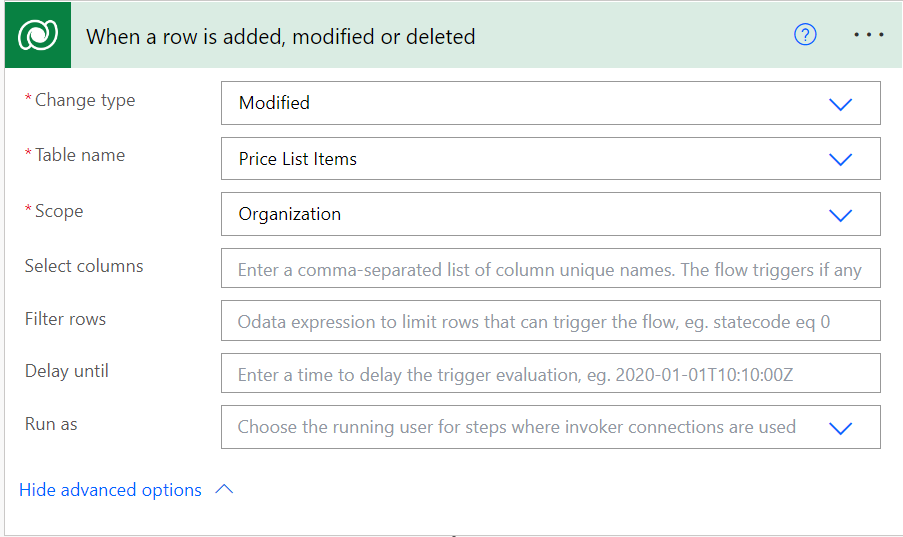
On the next screen we will configure the trigger. We will configure the Change Type to “modified” to ensure that the trigger only runs when a price list has been modified.

Table name: Price List Items (as we want to target Price List Changes in this case)

Scope: Organization (We want this flow to run for the entire dataverse organization, not just our user scope)

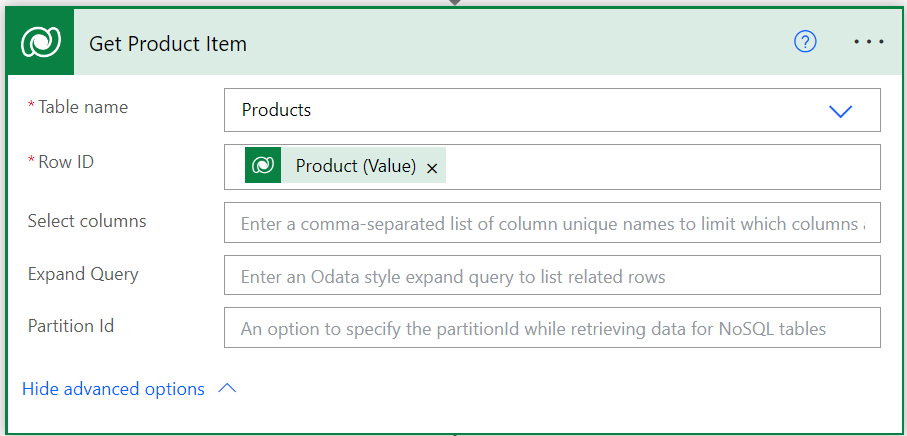
Step 4: Get details of product thas has been modified in the price list

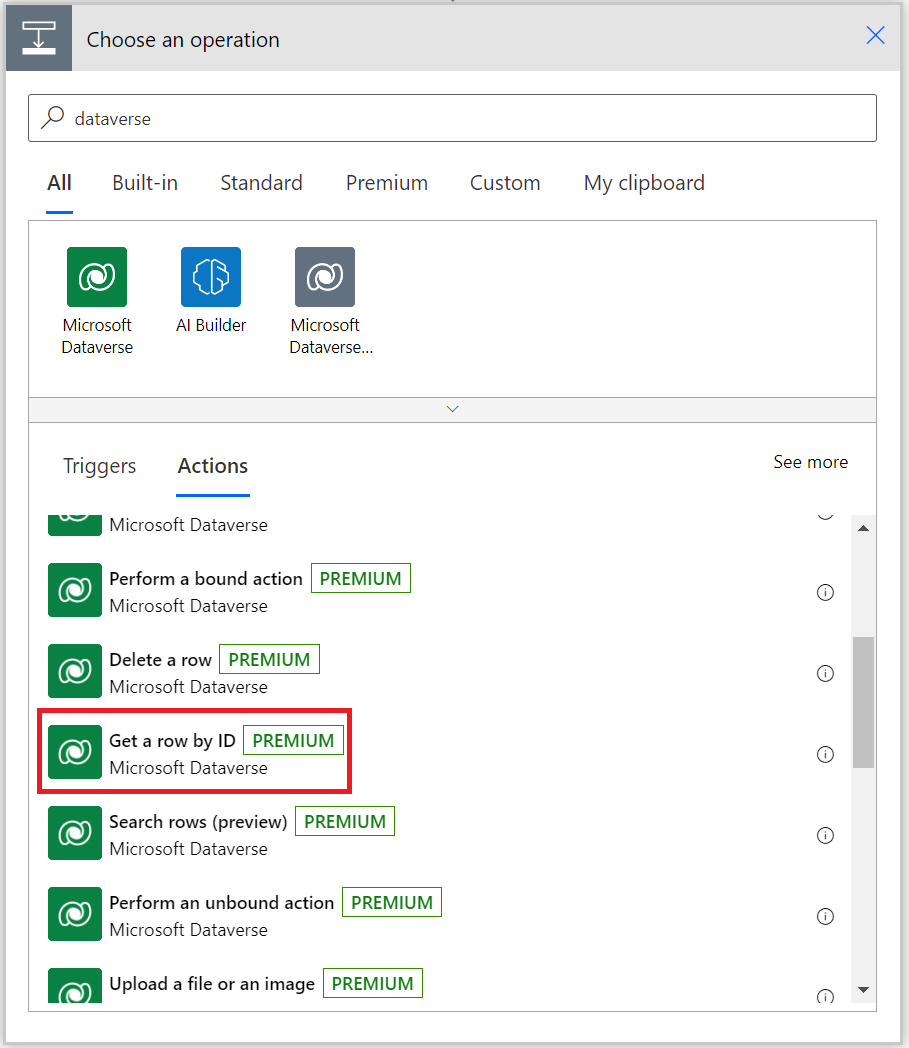
First we need to get the record of the Product that had a price change. We will add a new action to our flow and search for “dataverse” and select “get a row by ID”

We will select the table name “Products” and for Row ID we will select “Product (Value)”

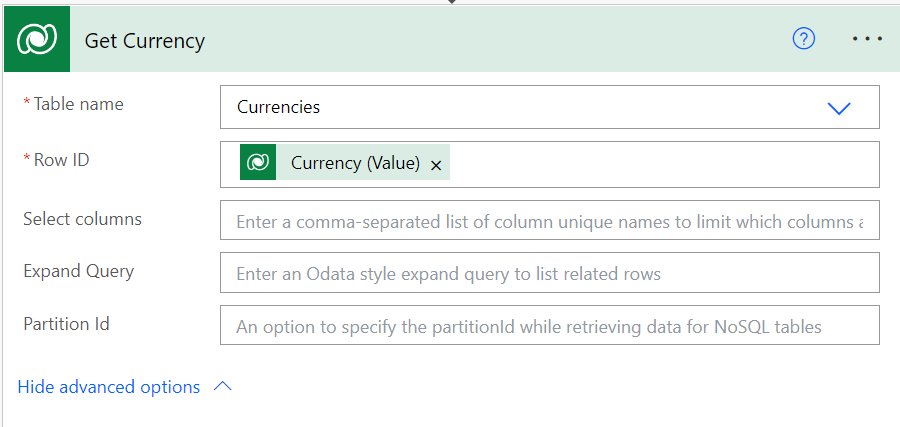
Step 5: Get Price List Currency

In our case we have price lists with different currencies, hence we will need to retrieve the actual currency of the pricelist.

We do that again with a Dataverse : Get Row by ID and select Currencies and Row ID: Currency (Value)

Step 6: Create Chat Message

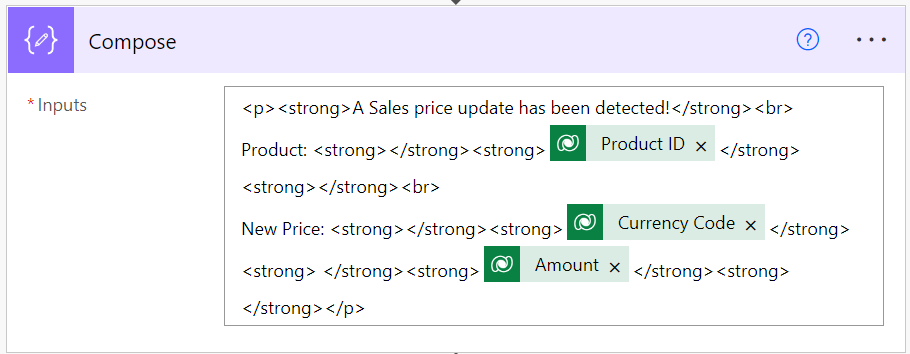
Since the Teams “Post message in a chat or channel” is sometimes buggy when it comes to message layouts, it is recommended to draft your message in a compose, and parse the compose to the next step.

Here is our chat  message including a little layout tweaking such as adding <strong> </strong> to make some letters bold.

We want to show the product code, which in our case is a custom field named “Product ID”.  The amount is the local amount from the price list, for which we add the Curency as well in order to be complete.

Step 7: Post Message in a Chat or Channel

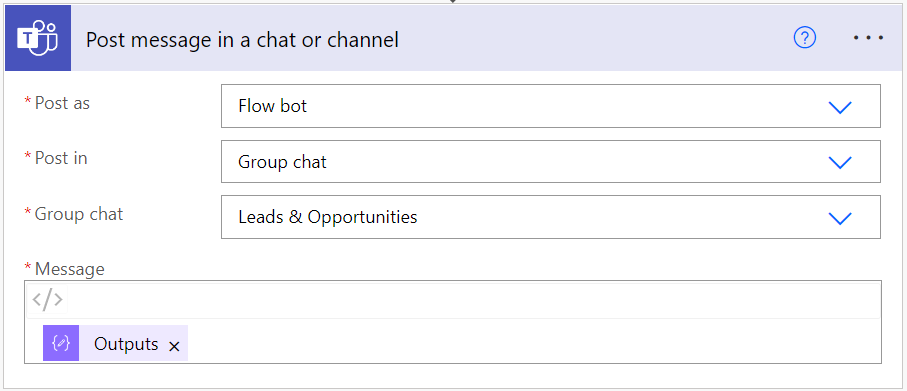
Now we can do the final step, which is to post our chat message in a group chat or in a channel. In our case we have a chat specifically for our sales team, where we want to post the message in.

The actual message is the output of our compose in step 6

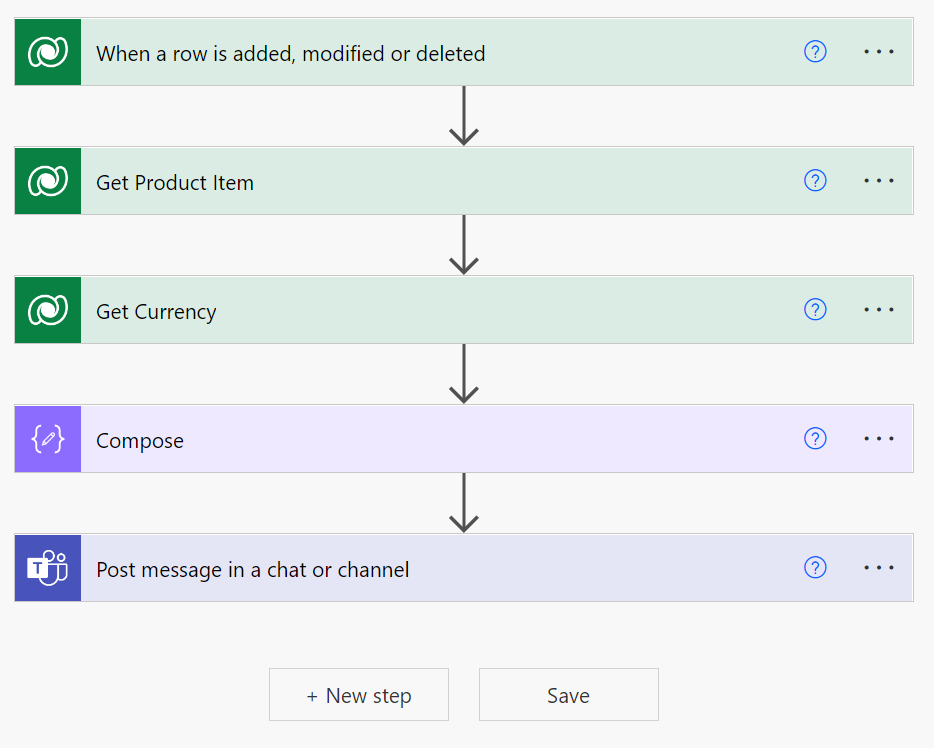
When you’re done with above, the entire flow should have the following elements:

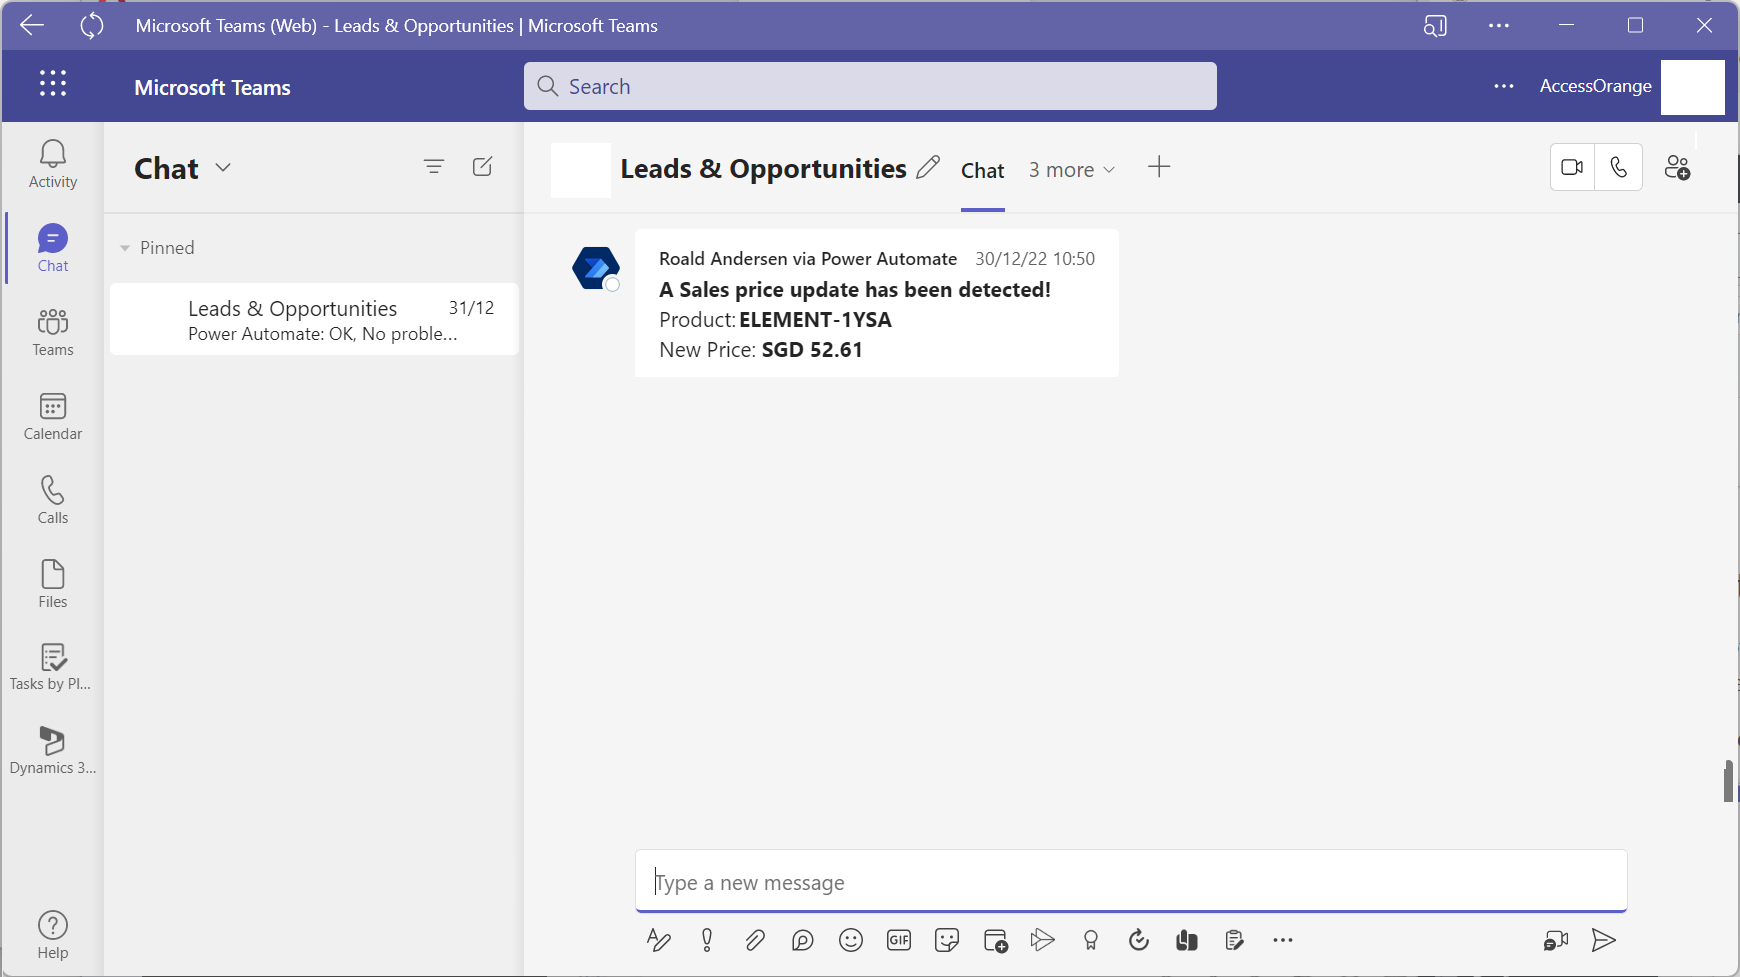
Now you can test your flow, and (hopefully) it should work. Here is an example of how it looks on our side:

Great Work! Feel free to reach out if you have any issues or questions regarding above flow.