In today’s fast-paced digital world, staying ahead of the curve is essential. That’s why we’re excited to introduce the Copilot Academy, a comprehensive learning platform designed to help you master the use of Microsoft Copilot across various applications.
What is Copilot Academy?
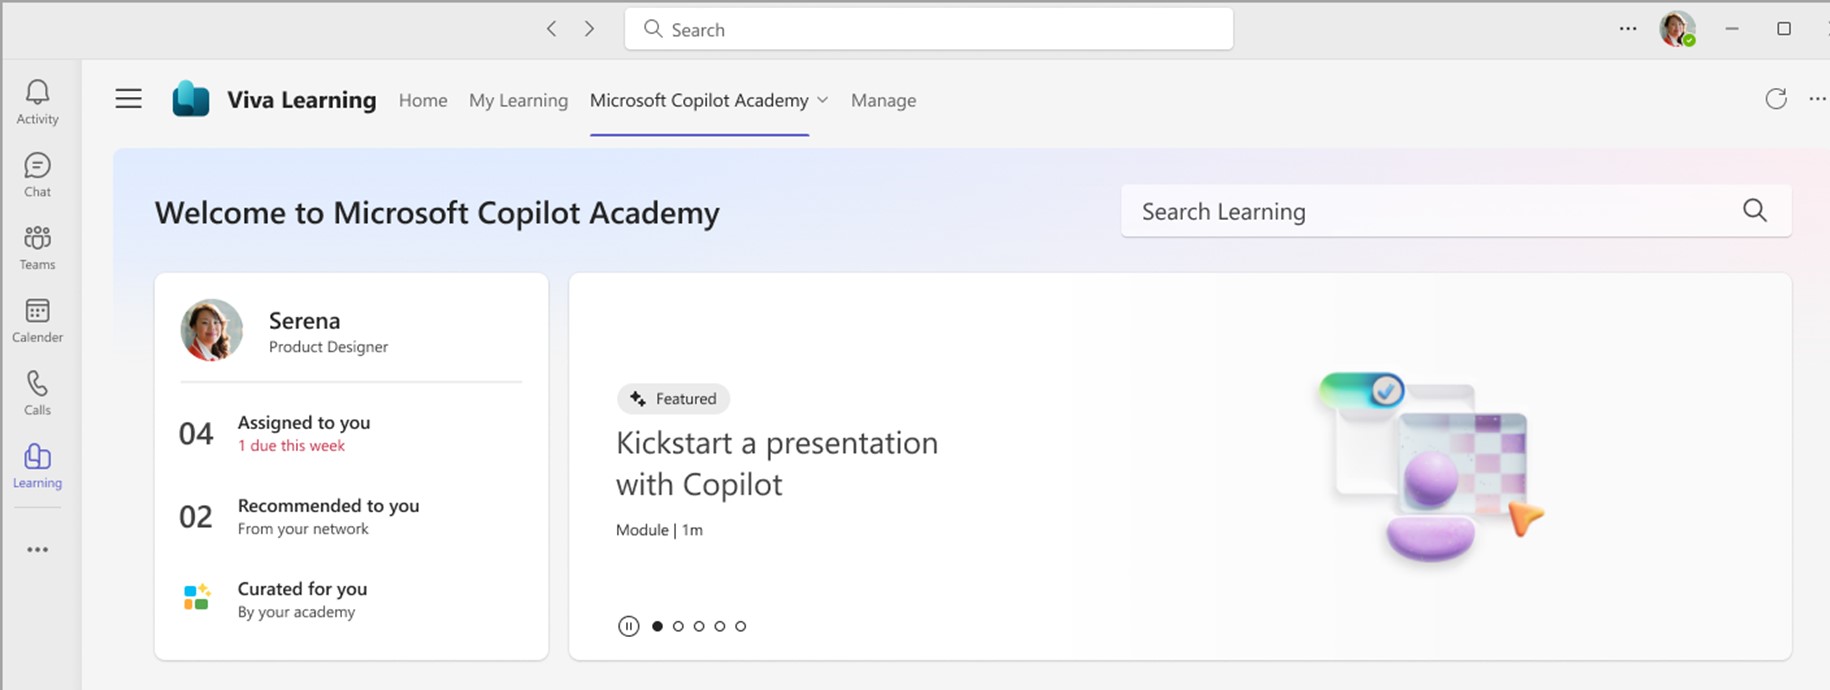
The Copilot Academy is an innovative educational platform integrated within Viva Learning. It offers structured educational content to help users learn about, discover, and effectively use Microsoft Copilot. Whether you’re looking to enhance your productivity, streamline your workflows, or simply get the most out of your Microsoft 365 applications, Copilot Academy has got you covered.
How to Access Copilot Academy
To access the academy in Viva Learning, Users must have a Microsoft M365 Copilot license, in addition to a Viva Learning seeded or premium license.
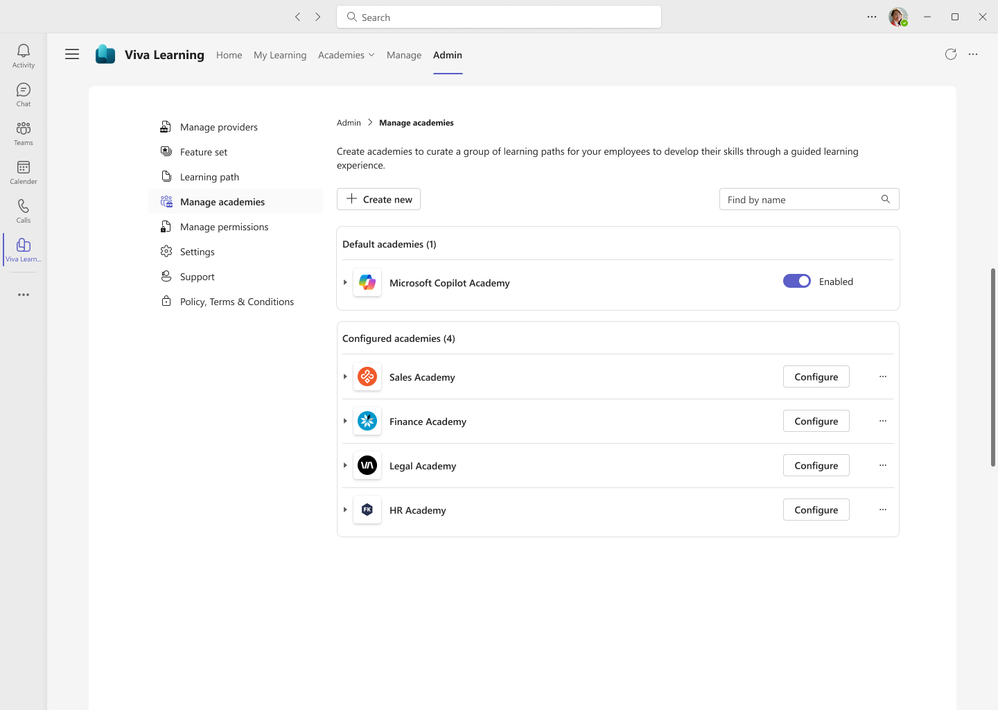
There are two ways to access Copilot Academy – directly through the Viva Learning webapp, or from the Viva Learning Teams app by using the Academies dropdown navigation menu. Copilot Academy is available in 8 languages: English, French, German, Italian, Spanish, Portuguese, Japanese and Chinese.
Why Join Copilot Academy?
Joining Copilot Academy offers a unique opportunity to elevate your digital skills and stay competitive in today’s technology-driven workforce. By enrolling, you gain access to a wealth of resources tailored to enhance your understanding and usage of Microsoft Copilot, allowing you to maximize the potential of your Microsoft 365 suite. With expertly crafted training materials, practical exercises, and real-time support, the academy equips you with the knowledge and confidence to utilize Copilot to its fullest, ultimately transforming the way you work and collaborate.
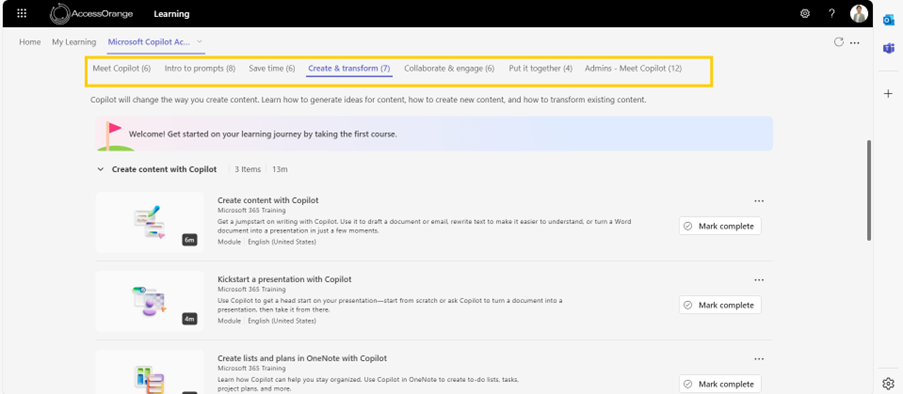
- Comprehensive Training: The academy provides in-depth training on how to use Copilot effectively across various Microsoft 365 applications. You’ll learn how to leverage Copilot to improve your productivity and efficiency.
- Interactive Learning: Featuring interactive modules, hands-on exercises, and real-world scenarios, the academy ensures you gain practical experience.
- Expert Guidance: Learn from industry experts and Microsoft-certified trainers who will share their insights and best practices.
- Community Support: Join a community of like-minded professionals and share your experiences, tips, and success stories.
Join The Copilot Academy Today!
Don’t miss out on the opportunity to elevate your skills and transform the way you work. Join the Copilot Academy today and start your journey towards becoming a Microsoft Copilot expert.
Microsoft 365 Copilot — Apply Now —
Apply today to make your work easier and smarter.
"*" indicates required fields
Unlocking Productivity and Value with Generative AI
Microsoft Copilot for Microsoft 365 promises to transform productivity by embedding generative AI into the daily tools we use for work. This innovation presents an exciting opportunity for businesses worldwide to streamline operations and enhance efficiency. But what is the actual return on investment (ROI) of adopting Copilot for Microsoft 365 in a global context?
Evaluating the Value of Copilot for Microsoft 365
For businesses considering the adoption of Copilot, the upfront cost is USD 360 per employee annually, or USD 30 per month when billed yearly. This may appear to be a significant investment, especially for larger organizations. However, it is essential to understand the potential savings and productivity boosts that can justify this expense.
The flexibility in purchasing licenses—without a minimum requirement—allows businesses to start with focused rollouts. This approach enables companies to measure the impact and ROI before scaling up the deployment.
Calculating the ROI of Copilot for Microsoft 365
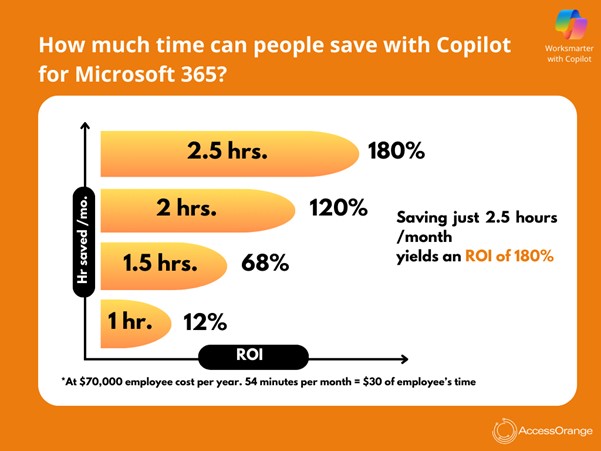
The break-even point for investing in Copilot can be achieved with just 54 minutes of time savings per month for an employee earning an annual total cost of USD 70,000 (approximately USD 5,833 per month). This total cost includes not just the base salary but also overheads, payroll taxes, and other ancillary costs.
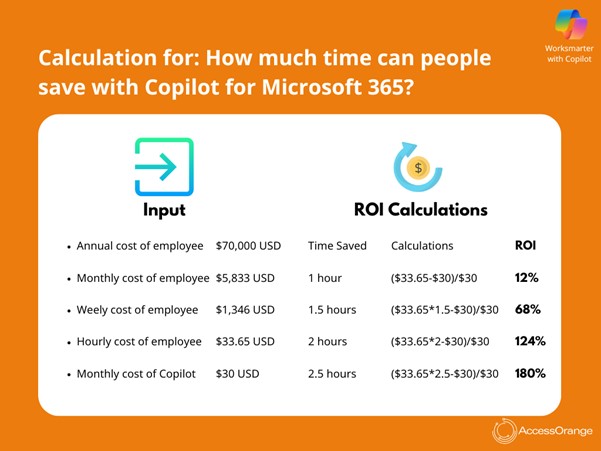
Here’s how to calculate the ROI:
- If an employee costs the company USD 70,000 per year (about USD 5,833 per month), the company needs to see if the employee can save enough time to cover the monthly cost of Copilot, which is USD 30.
- If this employee saves just 1 hour per month using Copilot, the company gets a 12% return on investment (ROI).
- If the employee saves 1.5 hours per month, they get a 68% ROI.
- Saving 2 hours per month translates to a 124% ROI.
- And saving 2.5 hours per month results in a 180% ROI.
So, essentially, even small-time savings can significantly justify the cost of Copilot, especially for employees with higher costs to the company.
The Higher the Annual Cost of an Employee – The Higher the ROI
Copilot’s value becomes even more apparent for higher-paid employees who save more time on routine tasks. For example, an employee with an annual total cost of USD 150,000 (hourly cost of approximately USD 75):
– 140% ROI if they save 1 hour a month.
– 261% ROI if they save 1.5 hours a month.
– 381% ROI if they save 2 hours a month.
– 501% ROI if they save 2.5 hours a month.
Are the Time Savings Realistic?
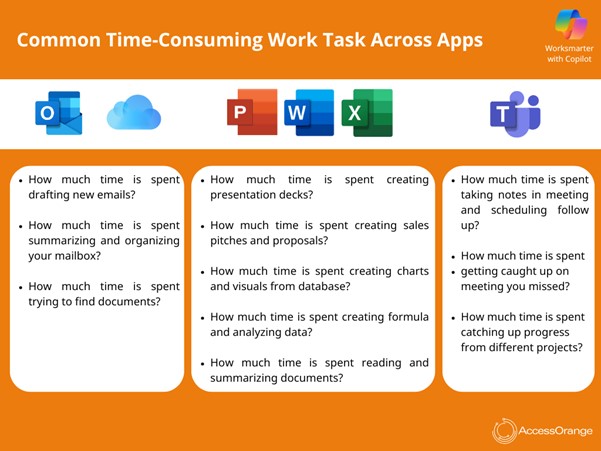
Research from the Boston Consulting Group (BCG) and Harvard, along with early adoption reports from Microsoft, supports the significant time savings Copilot can bring. Key findings include:
- Consultants at BCG completed 12.2% more tasks on average and 25% quicker using AI.
- The quality of work was 40% higher compared to those who did not use AI.
- Early adopters within Microsoft reported:
- 87% increased productivity.
- 79% focused more on important tasks.
- 81% reduced time spent searching for information.
- 1 in 3 saved more than 30 minutes per day.
Additional research highlights Copilot’s impact across various business environments:
- Email Management:
– Professionals using Copilot to draft and respond to emails save 3-8 minutes per email, significantly reducing the time spent on daily communication.
- Meeting Summarization:
– Copilot’s ability to summarize meetings allows employees to quickly review key points and action items, improving follow-up efficiency and reducing the need for extensive note-taking.
- Report Generation:
– Financial analysts and project managers benefit from Copilot’s report generation capabilities, experiencing a 35% increase in the speed of financial forecasting and project updates, respectively.
- Customer Service:
– Automated customer service responses powered by Copilot lead to a 50% reduction in call resolution times, enhancing customer satisfaction and freeing up representatives for more complex issues.
- Data Analysis:
– Business analysts using Copilot for data analysis report a significant reduction in time spent on data manipulation and interpretation, allowing them to focus on strategic decision-making.
- Administrative Tasks:
– Copilot helps reduce administrative workload, such as scheduling and document preparation, allowing employees to dedicate more time to core business activities.
These examples underscore Copilot’s versatility and effectiveness in enhancing productivity, accuracy, and efficiency across various business functions.
Conclusion
The data from early adopters of Copilot for Microsoft 365 and the broader use of Generative AI highlights a clear ROI for organizations. The greatest returns will come from leveraging the time savings to innovate and add value for customers. In these early stages, the personal productivity gains alone make Copilot a worthwhile investment, promising to revolutionize the way businesses operate.
In summary, here are the key advantages of using Copilot:
- Time Savings: Copilot significantly reduces the time required to perform routine tasks such as summarizing meetings, creating reports, drafting emails, and more. This allows employees to focus on more strategic activities that add value.
- Increased Efficiency: By automating repetitive tasks, Copilot helps streamline workflows and processes, leading to higher efficiency and better utilization of resources.
- Enhanced Productivity: With routine tasks taken care of, employees can dedicate more time to creative and high-impact work, boosting overall productivity and job satisfaction.
- Improved Accuracy: Copilot minimizes human errors by providing consistent and accurate outputs, ensuring higher quality work and reducing the need for revisions.
- Seamless Integration: Copilot integrates seamlessly with existing Microsoft 365 tools, making it easy for employees to adopt and start benefiting from its capabilities immediately.
By leveraging these advantages, organizations can unlock new levels of performance and innovation, driving growth and success in today’s competitive landscape.
In Dynamics 365 Sales, duplicate detection exists but only works at an individual level, for example, when a lead is converted or a new account is created.
Unfortunately, there’s no out-of-the-box solution to automatically detect duplicates in bulk across the system. This limitation can lead to data inaccuracies, especially as your organization grows.
To overcome this challenge, I created a Power Automate flow that finds and merges duplicate accounts automatically.
In this article, I’ll walk you through how to create this flow, and you can adapt it for your own needs.
Flow overview:
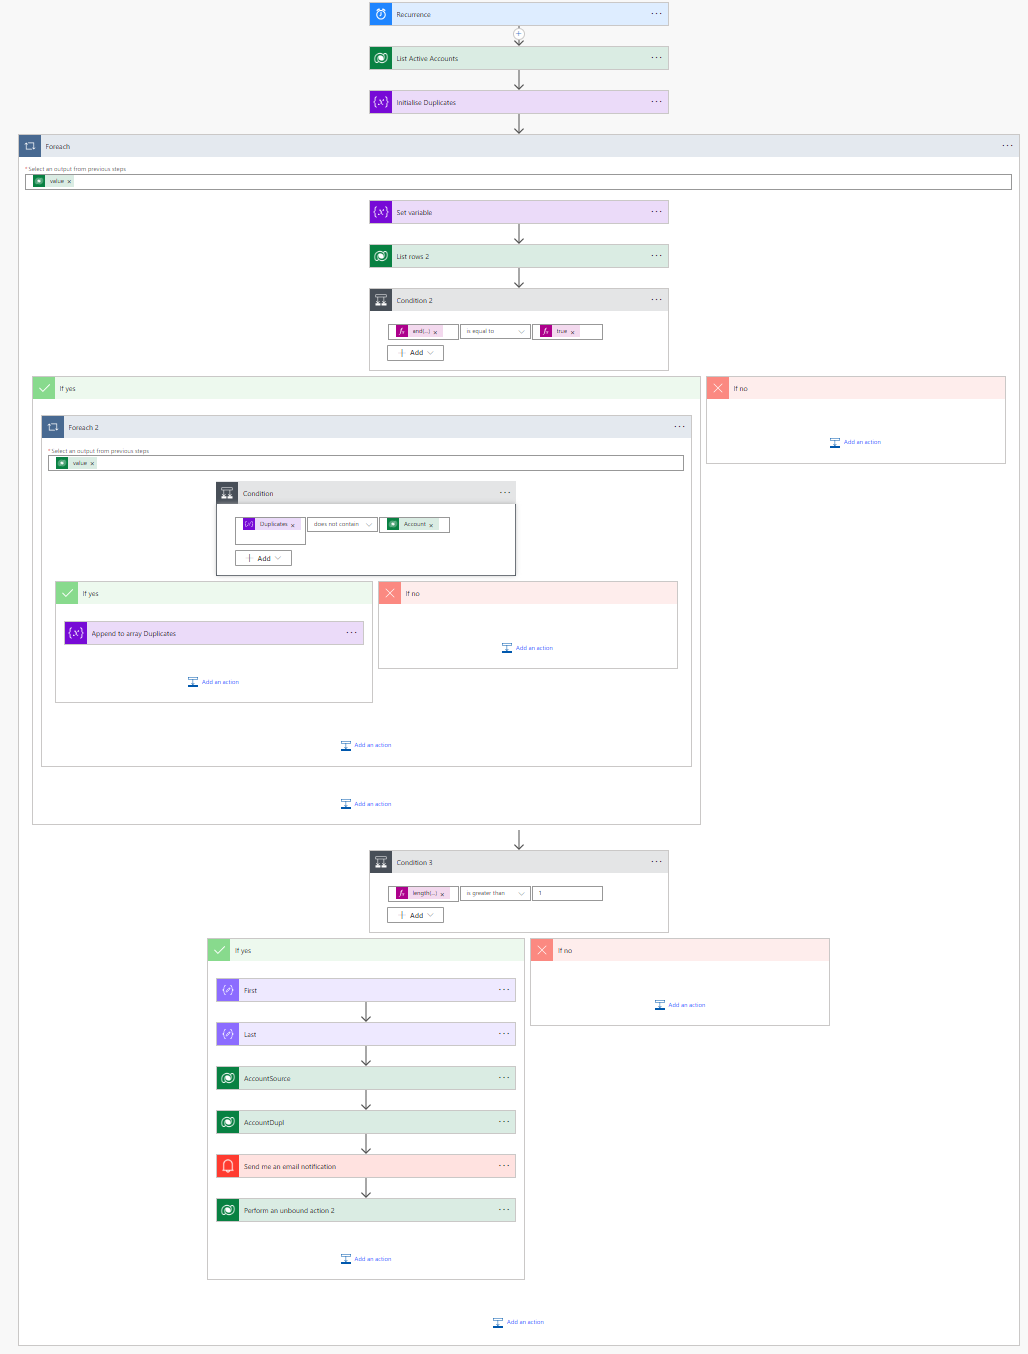
(Apologies, I have not renamed some of the foreach and conditions, but I think you will understand 🙂 )
Step-by-Step Guide to Creating the Flow
Step 1: Set up the Trigger
The first step is to set up the trigger for the flow. We want this flow to run on a regular schedule to detect duplicates. Use the Recurrence trigger to specify how frequently the flow should run (e.g., daily or weekly).

Step 2: Query Accounts from Dataverse
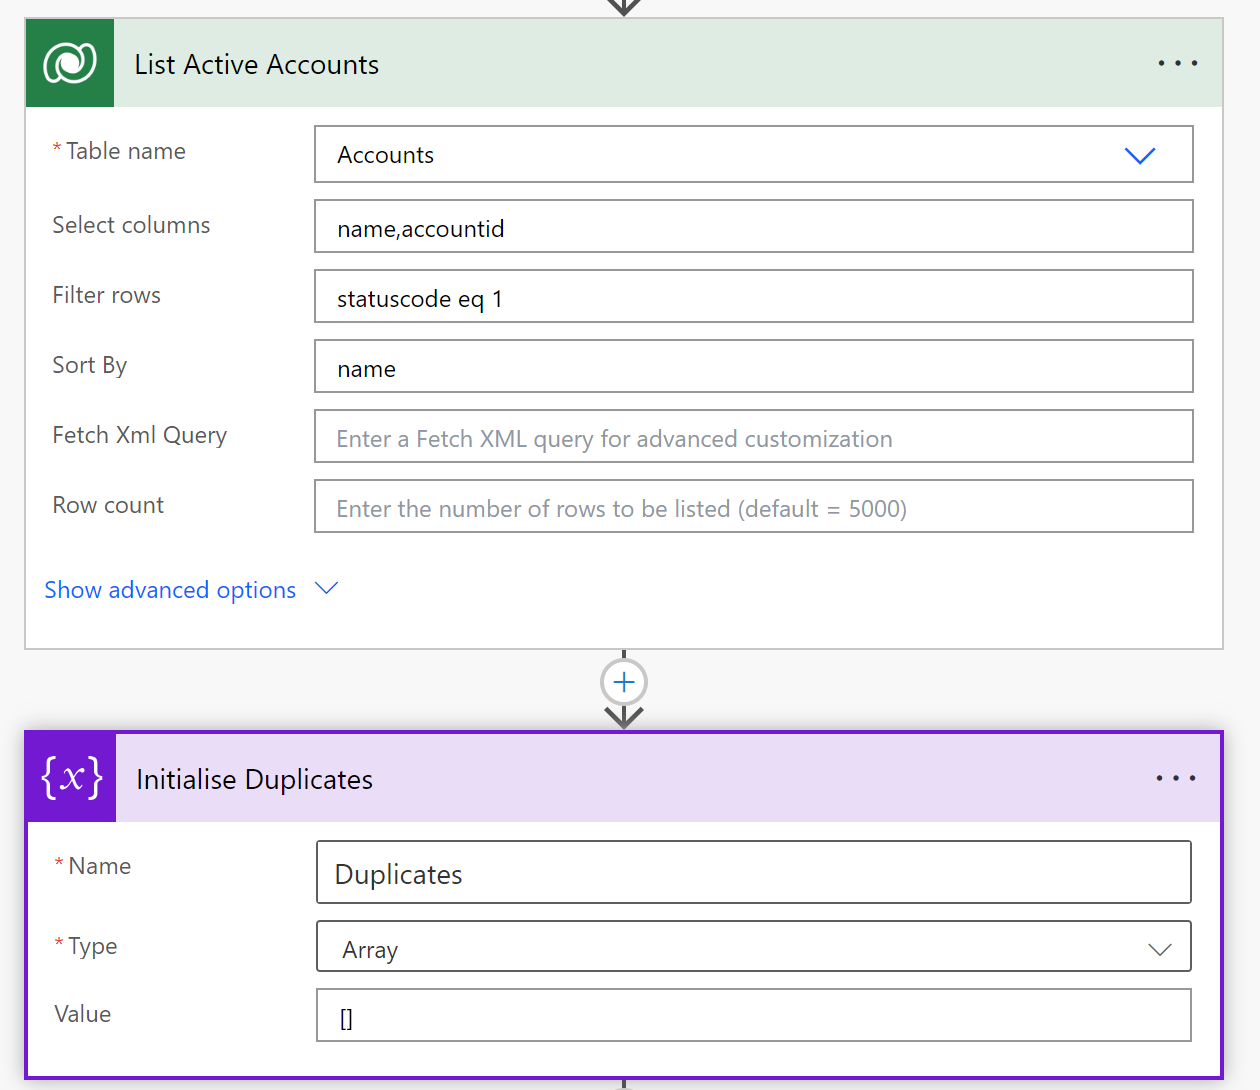
Next, add an action to list all accounts from the Dataverse. This will retrieve all active accounts so that we can compare them and detect duplicates.
- Action: Use List Rows from the Dataverse connector.
- Filter: You can filter for only active accounts or specific criteria that make sense for your business.
- Also initialize the variable Duplicates here as an array
Step 3: Identify Duplicate Accounts
Once the accounts are retrieved, you need to compare the names or other unique fields to detect duplicates.
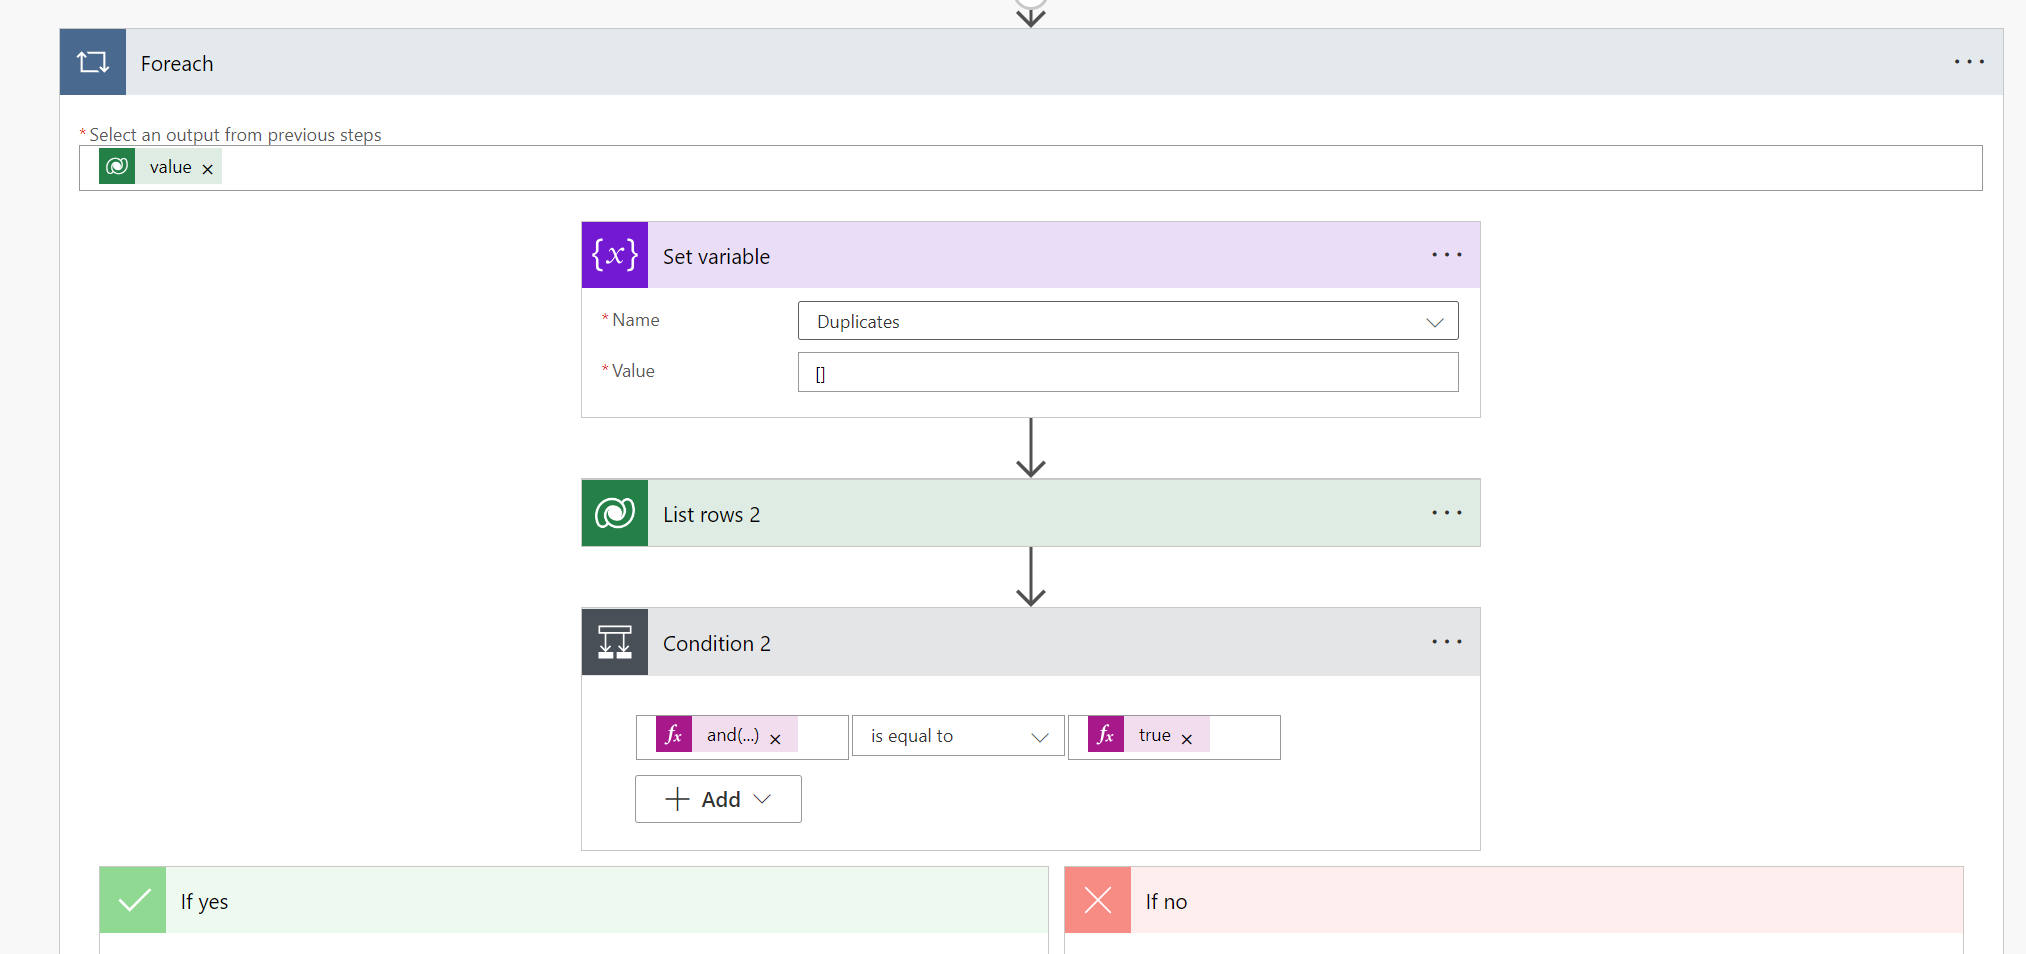
- Use a loop to go through each account and check for duplicate names.
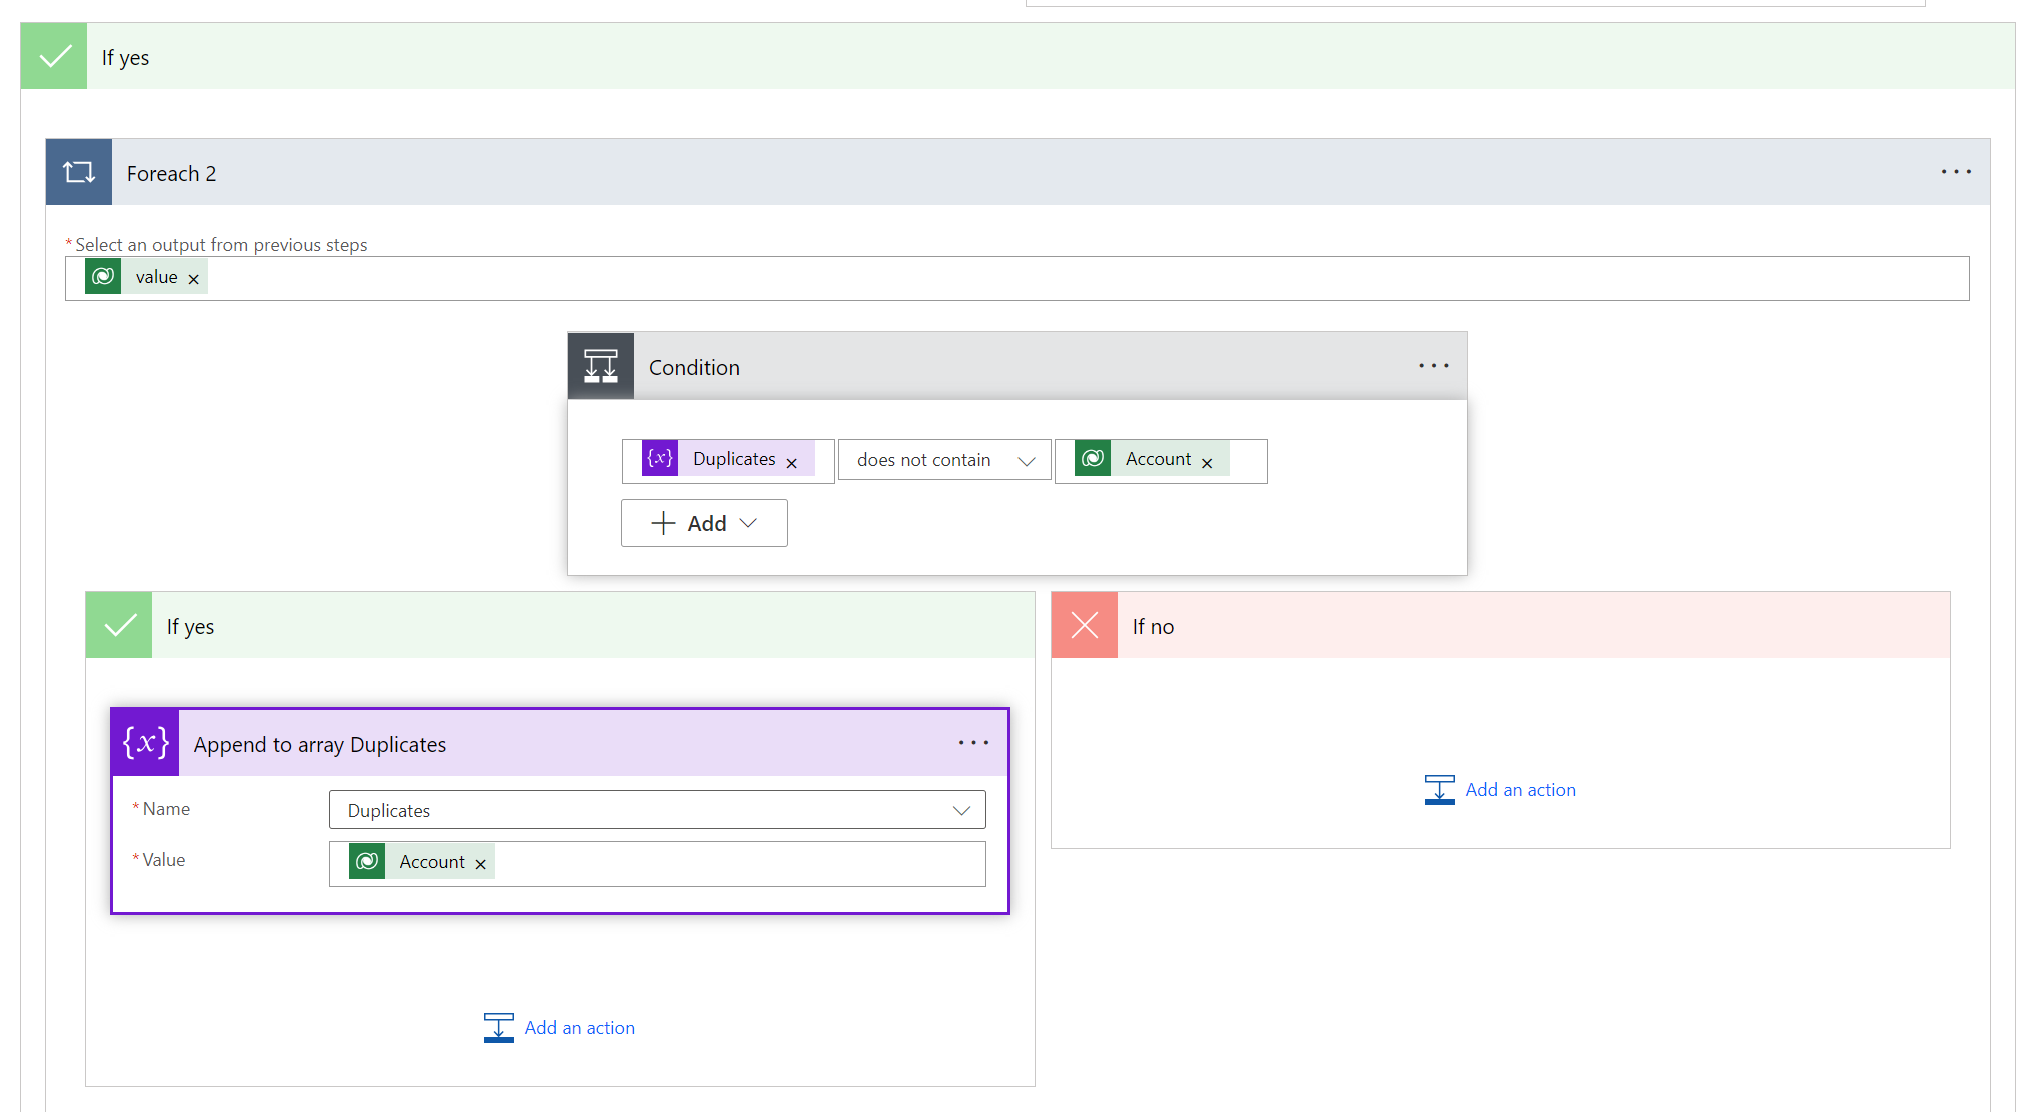
- Clear the array variable Duplicates
- Implement a condition in the flow to identify if two or more accounts share the same name.
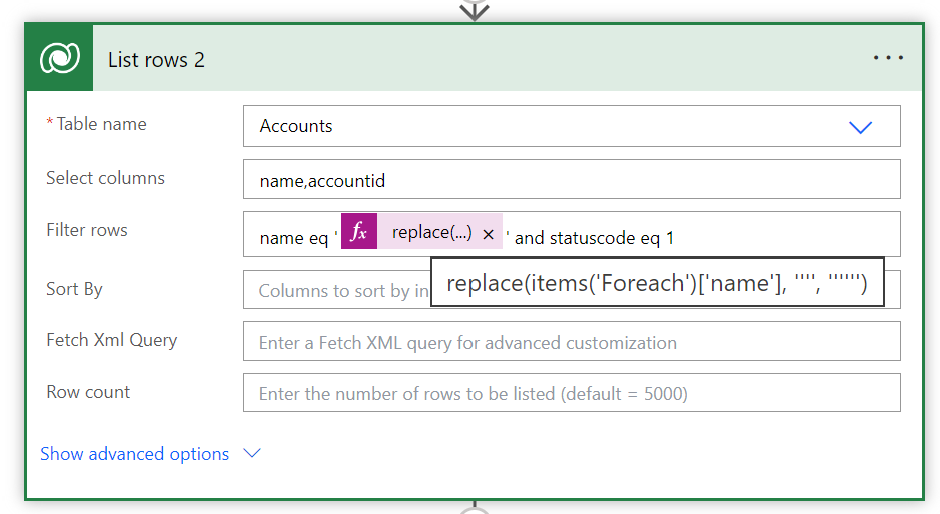
The Replace() is used to fix the acounts that have the character ‘ inside their name, to not break the odata filter.
Condition:

Step 4: Merge the Duplicates
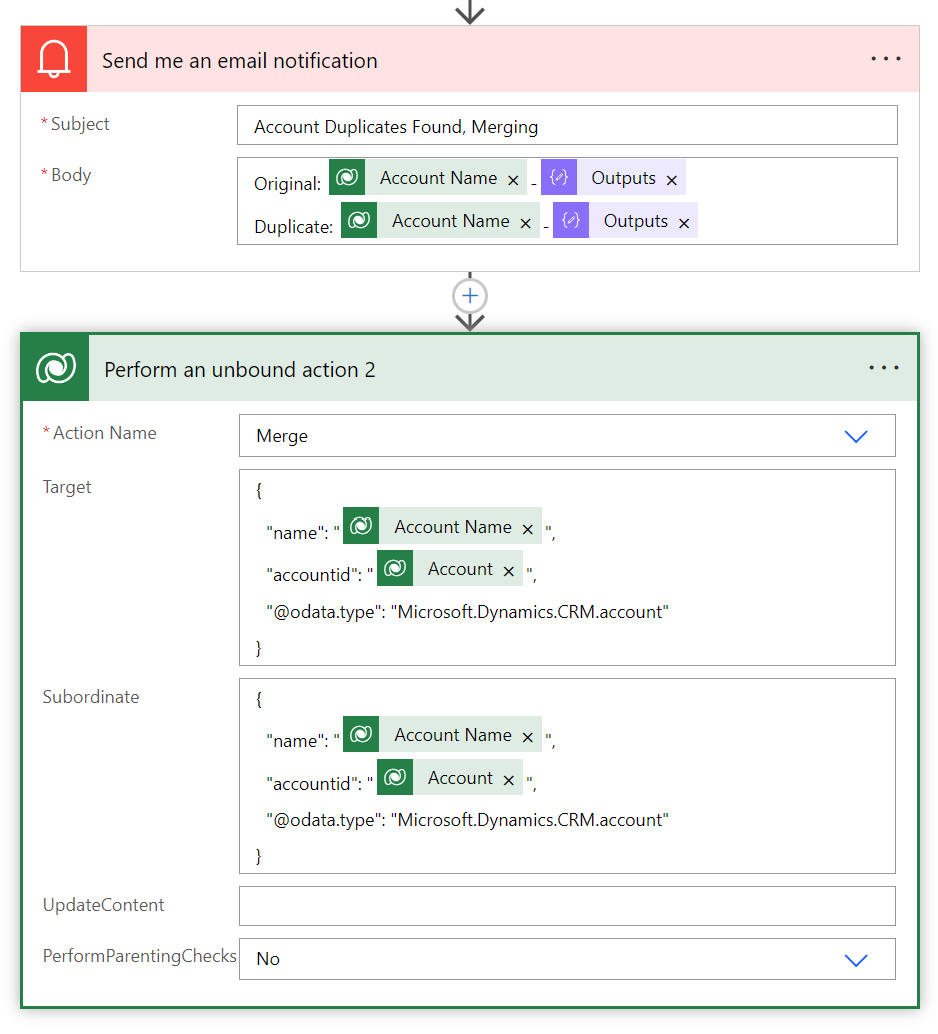
Once duplicates are identified, use Dataverse’s Unbound Action to merge the duplicate accounts. The unbound action allows you to merge records within Dataverse without having to handle the data manually.
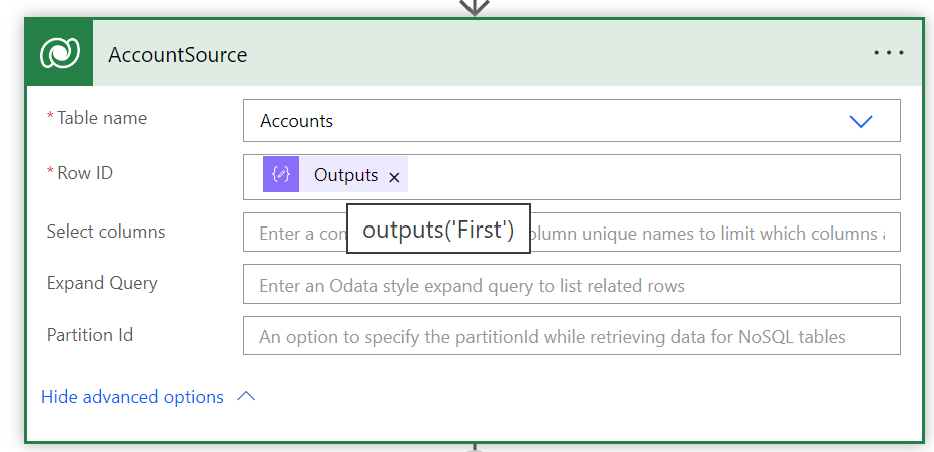
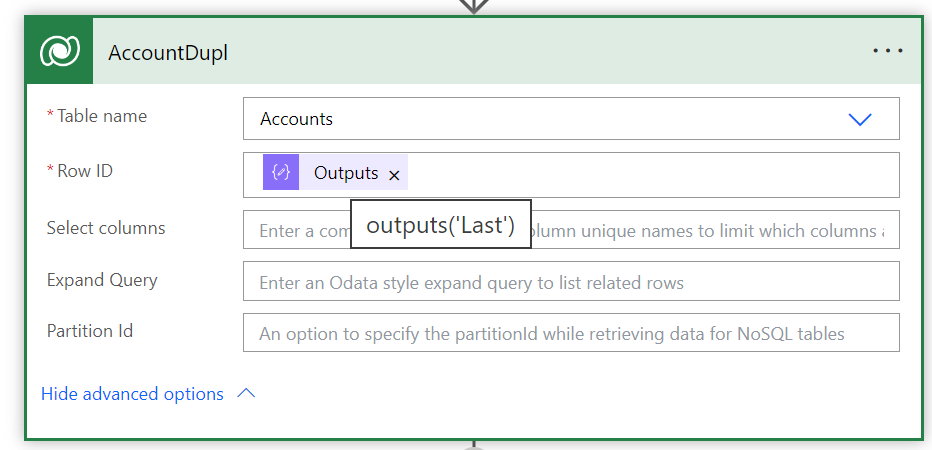
- Action: Use the Perform Unbound Action step from the Dataverse connector.
- Target: The original account and the duplicate account.
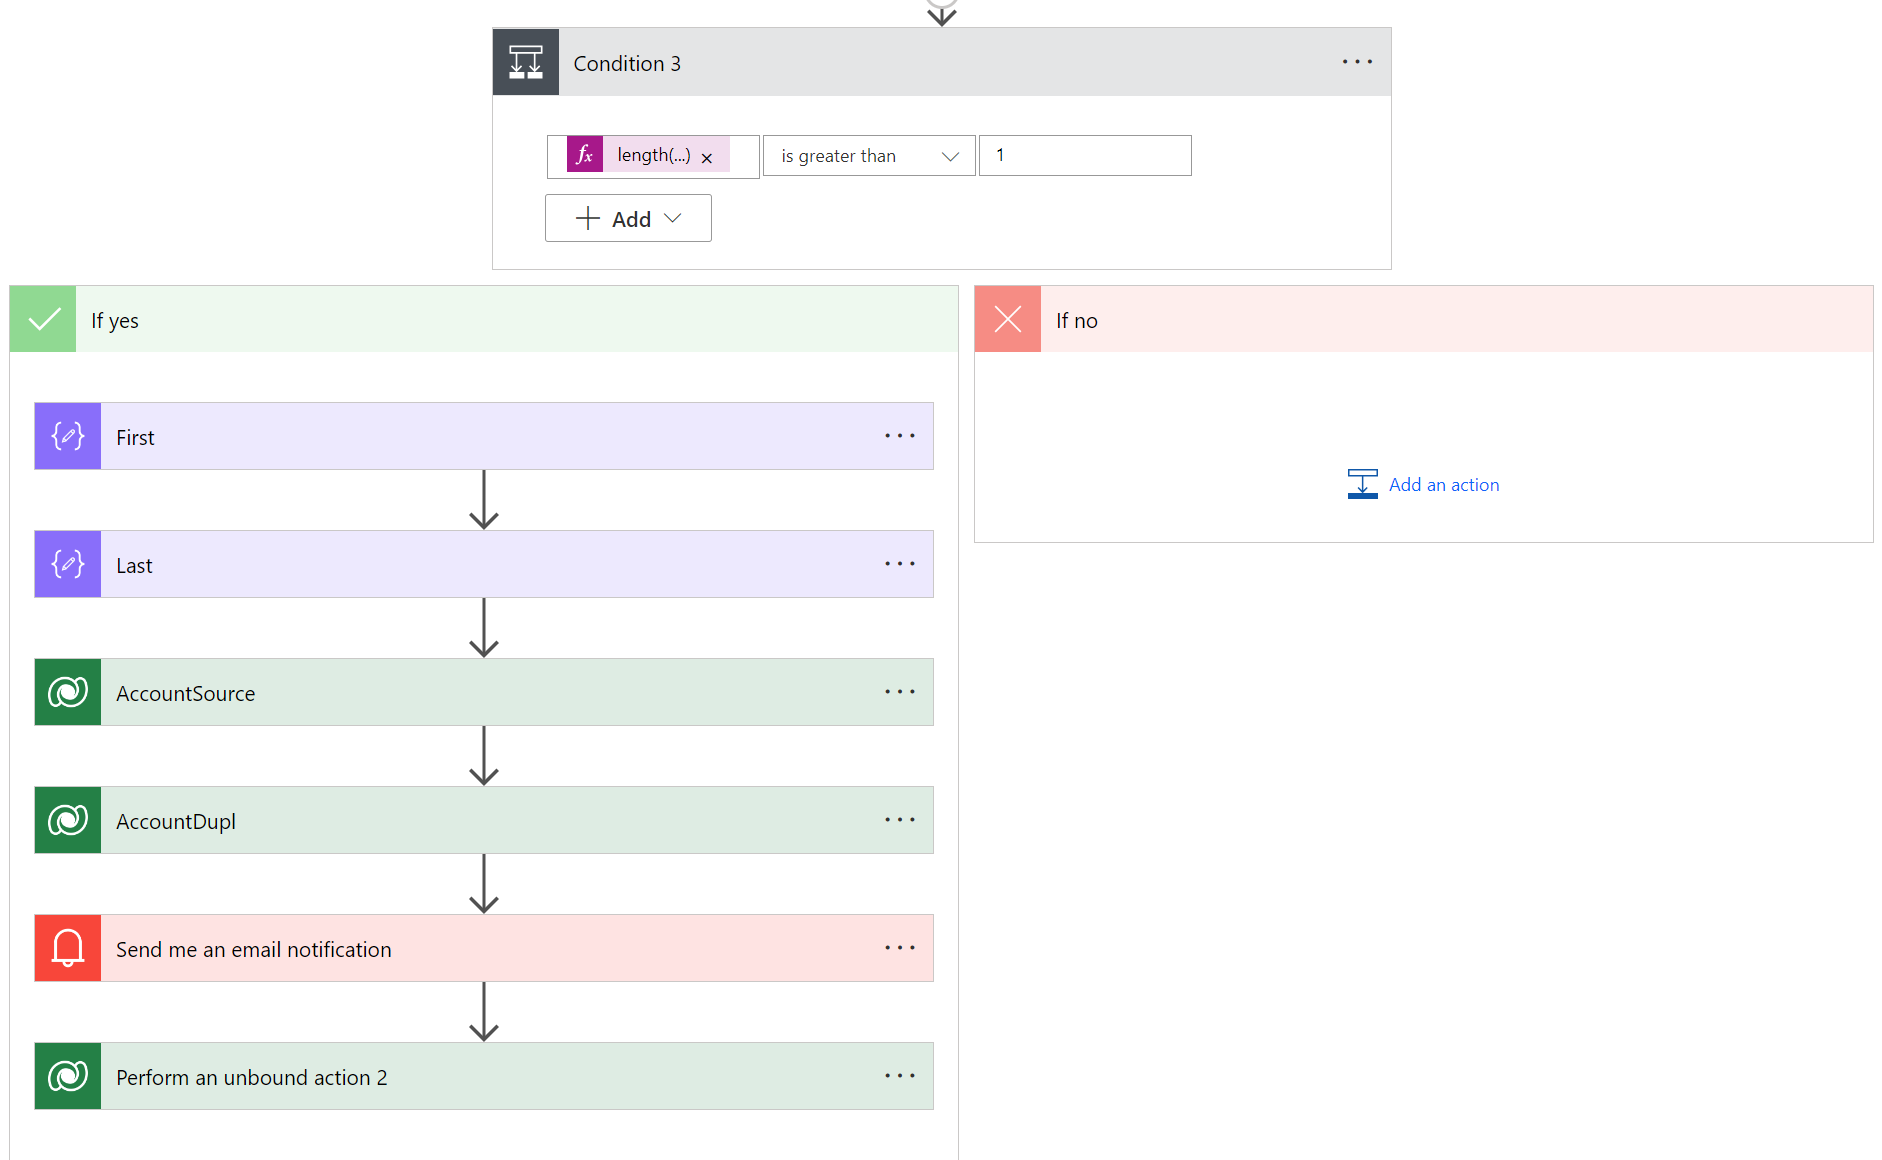
Condition 3: (meaning one or more duplicates have been found)



"*" indicates required fields
In this blog post, I’ll show you how to create a solution in Dynamics 365 that automatically ensures the Opportunity currency matches the Account currency.
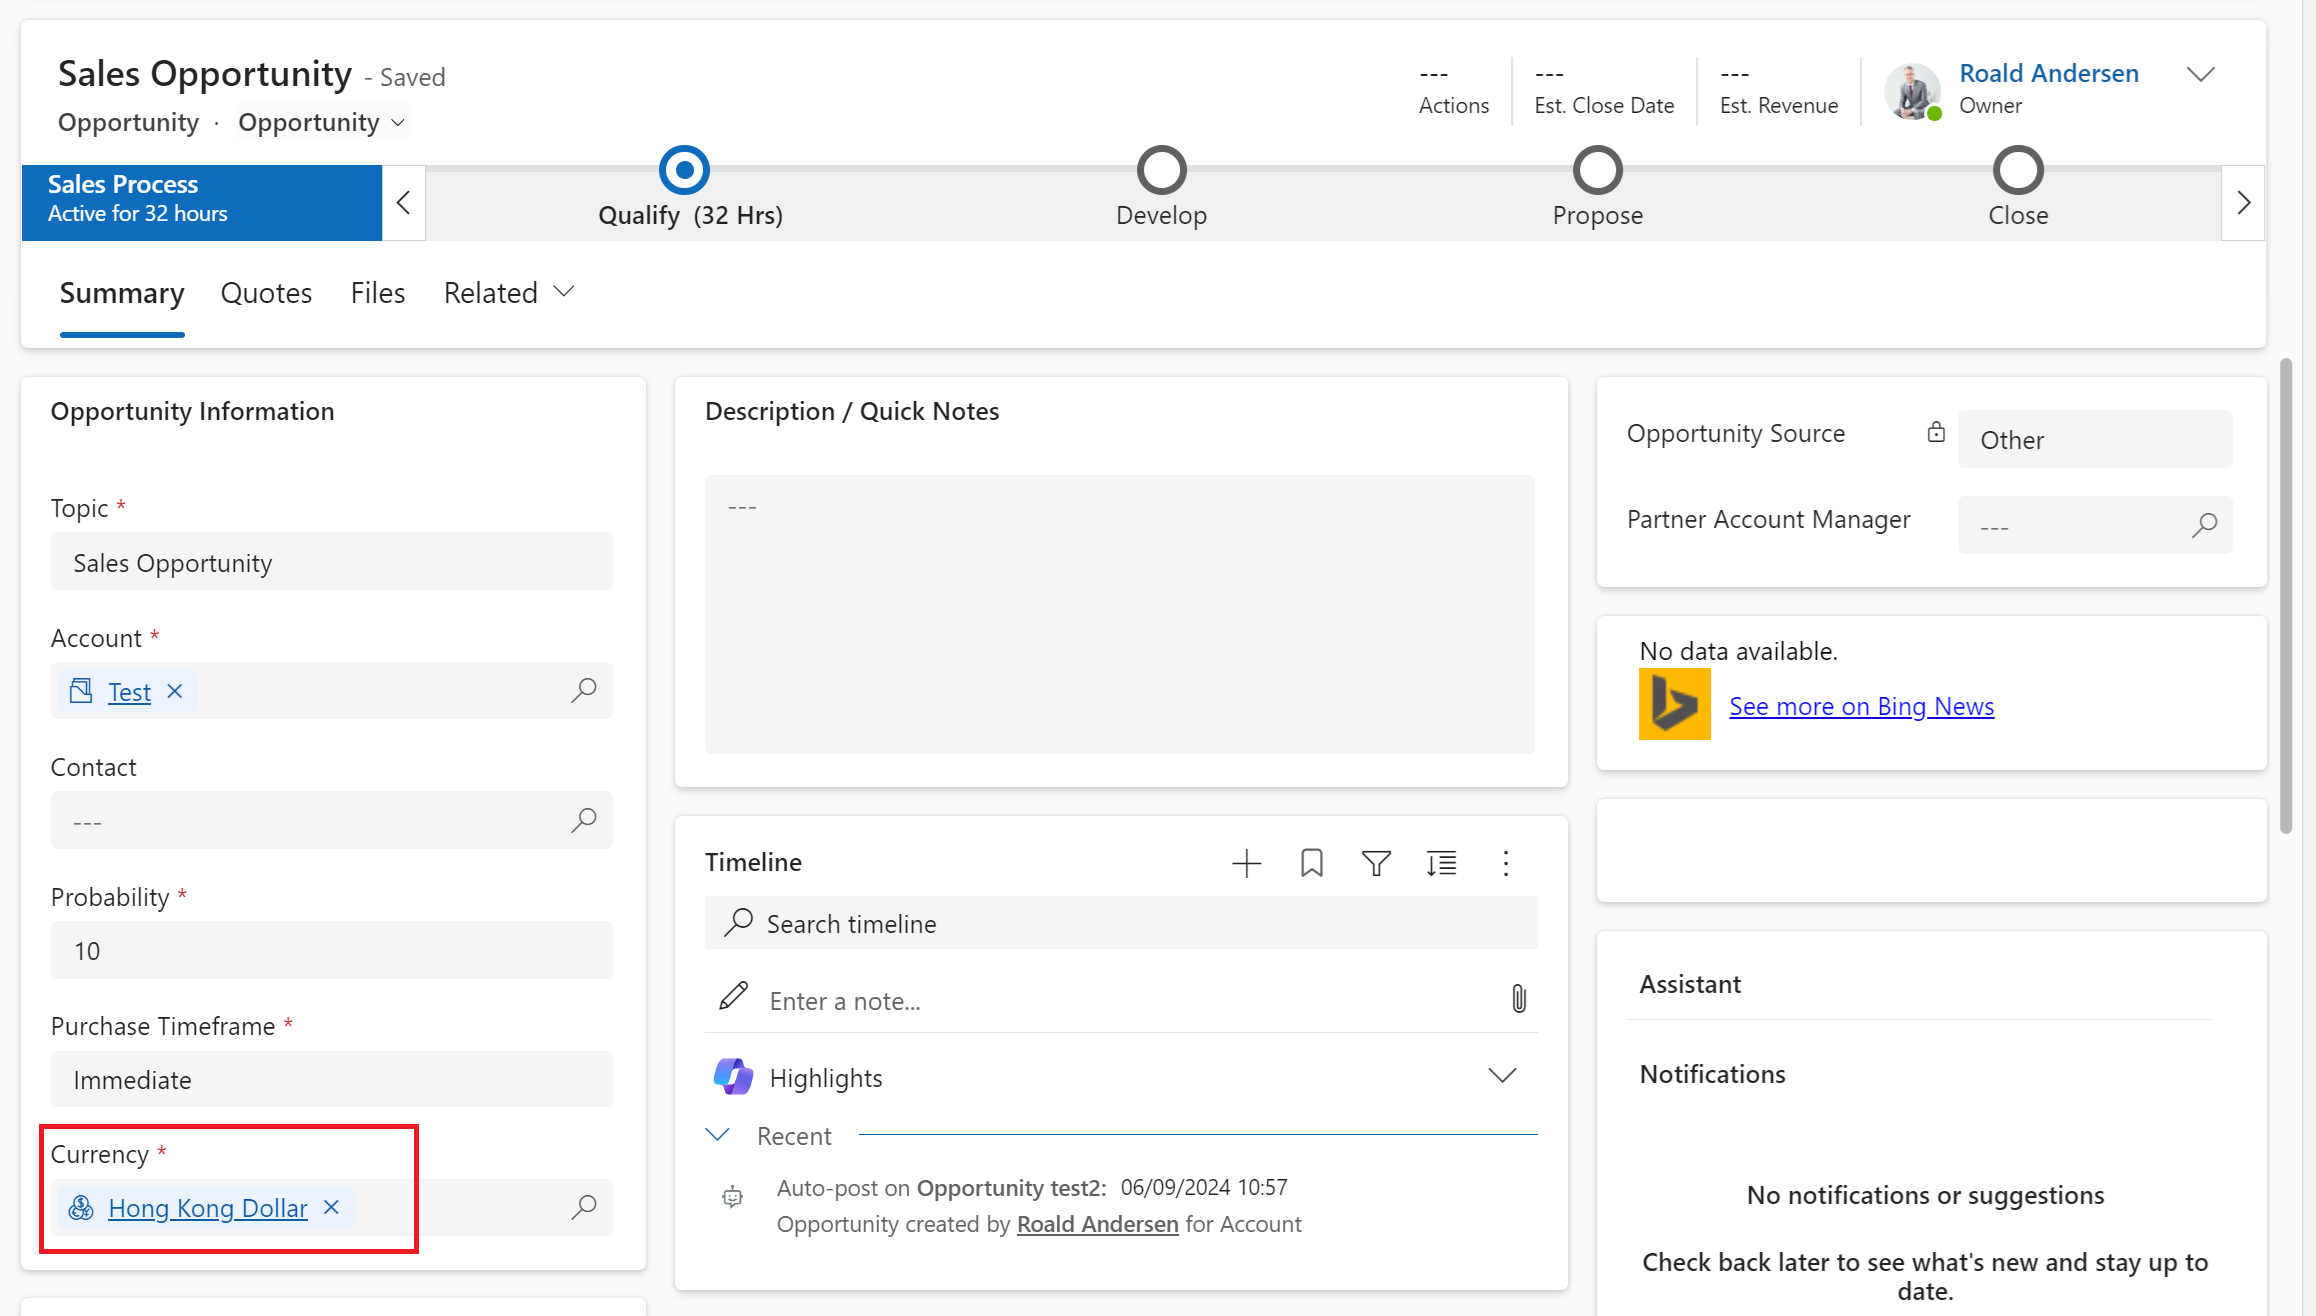
I wrote this solution as I got so frustrated that when you create an opportunity in Dynamics 365 Sales, that the currency is not automatically set to the correct currency. Instead it goes to the default currency as set in the system, which will create all sort of problems when you are working in a multi region sales team. (selection of wrong currencies, quote then cannot use the correct currency, etc)
This solution will use JavaScript to retrieve and compare these values, and if they don’t match, update the Opportunity currency to reflect the Account’s currency. Additionally, we’ll publish this solution and configure it to run seamlessly within Dynamics 365.
Prerequisites
Before you begin, ensure you have the following:
- Administrator access to Dynamics 365.
- Basic understanding of JavaScript and Dynamics 365 customization.
Let’s break down the process step-by-step.
Step 1: Create a New Solution in Dynamics 365
The first step is to create a solution to contain your custom JavaScript logic and publish it into Dynamics.
- Navigate to Power Platform Admin Center:
- Go to your Dynamics 365 environment.
- Click on the gear icon and select Advanced Settings.
- In the settings area, click on Solutions.
- Create a New Solution:
- Click New to create a new solution.
- Enter details such as:
- Display Name:
Opportunity-Account Currency Sync. - Publisher: Select or create a new one.
- Version: Start with
1.0.0.0.
- Display Name:
- Add the Opportunity Entity to the Solution:
- In the solution editor, click on Add Existing → Entity → Opportunity.
- This allows us to add custom logic to the Opportunity entity form.
Step 2: Write the JavaScript for Currency Sync
Next, we’ll write the JavaScript code to compare the Opportunity and Account currency and update the Opportunity currency if they don’t match.
- Create a Web Resource for JavaScript:
- In the solution, navigate to Web Resources and click New.
- Select JavaScript (JScript) as the type, and name it
currencySync.js. - Paste the following JavaScript code into the web resource:
function getDetailsFromOpportunity(executionContext) {
var formContext = executionContext.getFormContext();

// Check if the Opportunity has been saved (i.e., it has an ID)
var opportunityId = formContext.data.entity.getId();
if (!opportunityId) {
console.log("This is a new opportunity. The record has not been saved yet.");
return; // Exit the function if it's a new, unsaved Opportunity
}

// Proceed with the currency check if the Opportunity is not new
opportunityId = opportunityId.replace("{", "").replace("}", "");

// Get the Account (Customer Field) from the Opportunity
var accountLookup = formContext.getAttribute("parentaccountid");
if (accountLookup != null && accountLookup.getValue() != null) {
var account = accountLookup.getValue()[0];
var accountId = account.id;

// Retrieve the statuscode and compare currencies only if the opportunity is open
Xrm.WebApi.retrieveRecord("opportunity", opportunityId, "?$select=statuscode").then(
function success(result) {
var opportunityStatus = result.statuscode;
if (opportunityStatus === 1) {
console.log("Opportunity is open. Proceeding with currency check.");

// Retrieve the currency from the related Account
Xrm.WebApi.retrieveRecord("account", accountId, "?$select=transactioncurrencyid&$expand=transactioncurrencyid($select=currencyname)").then(
function success(result) {
if (result.transactioncurrencyid != null) {
var accountCurrencyId = result.transactioncurrencyid.transactioncurrencyid.toLowerCase();

// Get the Currency field from the Opportunity
var opportunityCurrencyLookup = formContext.getAttribute("transactioncurrencyid");
if (opportunityCurrencyLookup != null && opportunityCurrencyLookup.getValue() != null) {
var opportunityCurrency = opportunityCurrencyLookup.getValue()[0];
var opportunityCurrencyId = opportunityCurrency.id.replace("{", "").replace("}", "").toLowerCase();
var opportunityCurrencyName = opportunityCurrency.name;
console.log("Opportunity Currency Name: " + opportunityCurrencyName + " | Currency Id: " + opportunityCurrencyId);

// Compare the Opportunity currency with the Account currency
if (accountCurrencyId !== opportunityCurrencyId) {
console.log("Currencies do not match. Updating Opportunity currency to match Account currency.");

// Update the Opportunity currency to match the Account currency
formContext.getAttribute("transactioncurrencyid").setValue([{
id: accountCurrencyId,
name: result.transactioncurrencyid.currencyname,
entityType: "transactioncurrency"
}]);

// Save the form after the currency is updated
formContext.data.entity.save();
} else {
console.log("Currencies match. No update required.");
}
} else {
console.log("No currency is associated with this opportunity.");
}
}
},
function(error) {
console.log("Error retrieving account currency: " + error.message);
}
);
} else {
console.log("Opportunity is not open. No currency update will be performed.");
}
},
function(error) {
console.log("Error retrieving opportunity status: " + error.message);
}
);
} else {
console.log("No account is associated with this opportunity.");
}
}
- Save and Publish the Web Resource:
- Click Save and then Publish the web resource.
Step 3 : Add the JavaScript to the Opportunity Form for the Account Field onChange Event
In addition to loading the script when the form is loaded, we’ll also trigger it when the Account field is changed by the user.
1. Go to the Opportunity Form Editor:
- In the solution editor, select the Opportunity entity, and click on Forms.
- Open the Main form for editing.
2. Add the JavaScript Web Resource to the Form (if not already added):
- If you’ve already added the
currencySync.jsweb resource in the previous steps, you don’t need to do this again. - If not, click on Form Properties → Form Libraries → Add, and select the
currencySync.jsweb resource.
3. Attach the Function to the Form Load Event (if not already done):
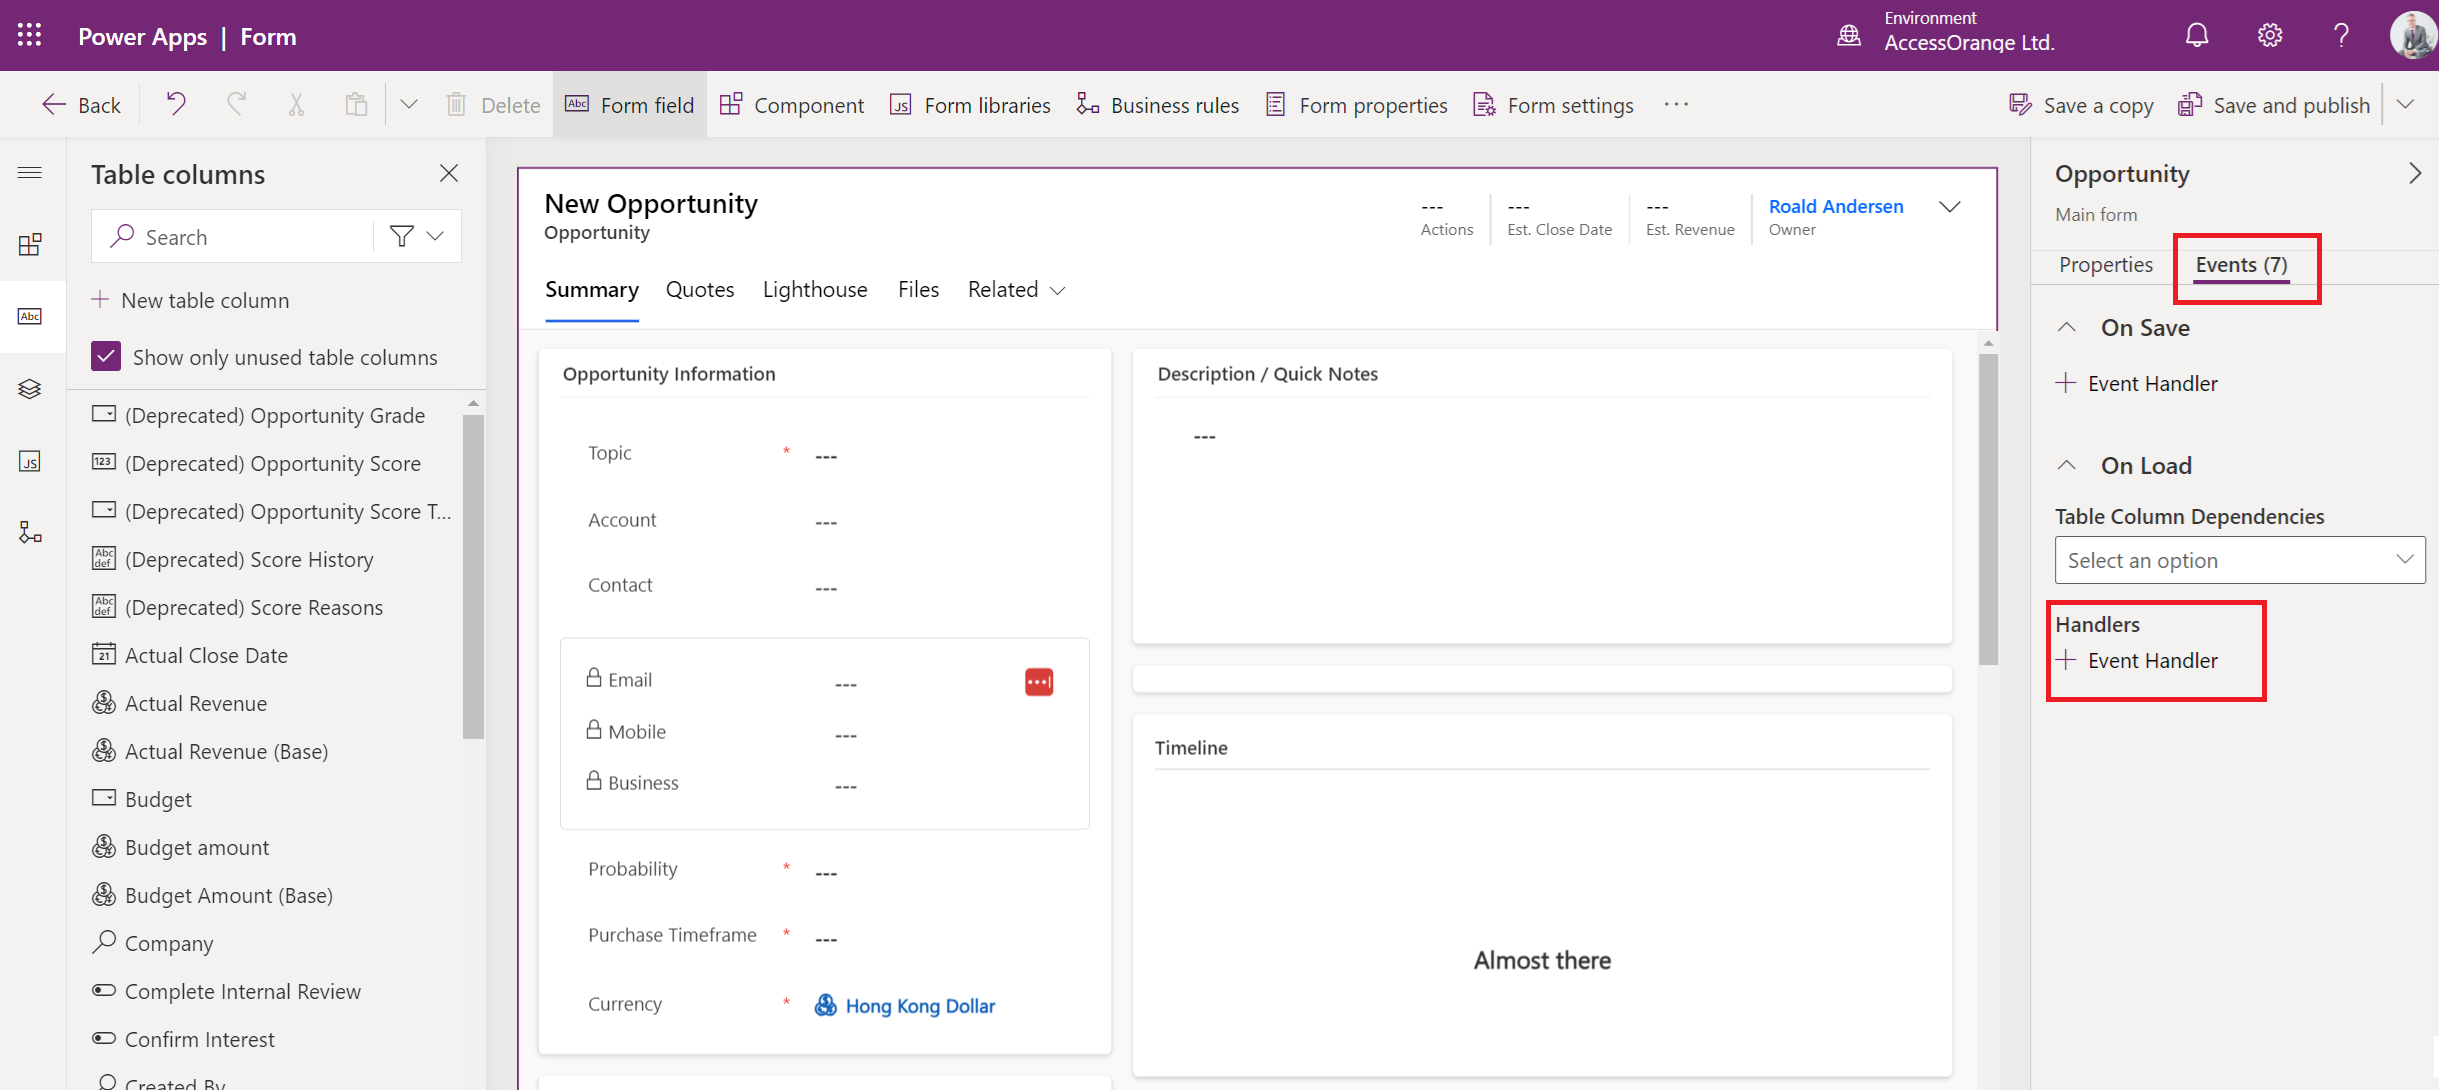
- In the Event Handlers section under Form Properties, add the function as before for the OnLoad event.
![]()
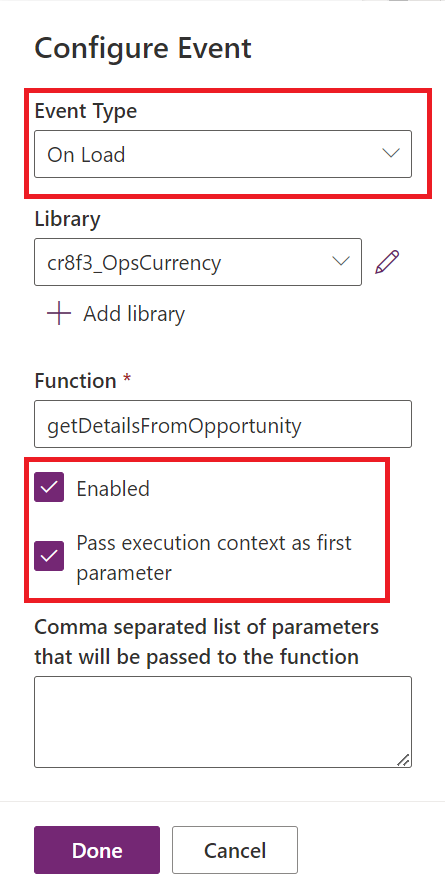
- Make sure to set the correct event handler details:
![]()
- Do the same for On Save, so when the opportunity is saved, the function will check if the currency needs to be updated.
4. Attach the Function to the Account Field onChange Event:
- In the Form Editor, locate the Account field (which is the parentaccountid field in Dynamics).
- Double-click on the Account field, or select it and click Change Properties.
- Go to the Events tab of the field properties.
- Under Field Events, click Add.
- In the Library dropdown, select the
currencySync.jslibrary (if not already added). - In the Function Name field, enter
getDetailsFromOpportunity(the same function name as used for the onLoad event). - Uncheck the box that says “Pass execution context as the first parameter,” if it’s checked.
- Click OK to save the event handler for the Account field’s onChange event.
5. Save and Publish the Form:
- Save the changes made in the form editor.
- Click Publish to make the changes live in Dynamics 365.
Testing the onChange Event
Now, your JavaScript function will be triggered both when the Opportunity form loads and when the Account field is changed.
Test the Functionality:
- Open an Opportunity in Dynamics 365.
- Change the Account value, and ensure that the script compares the Opportunity currency with the new Account currency.
- If the currencies don’t match, the Opportunity currency should update automatically.
Have any questions on this script, or happy that it worked for you? Leave a comment below!
"*" indicates required fields
In the fast-paced business environment of today, staying on top of meetings and understanding all the discussions, especially when they occur in different languages, can be challenging.
As a Dutch professional working in Taiwan, I often face this challenge due to the language barrier. Fortunately, Microsoft Teams and Microsoft 365 Copilot offer powerful tools to record, transcribe, and translate meetings, making communication seamless and efficient.
This beginner’s guide will walk you through the steps to leverage these tools effectively.
Introduction to Microsoft Teams Recording and Transcription
What is Microsoft Teams?
Microsoft Teams is a collaboration platform that integrates people, content, and tools to engage in seamless collaboration. It is widely used for chat, meetings, file sharing, and app integration. One of its standout features is the ability to record meetings and transcribe them, making it an invaluable tool for documenting conversations and actions.
Why Use Recording and Transcription?
Recording and transcription in Microsoft Teams help ensure that you don’t miss any critical information discussed during meetings. This is particularly useful for multilingual teams or when detailed minutes are required. The transcription feature can convert spoken language into written text, allowing you to review and search through the content easily.
Setting Up Microsoft Teams for Recording and Transcription
Enabling Meeting Recording
To start recording a meeting in Microsoft Teams, follow these steps:
- Start or join a meeting in Microsoft Teams.
- Click on the three dots (
...) in the meeting control bar to open more options. - Select Start recording from the dropdown menu. The recording will begin, and participants will be notified.
- Transcription will automatically start together with the recording.

Customizing Language Settings for Transcription
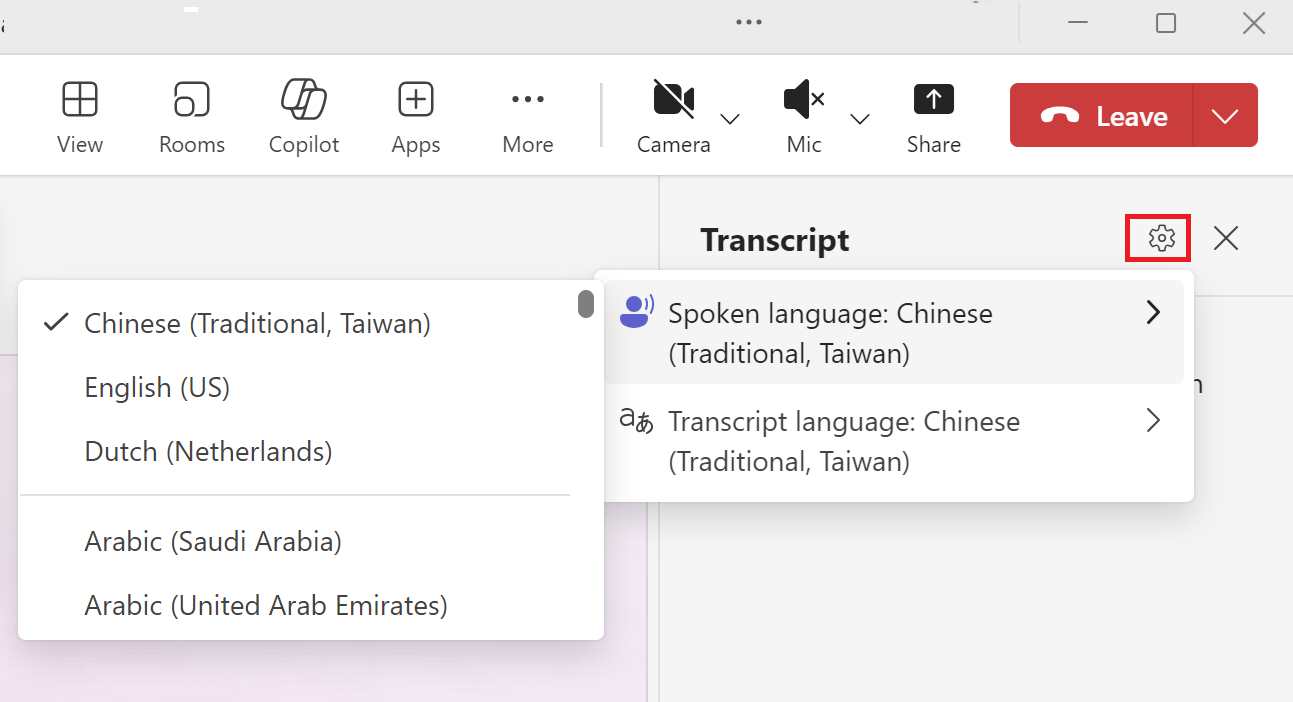
Setting the Spoken Language
To ensure accurate transcription, it’s crucial to set the correct spoken language:
- During the meeting, click on the three dots (
...) and select Meeting options. - In the Meeting options panel, find the Language section.
- Select the spoken language used in the meeting (e.g., Chinese – Simplified or Traditional).
- Save the settings to apply the changes.
Post-Meeting Access to Transcripts
After the meeting ends, the transcript will be available in the meeting chat and the files tab. You can download the transcript for further review and translation.

Utilizing Microsoft 365 Copilot for Transcript Review
Introduction to Microsoft 365 Copilot
Microsoft 365 Copilot is an AI-powered assistant that can help you with various tasks, including document summarization and translation. It can be especially useful for reviewing meeting transcripts by providing summaries and translating text.
Summarizing the Transcript
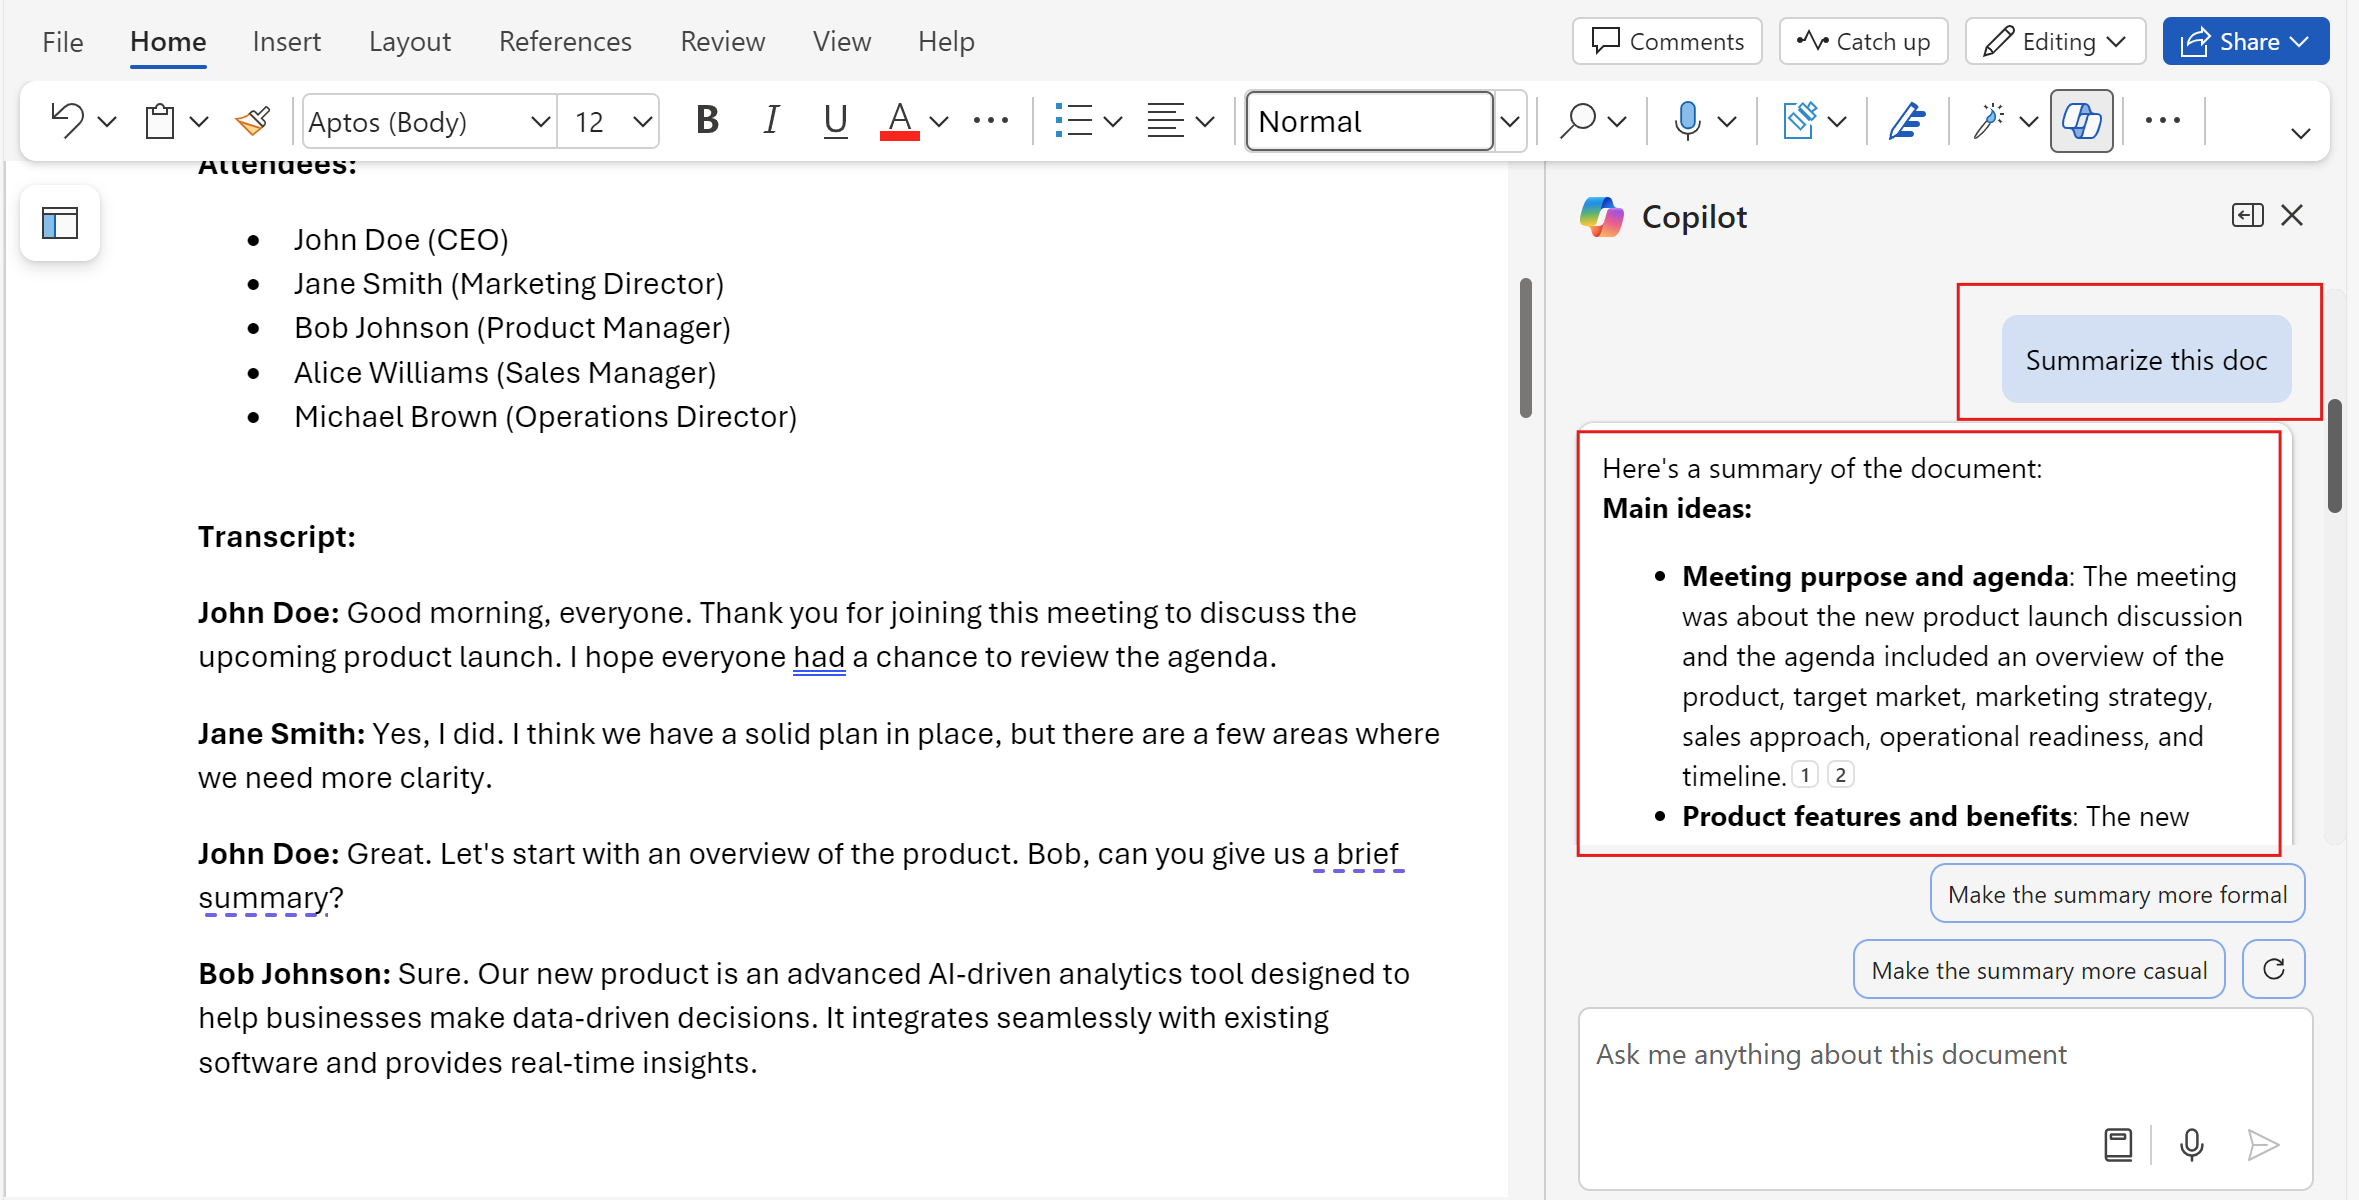
To summarize a transcript using Copilot:
- Open the downloaded transcript in Microsoft Word.
- In the Copilot pane, type: “Summarize this document.”
- Copilot will generate a summary of the key points discussed in the meeting, making it easier to grasp the main ideas quickly.
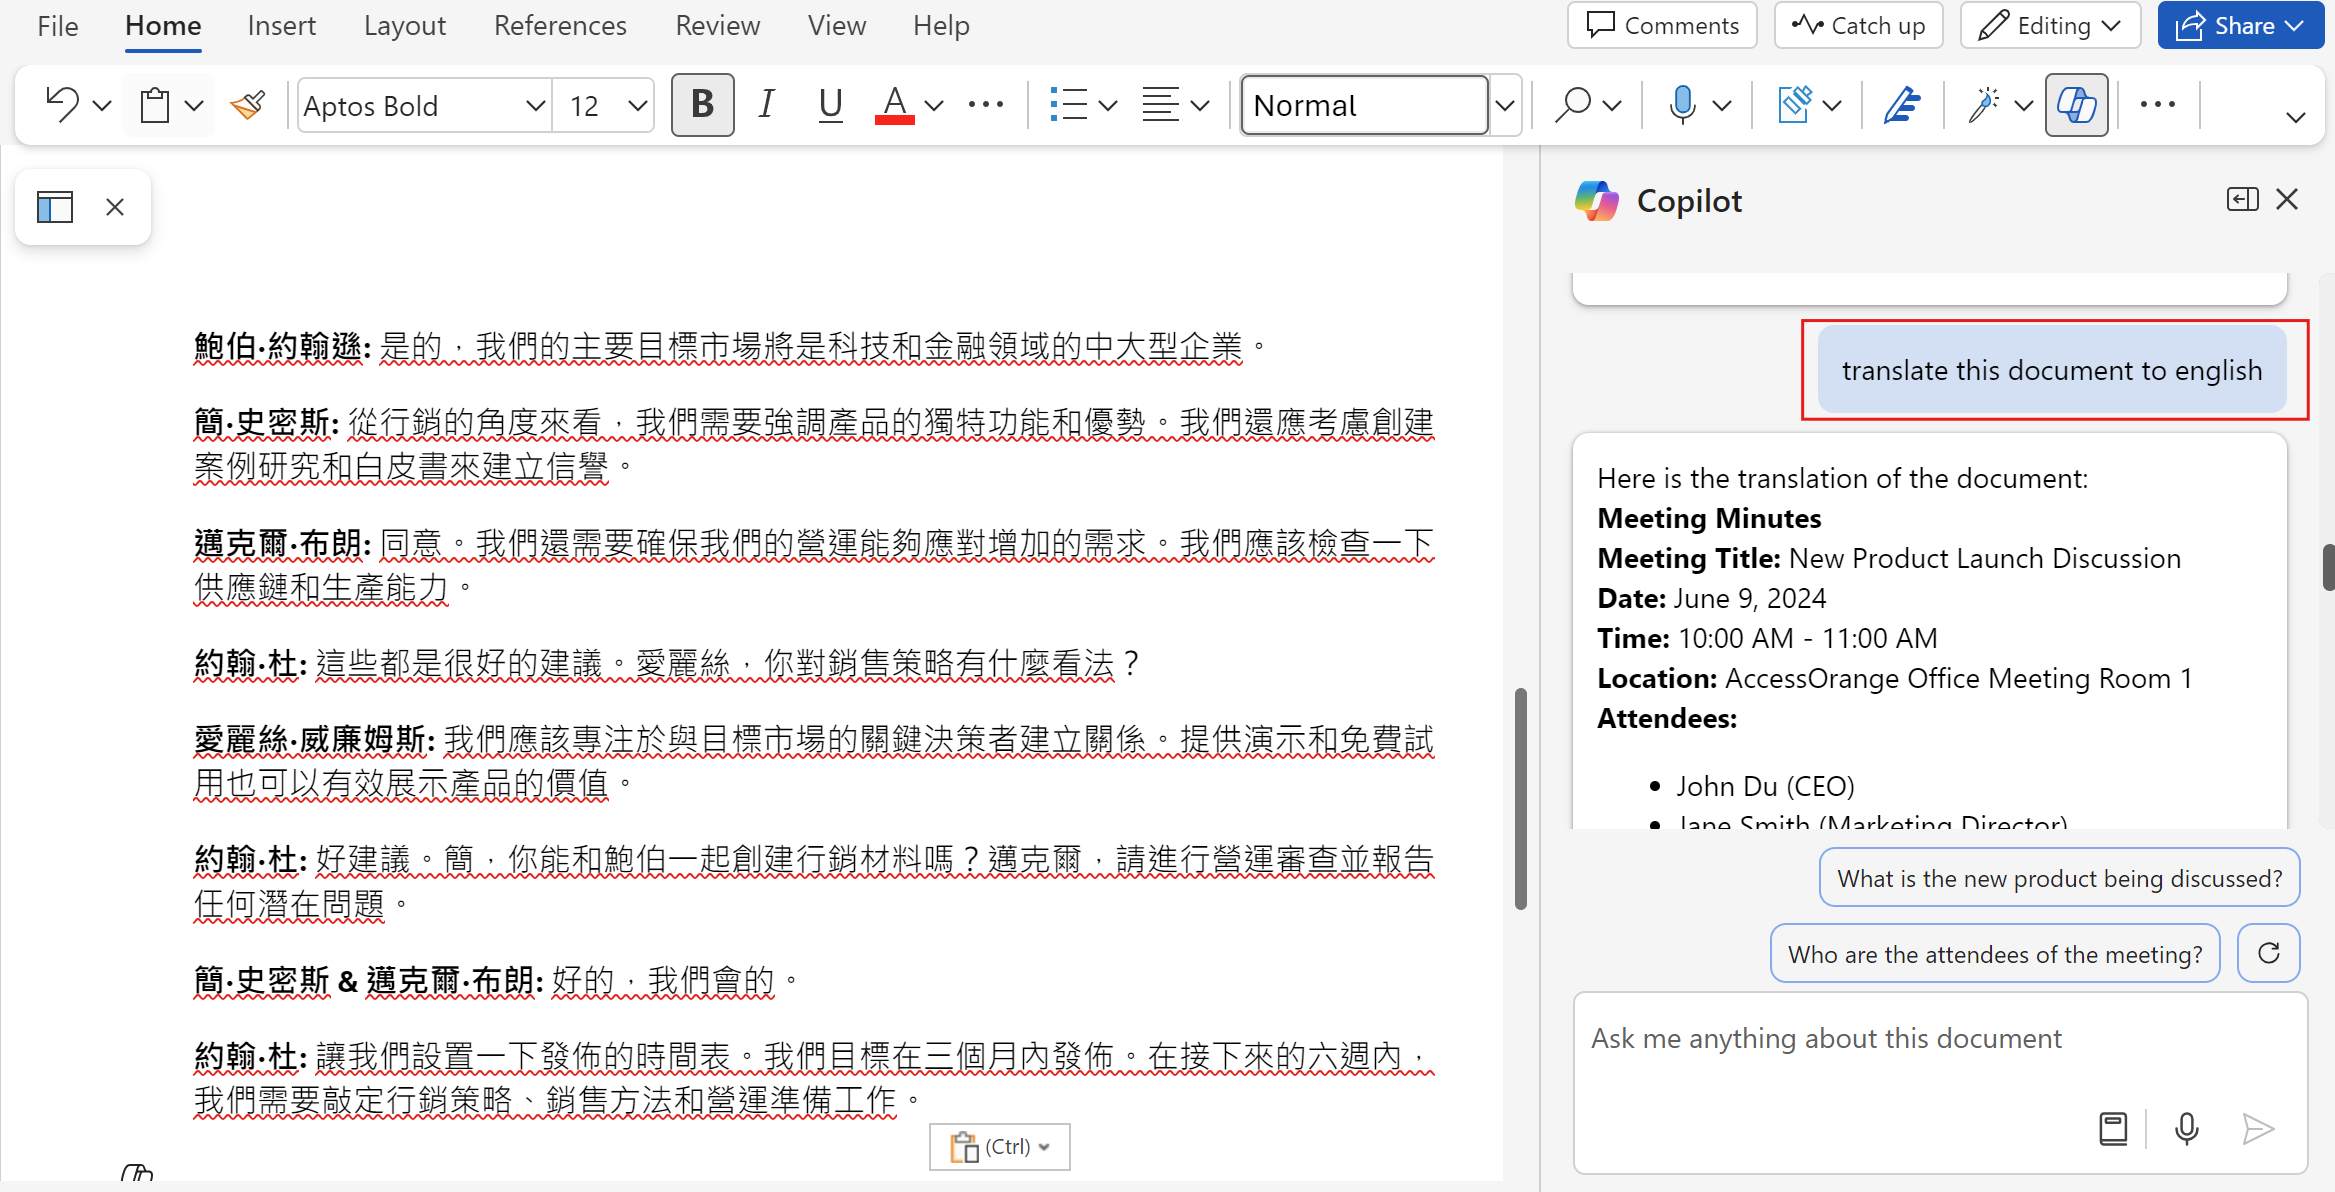
Translating the Transcript
If your transcript is not in english. (if you have not set the language correctly during recording!) you can translate it back to your own language:
- Open the transcript in Microsoft Word.
- In the Copilot pane, type: “Translate this document to English.”
- Copilot will translate the text, allowing you to understand the content in your preferred language.
Extracting Key Points and Generating Reports
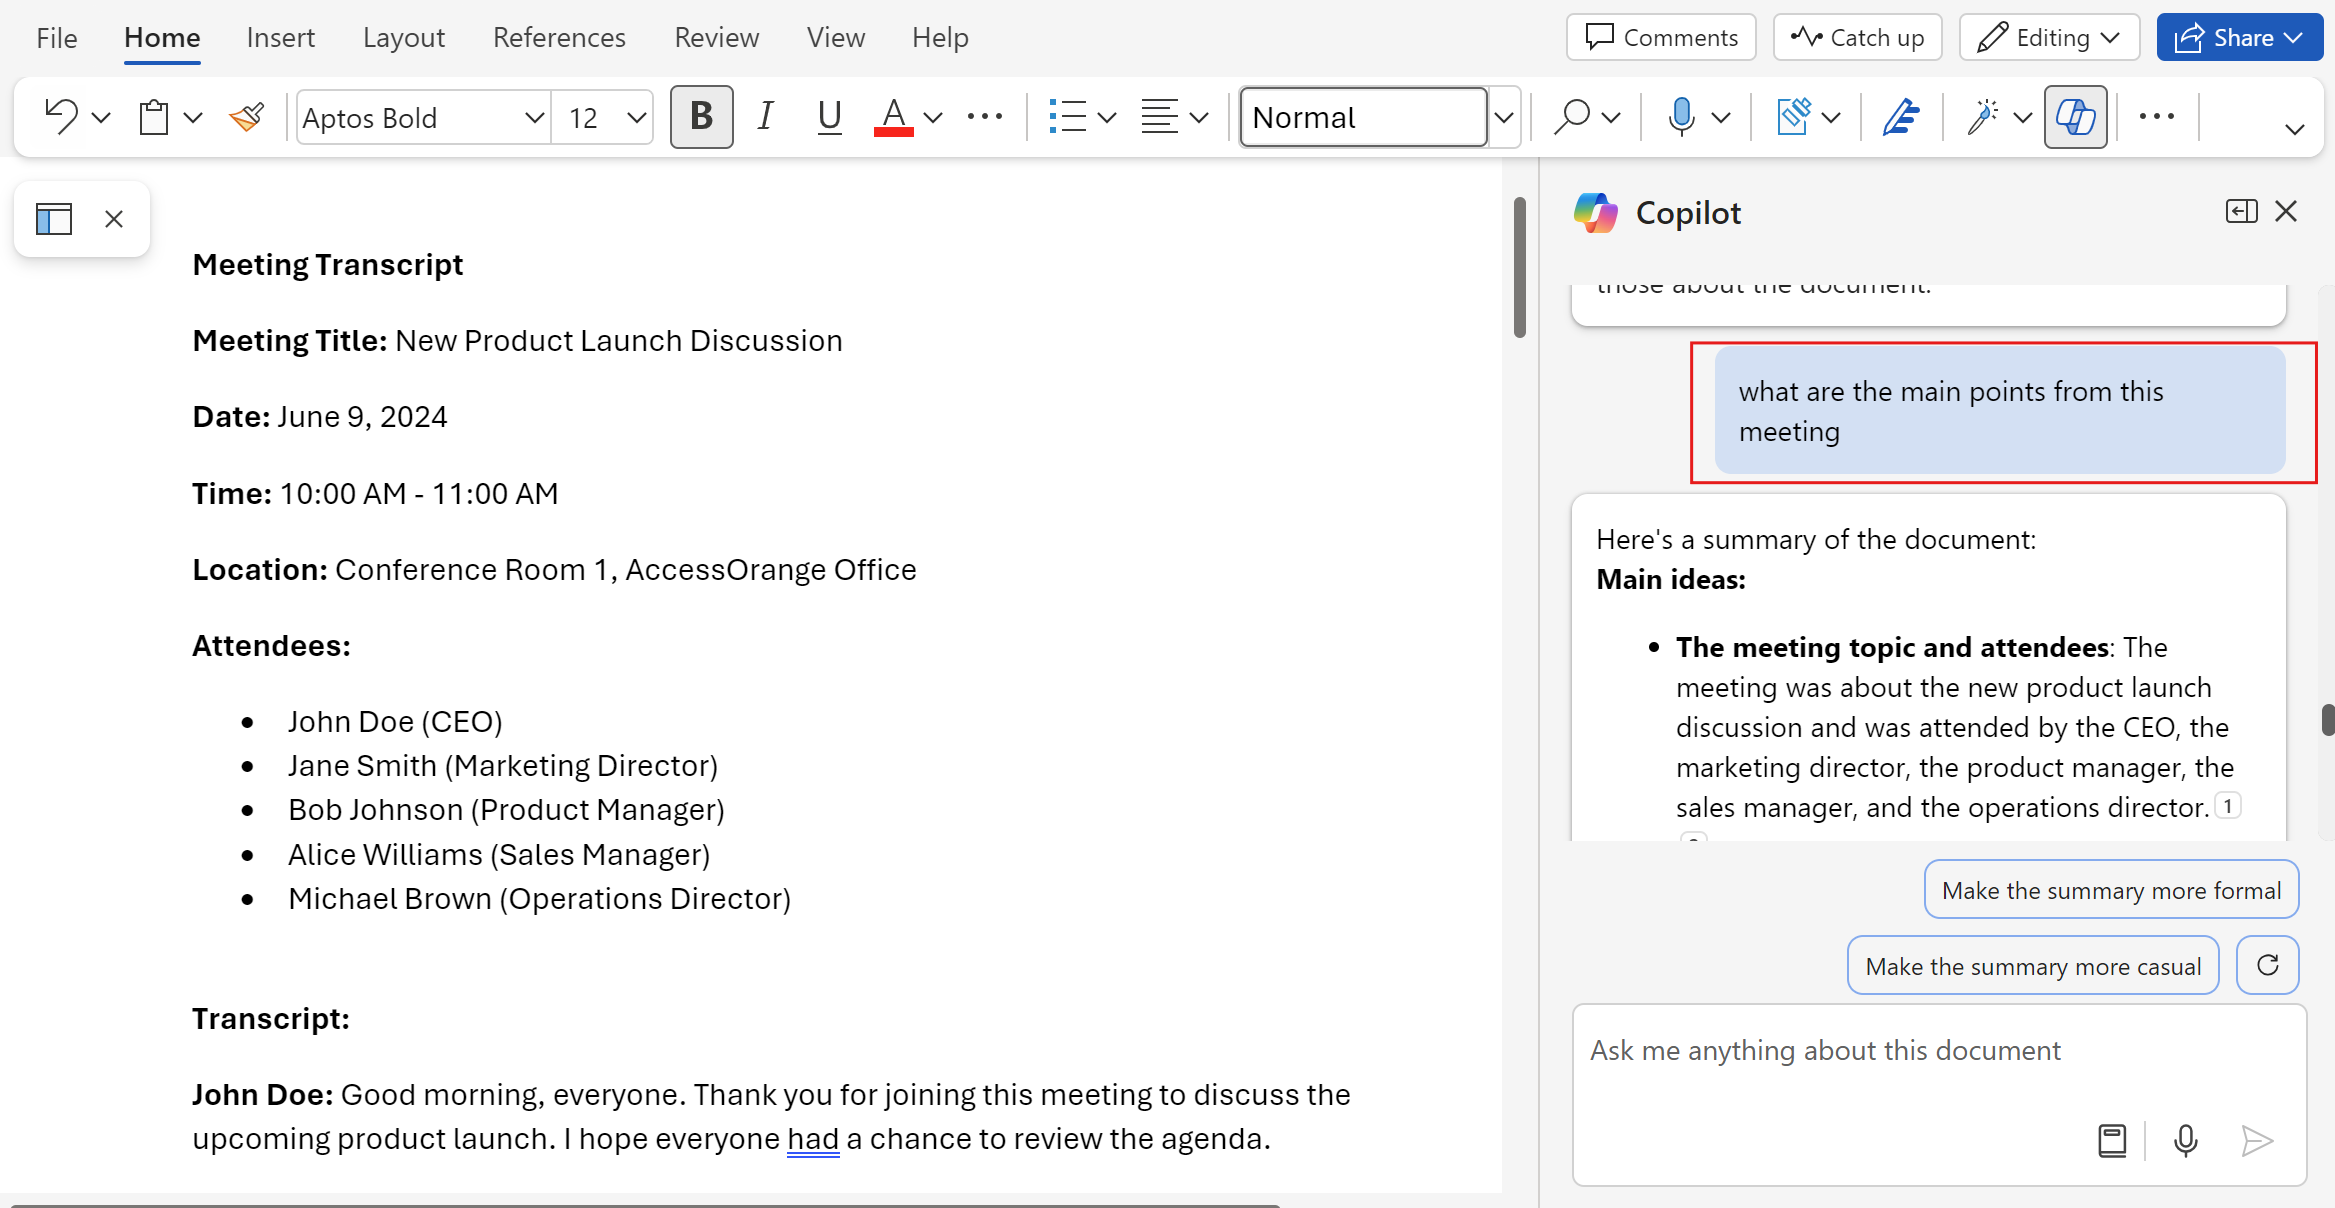
Highlighting Key Points
To highlight the main points from the transcript:
- Use Copilot in Microsoft Word by typing: “What are the main points from this meeting.”
- Review the highlighted text to focus on the critical information discussed during the meeting.
Creating a Summary Report
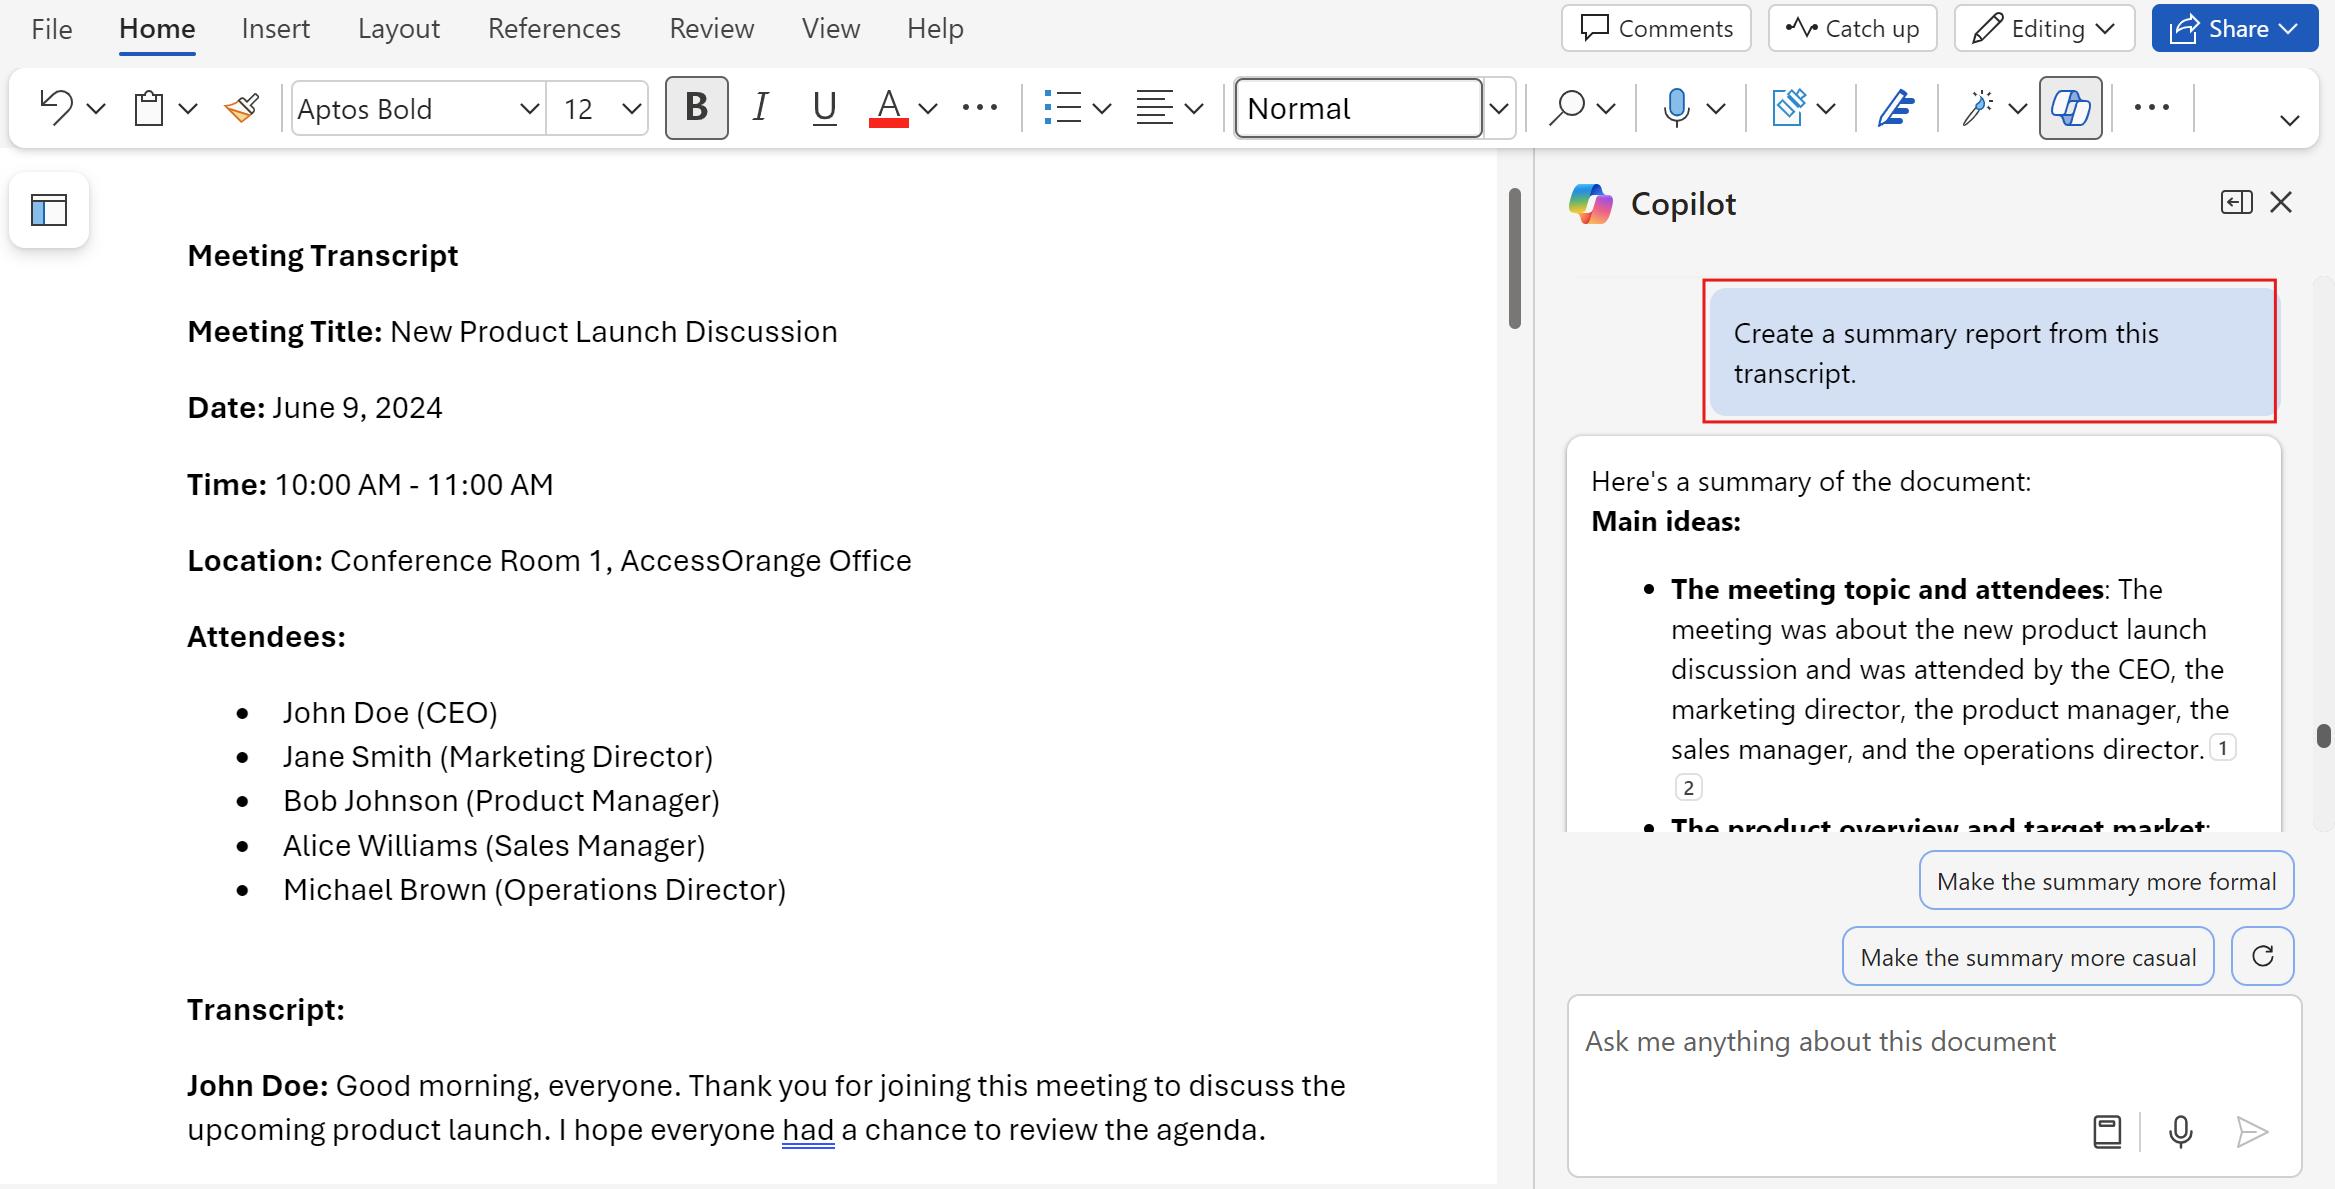
To create a report based on the meeting transcript:
- Open the transcript in Microsoft Word.
- Use Copilot with a prompt like: “Create a summary report from this transcript.”
- Copilot will generate a draft report, which you can then edit and refine as needed.
Reviewing and Refining the Report
Once Copilot generates the report, review it carefully. Make any necessary edits to ensure it accurately reflects the meeting’s discussions and key points. This report can then be shared with your team for further action.
Practical Tips and Best Practices
Ensuring Clear Audio
For the best transcription results, ensure that all participants speak clearly. If you use your laptop or your phone, lay it in the middle of the table close to all participants. This will minimize errors in the transcription and make the review process smoother.
Update The Language Settings Before Your Meeting
Always check and update the language settings before starting the transcription, especially if your meetings involve multiple languages. This helps in achieving accurate transcriptions. If you forget, no problem! You can always have copilot translate the meeting transcription.
Conclusion
Teams together with Copilot for Microsoft 365 has been a real life saver for me when it comes to having meetings where I don’t fully speak the native language.
By utilizing Microsoft Teams for recording and transcription and Microsoft 365 Copilot for reviewing and translating transcripts, you can ensure that no critical information is “lost in translation”.
I hope you find this article useful. If you have more tips on how to utilize Copilot and Teams for meetings, let me know!
You’ve entered a world where AI is like a friendly buddy you can talk to anytime. Need some help? Just write what you want in the Microsoft Copilot chat window.
Copilot can do many things for you, like giving you a quick answer, a nice picture, or even a fancy graph.
But keep in mind that the clearer you are with Copilot about what you want, the better it can show you what it can do. The secret to making the most of Copilot’s abilities is prompting—the skill of giving clear and concise instructions or questions.
The quality of Copilot’s responses depends on the accuracy of your prompts, so it’s an important skill for using the power of AI assistance.
What is Copilot prompting?
1.Provide clear and concise prompts.
When interacting with Copilot for Microsoft 365, it’s crucial to be both clear and concise.
- Clear: Make your request or query unambiguous.
- Concise: Keep it brief without sacrificing clarity.
Microsoft built Copilot to act, so telling Copilot what “to do” rather than what “not to do” is more effective. Try using “if-then” instructions.
2.Experiment with different styles.
Get creative and experiment with different styles to home in on answers that fit your needs. Try specifying tone (neutral, casual, professional) or giving guidance for what kind of language to use. For example, “Use language a nontechnical person could understand.”

3.Give Copilot a point of view from which to answer.
When you provide a point of view from which to answer, it helps Copilot understand the context of your request and generate more accurate responses.Usually, that involves the explanation about who you are and what you’re trying to achieve so the AI can roleplay. For example:
- You’re a social media manager writing Instagram post copy.
- You’re a marketing manager working on a new campaign marketing proposal.
You can also ask for a response in the style of a specific persona or approach, such as:
- Tell me how to solve this problem with the expertise of a business professor.
- Teach me about this sustainability concept in a way a nontechnical person could understand.
4.Give Copilot a point of view from which to answer.
Some people make the mistake of quitting after a single prompt gets an unsatisfactory response. Working with Copilot is a dynamic and interactive process, where you and your Copilot collaborate to produce content, tackle complex problems, and acquire new information based on your goals, expectations, and feedback. And your initial prompt is just the start. As you provide more details and context, that conversation helps Copilot understand what you want and generate more relevant outputs. For example, “Please create a storyboard for a 60-minute keynote where I need to get a room full of salespeople engaged about our new approach to sustainability. Use these files as background.“
These tips can help new users improve their experience with Copilot for Microsoft 365 and take advantage of its features. If you need any help with Copilot, please contact AccessOrange for support.
What makes a good prompt?

